> ## Documentation Index
> Fetch the complete documentation index at: https://docs.getthread.com/llms.txt
> Use this file to discover all available pages before exploring further.
# Set Up the ConnectWise PSA Ticketing Integration
> Create the ConnectWise Manage security role, API member, and keys Thread needs to sync tickets, contacts, time entries, and configurations with your PSA.
This guide explains how to set up the ConnectWise PSA Integration in the platform.
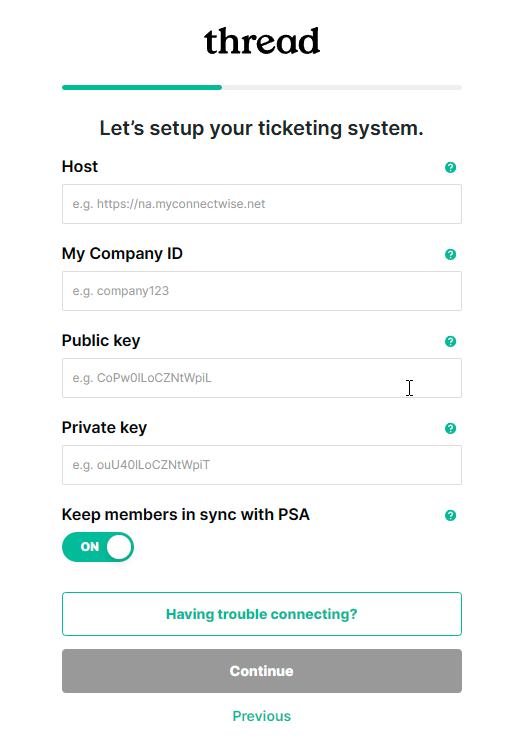
During the initial setup of your account in the platform, you are prompted to set up your ticketing system. Following the prompts for ConnectWise will lead you to the following screen asking you to enter API credentials.
Leave this screen open, we will come back to it later.
 Open a new browser tab or window to continue to the next step, configuring the API user.
## 1. Configure the Security Role for the API User
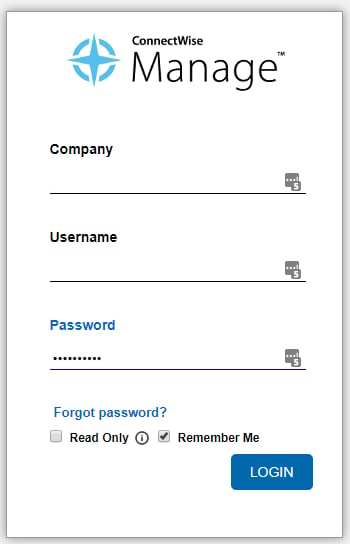
Log-in to ConnectWise.
Open a new browser tab or window to continue to the next step, configuring the API user.
## 1. Configure the Security Role for the API User
Log-in to ConnectWise.
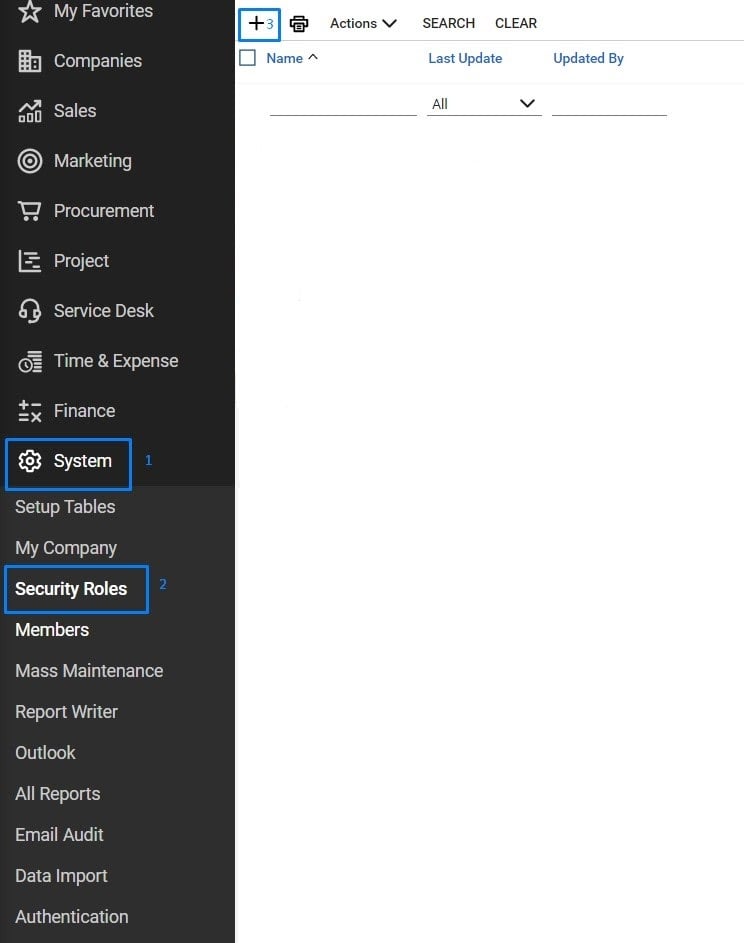
 Select in the left side panel **System** -> **Security Roles** and click on the **+** sign to create a new security role.
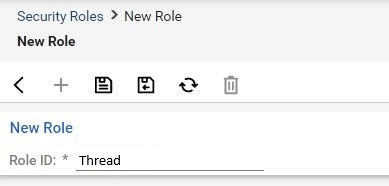
 Enter a name for the new role in the **Role ID** field and click **Save**.
 Change Permissions in the following categories and click **Save** when done.
| Companies | | | | |
| ------------------- | --------- | ---------- | ------------ | ------------- |
| | Add Level | Edit Level | Delete Level | Inquire Level |
| Company Maintenance | All | All | None | All |
| Configurations | All | All | None | All |
| Contacts | All | All | None | All |
| Manage Attachments | All | All | None | All |
| Team Members | All | All | None | All |
| Finance | | | | |
| ----------------- | --------- | ---------- | ------------ | ------------- |
| | Add Level | Edit Level | Delete Level | Inquire Level |
| Billing View Time | All | All | None | All |
| Agreements | None | None | None | All |
| Projects | | | | |
| --------------- | --------- | ---------- | ------------ | ------------- |
| | Add Level | Edit Level | Delete Level | Inquire Level |
| Project Tickets | All | All | None | All |
| Service Desk | | | | |
| --------------------- | --------- | ---------- | ------------ | ------------- |
| | Add Level | Edit Level | Delete Level | Inquire Level |
| Close Service Tickets | All | All | None | All |
| Merge Tickets | All | All | None | All |
| Resource Scheduling | All | All | All | All |
| Service Tickets | All | All | None | All |
| System | | | | |
| ------------------ | --------- | ---------- | ------------ | ------------- |
| | Add Level | Edit Level | Delete Level | Inquire Level |
| Manage Hosted API | None | None | None | All |
| Member Maintenance | None | None | None | All |
| Security Roles | None | None | None | All |
| Table Setup | All | All | None | All |
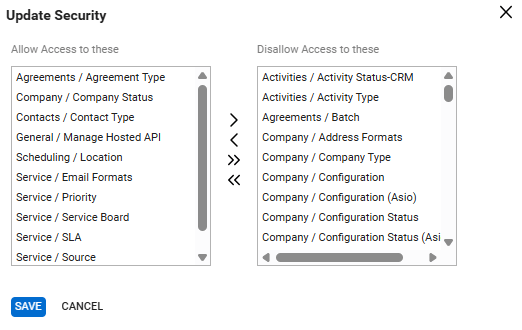
**Update:** On the right side of Table Setup click **customize**. You will see a pop up modal in which you can Allow or Disallow particular permissions. Make sure to allow the following permissions:
* *Agreements / Agreement Type*
* *Company / Company Status*
* *Contacts / Contact Type*
* *General / Manage Hosted API*
* *Scheduling / Location*
* *Service / Email Formats*
* *Service / Priority*
* *Service / Service Board*
* *Service / SLA*
* *Service / Source*
* *Time / Work Role*
Change Permissions in the following categories and click **Save** when done.
| Companies | | | | |
| ------------------- | --------- | ---------- | ------------ | ------------- |
| | Add Level | Edit Level | Delete Level | Inquire Level |
| Company Maintenance | All | All | None | All |
| Configurations | All | All | None | All |
| Contacts | All | All | None | All |
| Manage Attachments | All | All | None | All |
| Team Members | All | All | None | All |
| Finance | | | | |
| ----------------- | --------- | ---------- | ------------ | ------------- |
| | Add Level | Edit Level | Delete Level | Inquire Level |
| Billing View Time | All | All | None | All |
| Agreements | None | None | None | All |
| Projects | | | | |
| --------------- | --------- | ---------- | ------------ | ------------- |
| | Add Level | Edit Level | Delete Level | Inquire Level |
| Project Tickets | All | All | None | All |
| Service Desk | | | | |
| --------------------- | --------- | ---------- | ------------ | ------------- |
| | Add Level | Edit Level | Delete Level | Inquire Level |
| Close Service Tickets | All | All | None | All |
| Merge Tickets | All | All | None | All |
| Resource Scheduling | All | All | All | All |
| Service Tickets | All | All | None | All |
| System | | | | |
| ------------------ | --------- | ---------- | ------------ | ------------- |
| | Add Level | Edit Level | Delete Level | Inquire Level |
| Manage Hosted API | None | None | None | All |
| Member Maintenance | None | None | None | All |
| Security Roles | None | None | None | All |
| Table Setup | All | All | None | All |
**Update:** On the right side of Table Setup click **customize**. You will see a pop up modal in which you can Allow or Disallow particular permissions. Make sure to allow the following permissions:
* *Agreements / Agreement Type*
* *Company / Company Status*
* *Contacts / Contact Type*
* *General / Manage Hosted API*
* *Scheduling / Location*
* *Service / Email Formats*
* *Service / Priority*
* *Service / Service Board*
* *Service / SLA*
* *Service / Source*
* *Time / Work Role*
 | Time & Expense | | | | |
| -------------------------- | --------- | ---------- | ------------ | ------------- |
| | Add Level | Edit Level | Delete Level | Inquire Level |
| Expense Billable Option | All | All | None | All |
| Expense Report Entry | All | All | None | All |
| Time Entry | All | All | All | All |
| Time Entry Billable Option | All | All | None | All |
## 2. Create the API Member and Keys
Select **System** -> **Members** in the left side panel, click on **API Members** tab and click on **+** to add a new API member.
| Time & Expense | | | | |
| -------------------------- | --------- | ---------- | ------------ | ------------- |
| | Add Level | Edit Level | Delete Level | Inquire Level |
| Expense Billable Option | All | All | None | All |
| Expense Report Entry | All | All | None | All |
| Time Entry | All | All | All | All |
| Time Entry Billable Option | All | All | None | All |
## 2. Create the API Member and Keys
Select **System** -> **Members** in the left side panel, click on **API Members** tab and click on **+** to add a new API member.
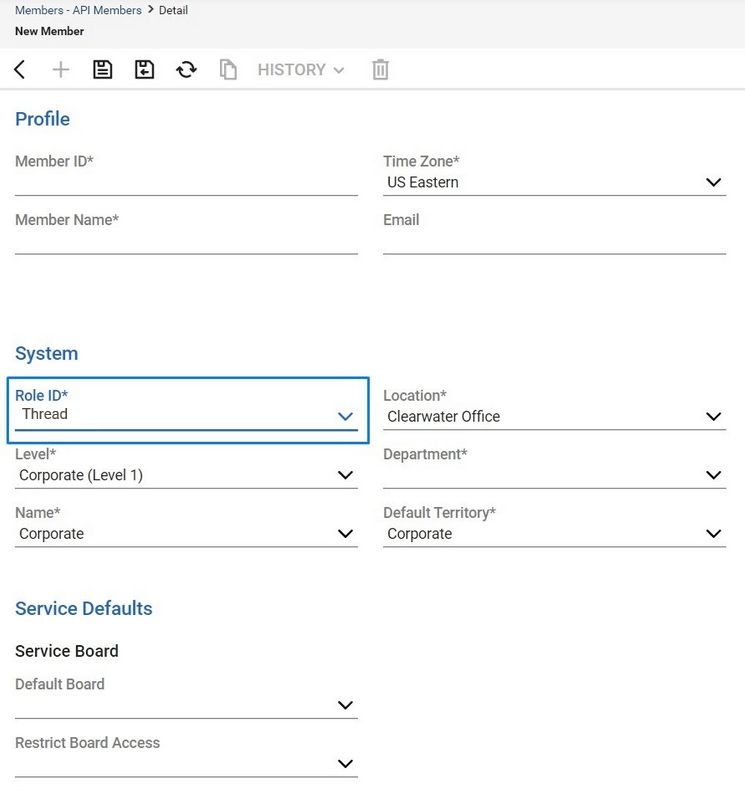
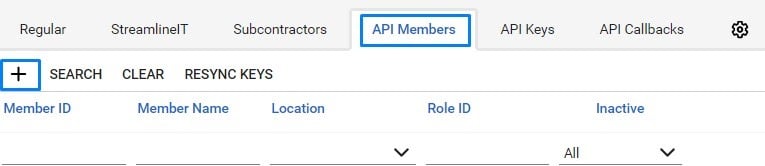 Fill out all required fields, and select the role created earlier in **System** -> **Role ID**.
1. Set **Member ID** to *Thread* (or whatever you like to call it)
2. Make sure that **Level** is set to Corporate (Level 1).
3. **IMPORTANT**: Remove all boards from **Service Defaults** -> **Restricted Board Access**. Click **Save**.
Fill out all required fields, and select the role created earlier in **System** -> **Role ID**.
1. Set **Member ID** to *Thread* (or whatever you like to call it)
2. Make sure that **Level** is set to Corporate (Level 1).
3. **IMPORTANT**: Remove all boards from **Service Defaults** -> **Restricted Board Access**. Click **Save**.
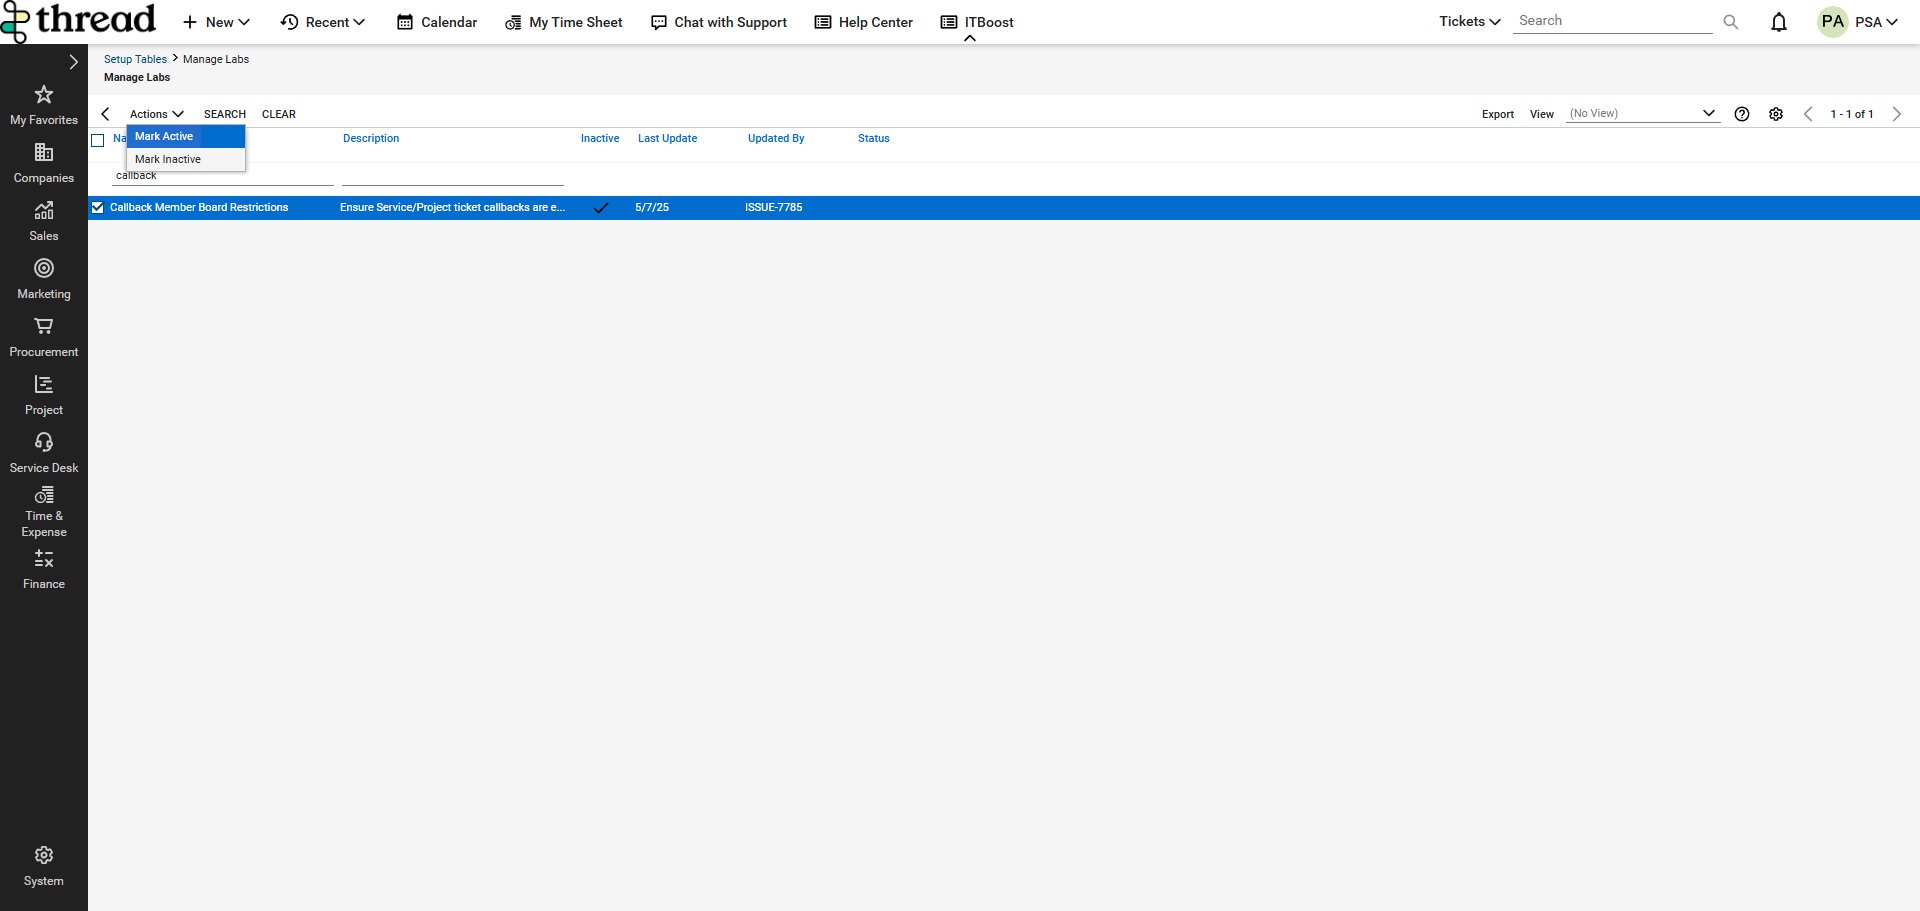
 4. If you are setting up Board exclusions in your API Member there is an extra flag that has to be turned on to make callbacks from api users compliant to their board restrictions. 1) Navigate to System > Setup Tables > Manage Labs table 2) Pull up and activate the 'Callback Member Board Restrictions' lab with the Actions drop down:
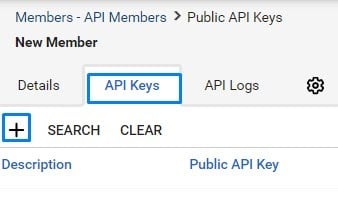
 Select **API Keys** tab and click on **+** icon in the top left corner
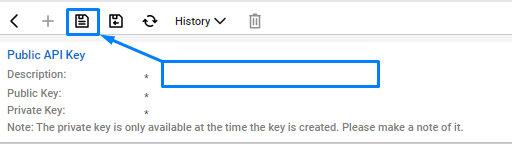
 Type "Thread" in Description field and press **Save**.
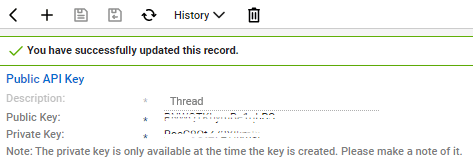
 **Save your public and private keys** - while public key is always available in ConnectWise, private key is only available at the time the key is created, so please make a note of it, you will need it in the next step.
 ## 3. Configure Thread with the API Information
Now that you've set up your API keys, it's time to integrate ConnectWise with Thread! It's time to take the information you saved in the previous steps and enter it into the web form.
## 3. Configure Thread with the API Information
Now that you've set up your API keys, it's time to integrate ConnectWise with Thread! It's time to take the information you saved in the previous steps and enter it into the web form.
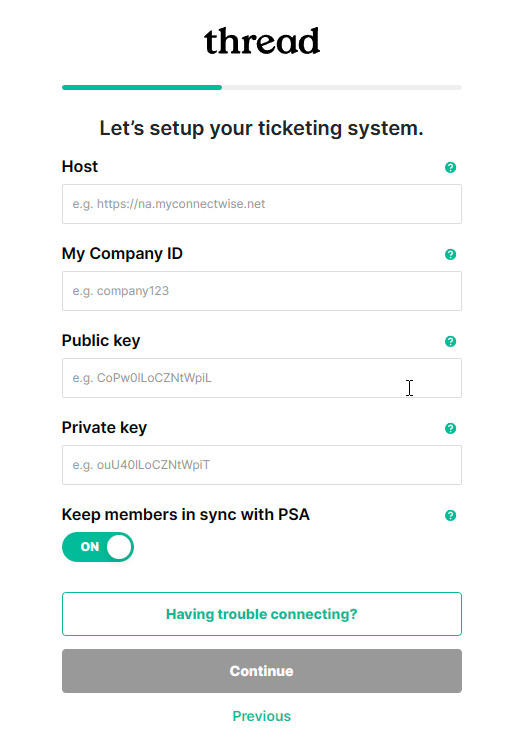 **Host** - Enter in the base URL that you use to log in to ConnectWise If you are a ConnectWise Cloud customer, you can refer to the table below for extra assistance. If you manage and/or host your own instance of ConnectWise, refer to the URL that you use to log in to ConnectWise **ConnectWise Cloud Region\*\*\*\*ConnectWise PSA URL**North Americahttps\://na.myconnectwise.netEuropehttps\://eu.myconnectwise.netAustralia and New Zealandhttps\://aus.myconnectwise.netAfricahttps\://za.myconnectwise.net
**My Company ID** - Enter in the company ID that you use to log in to ConnectWise
**Public Key** - Enter in the **Public Key** for the API key you saved in step **2.5 Create the API and Member Keys** section above.
**Private Key** - Enter the **Private Key** for the API key you saved in step **2.5** **Create the API and Member Keys** section above.
**Keep members in sync with PSA**
1. Leave this checked to quickly enable your team's access to thread.
2. Uncheck this if you prefer to invite members individually. If you choose this option, you will be able to invite members later.
Once everything has been entered correctly, click **Continue** to proceed.
## ConnectWise PSA FAQ
**Q: "Since my techs started using Inbox, I noticed that my reports are giving credit to the Thread API user for closing tickets. We want to make sure our reports reflect which technician closed the ticket. How do you recommend we handle this?"**
A: ConnectWise's API does not allow vendors to impersonate users in the audit trail (only in the notes and other areas). This means that if a technician closes a ticket using Thread, it will attribute the closed by meta data in the ticket to your Thread API member. A great workaround is to update your reporting to report on tickets closed by ticket owner.
## Next: Design your Customer Experience
Set up and personalize Thread Messenger for your clients.
See **Integrations** updates in the [changelog](/changelog/q3-2026).
## Related topics
- [Set Up the ConnectWise Automate Integration](/integrations/how-do-i-set-up-connectwise-automate.md)
- [Set Up the Autotask PSA Ticketing Integration](/integrations/creating-a-autotask-api-user.md)
- [Set Up the HaloPSA Ticketing Integration](/integrations/how-to-setup-halo-psa-integration.md)
**Host** - Enter in the base URL that you use to log in to ConnectWise If you are a ConnectWise Cloud customer, you can refer to the table below for extra assistance. If you manage and/or host your own instance of ConnectWise, refer to the URL that you use to log in to ConnectWise **ConnectWise Cloud Region\*\*\*\*ConnectWise PSA URL**North Americahttps\://na.myconnectwise.netEuropehttps\://eu.myconnectwise.netAustralia and New Zealandhttps\://aus.myconnectwise.netAfricahttps\://za.myconnectwise.net
**My Company ID** - Enter in the company ID that you use to log in to ConnectWise
**Public Key** - Enter in the **Public Key** for the API key you saved in step **2.5 Create the API and Member Keys** section above.
**Private Key** - Enter the **Private Key** for the API key you saved in step **2.5** **Create the API and Member Keys** section above.
**Keep members in sync with PSA**
1. Leave this checked to quickly enable your team's access to thread.
2. Uncheck this if you prefer to invite members individually. If you choose this option, you will be able to invite members later.
Once everything has been entered correctly, click **Continue** to proceed.
## ConnectWise PSA FAQ
**Q: "Since my techs started using Inbox, I noticed that my reports are giving credit to the Thread API user for closing tickets. We want to make sure our reports reflect which technician closed the ticket. How do you recommend we handle this?"**
A: ConnectWise's API does not allow vendors to impersonate users in the audit trail (only in the notes and other areas). This means that if a technician closes a ticket using Thread, it will attribute the closed by meta data in the ticket to your Thread API member. A great workaround is to update your reporting to report on tickets closed by ticket owner.
## Next: Design your Customer Experience
Set up and personalize Thread Messenger for your clients.
See **Integrations** updates in the [changelog](/changelog/q3-2026).
## Related topics
- [Set Up the ConnectWise Automate Integration](/integrations/how-do-i-set-up-connectwise-automate.md)
- [Set Up the Autotask PSA Ticketing Integration](/integrations/creating-a-autotask-api-user.md)
- [Set Up the HaloPSA Ticketing Integration](/integrations/how-to-setup-halo-psa-integration.md)