> ## Documentation Index
> Fetch the complete documentation index at: https://docs.getthread.com/llms.txt
> Use this file to discover all available pages before exploring further.
# Set Up the HaloPSA Ticketing Integration
> Connect Thread to HaloPSA by creating an API-only agent, applying ticketing and CRM permissions, and entering credentials in the Thread workspace setup.
## Overview
This guide explains how to set up the HaloPSA Integration in Thread.
## Set up the integration
If this is your first time setting up your workspace, refer to [Create your workspace](/onboarding/create-your-workspace) for detailed instructions.
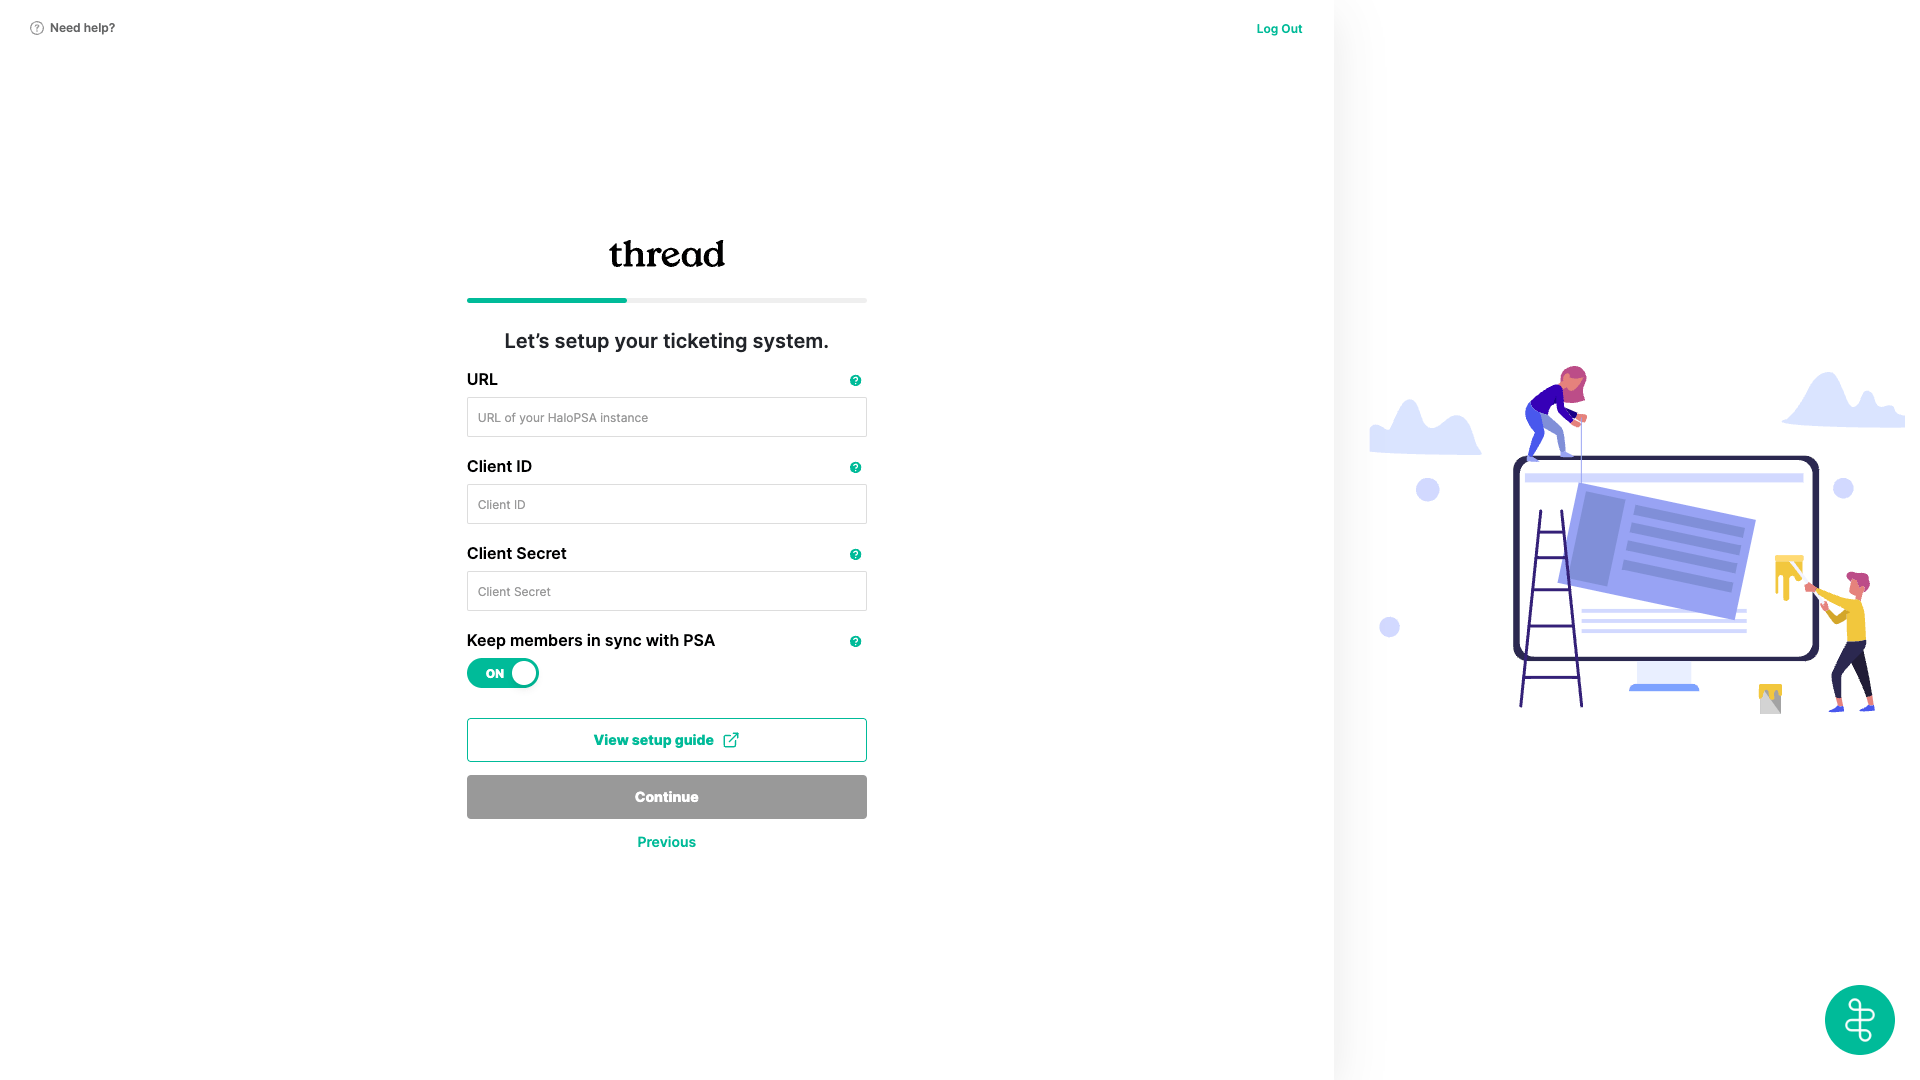
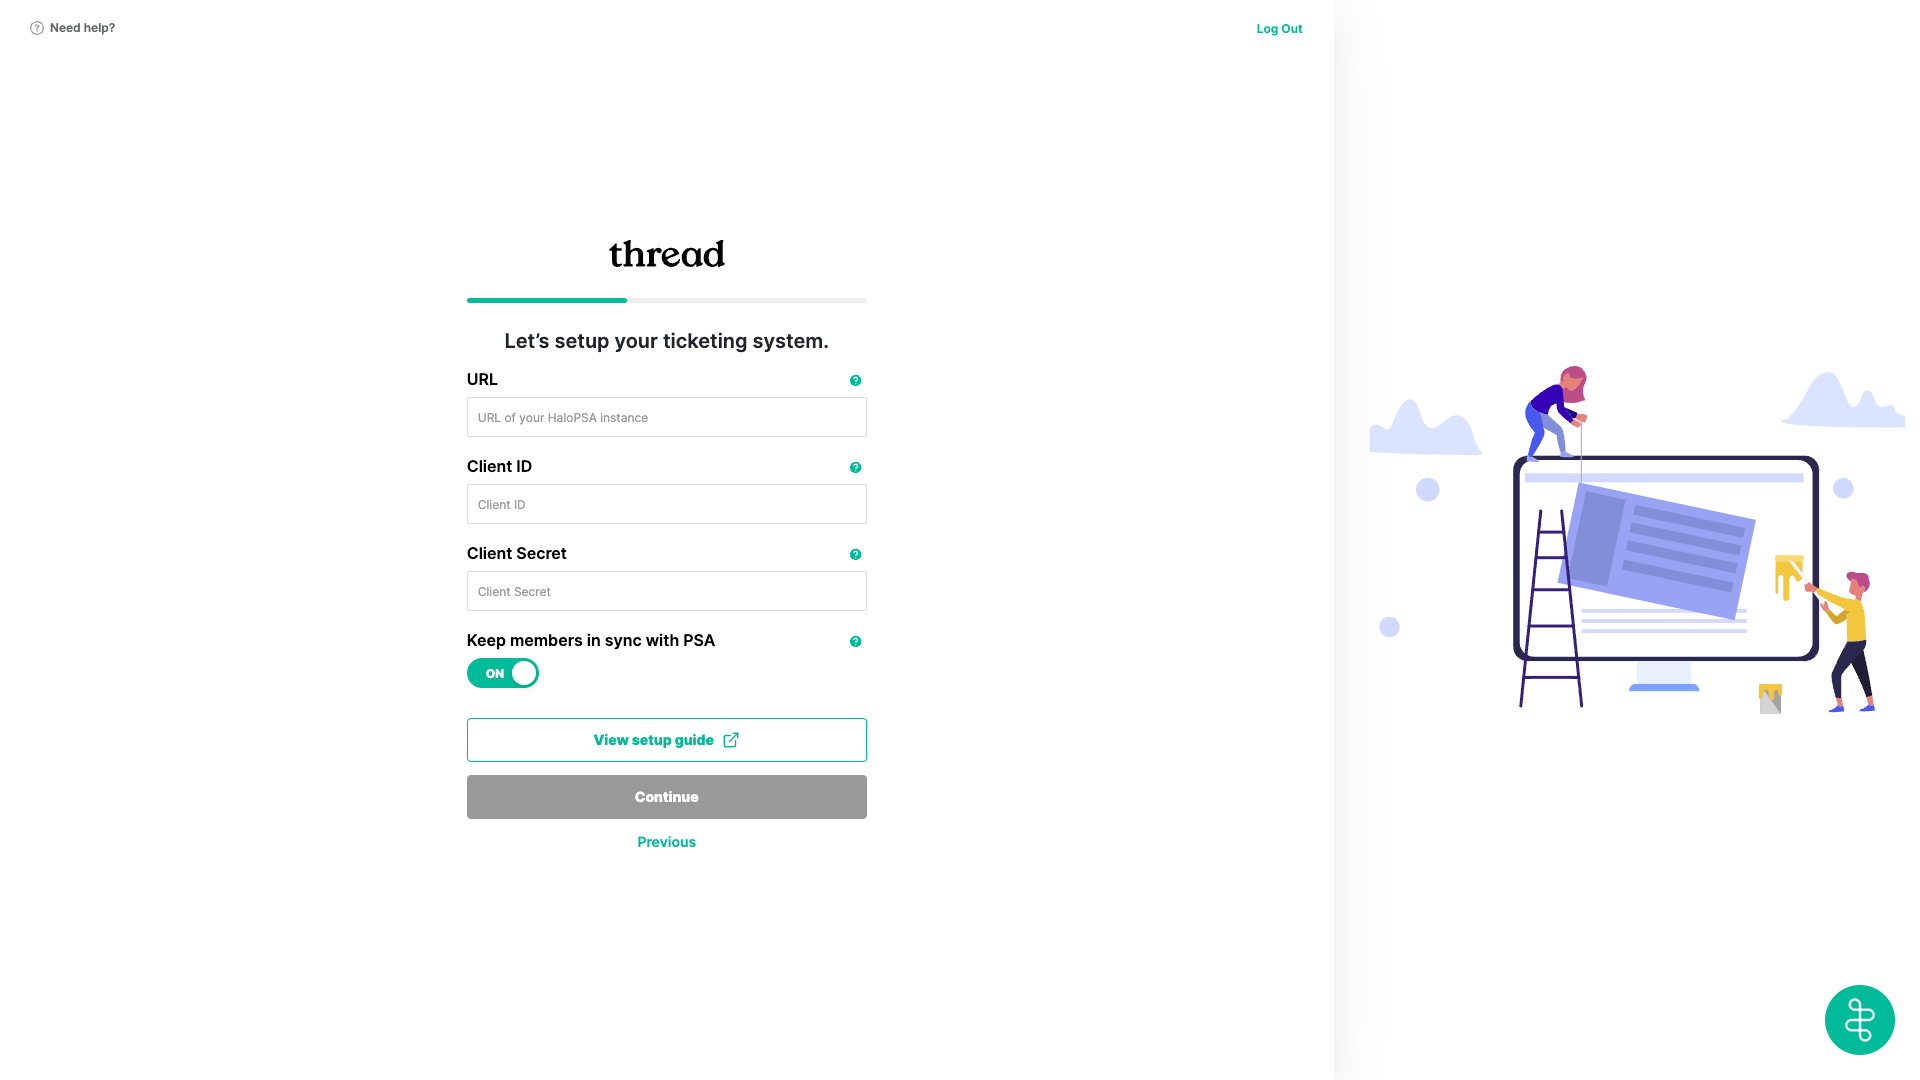
1. When you initially set up your workspace in Thread, you will be prompted to configure your ticketing system. If you select HaloPSA, you will be directed to a screen where you must enter your API credentials. Keep this screen open; we will return to it later.
 2. Open a new browser tab or window to proceed to the next step: **Creating an API-Only Agent**.
1. Login to Halo.
2. Navigate to the **Configuration** section.
3. Go to **Team & Agents** → **Agents**.
4. Click **New** in the top-right corner to create a new agent.
5. Give it a username (e.g., **Thread API Agent**).
6. Set the **Is an API-only Agent** checkbox to selected. API-only agents do not take up a license.
7. Select ***No Default Team*** under the **Default Team** dropdown.
8. Select **Default Working Hours** from the dropdown and click save.
9. Click the **Permissions** tab, select the following permissions, and click **Save**.
| Permission | Access |
| -------------------------------------------------------------------------- | --------------------- |
| Tickets Access Level | Read and Modify |
| Customers Access Level | Read and Modify |
| User Access Level | Read and Modify |
| CRM Access Level | Read and Modify |
| Assets Access Level | Read and Modify |
| Calendars and Appointments Access Level | Read and Modify |
| Customer Agreements Access Level | Read Only |
| Timesheets Access Level | Read and Modify (All) |
| Can add new Tickets | Yes |
| Can edit closed Tickets | Yes |
| Can view Unassigned Tickets | Yes |
| Can view Tickets that are assigned to other Agents | Yes |
| Can change a Ticket's Ticket Type | Yes |
| Can Configure Webhooks Access Control | Yes |
| Can Re-assign Tickets | Yes |
| Can Edit Advanced Ticket Details | Yes |
| Can assign to Agents in Teams the Agent is not a member of | Yes |
| Can Edit Tickets Which Are Not Assigned To Them | Yes |
| Can override maximum priority escalation at ticket type level | Yes |
| Can always update Ticket Statuses and re-assign Tickets outside of actions | Yes |
10. Click **Save** to save the newly created API-only Agent.
1. Navigate to the **Configuration** section.
2. Go to **Integrations → HaloPSA API**.
3. Click **View Applications**.
4. Click **New** in the top-right corner to create a new application.
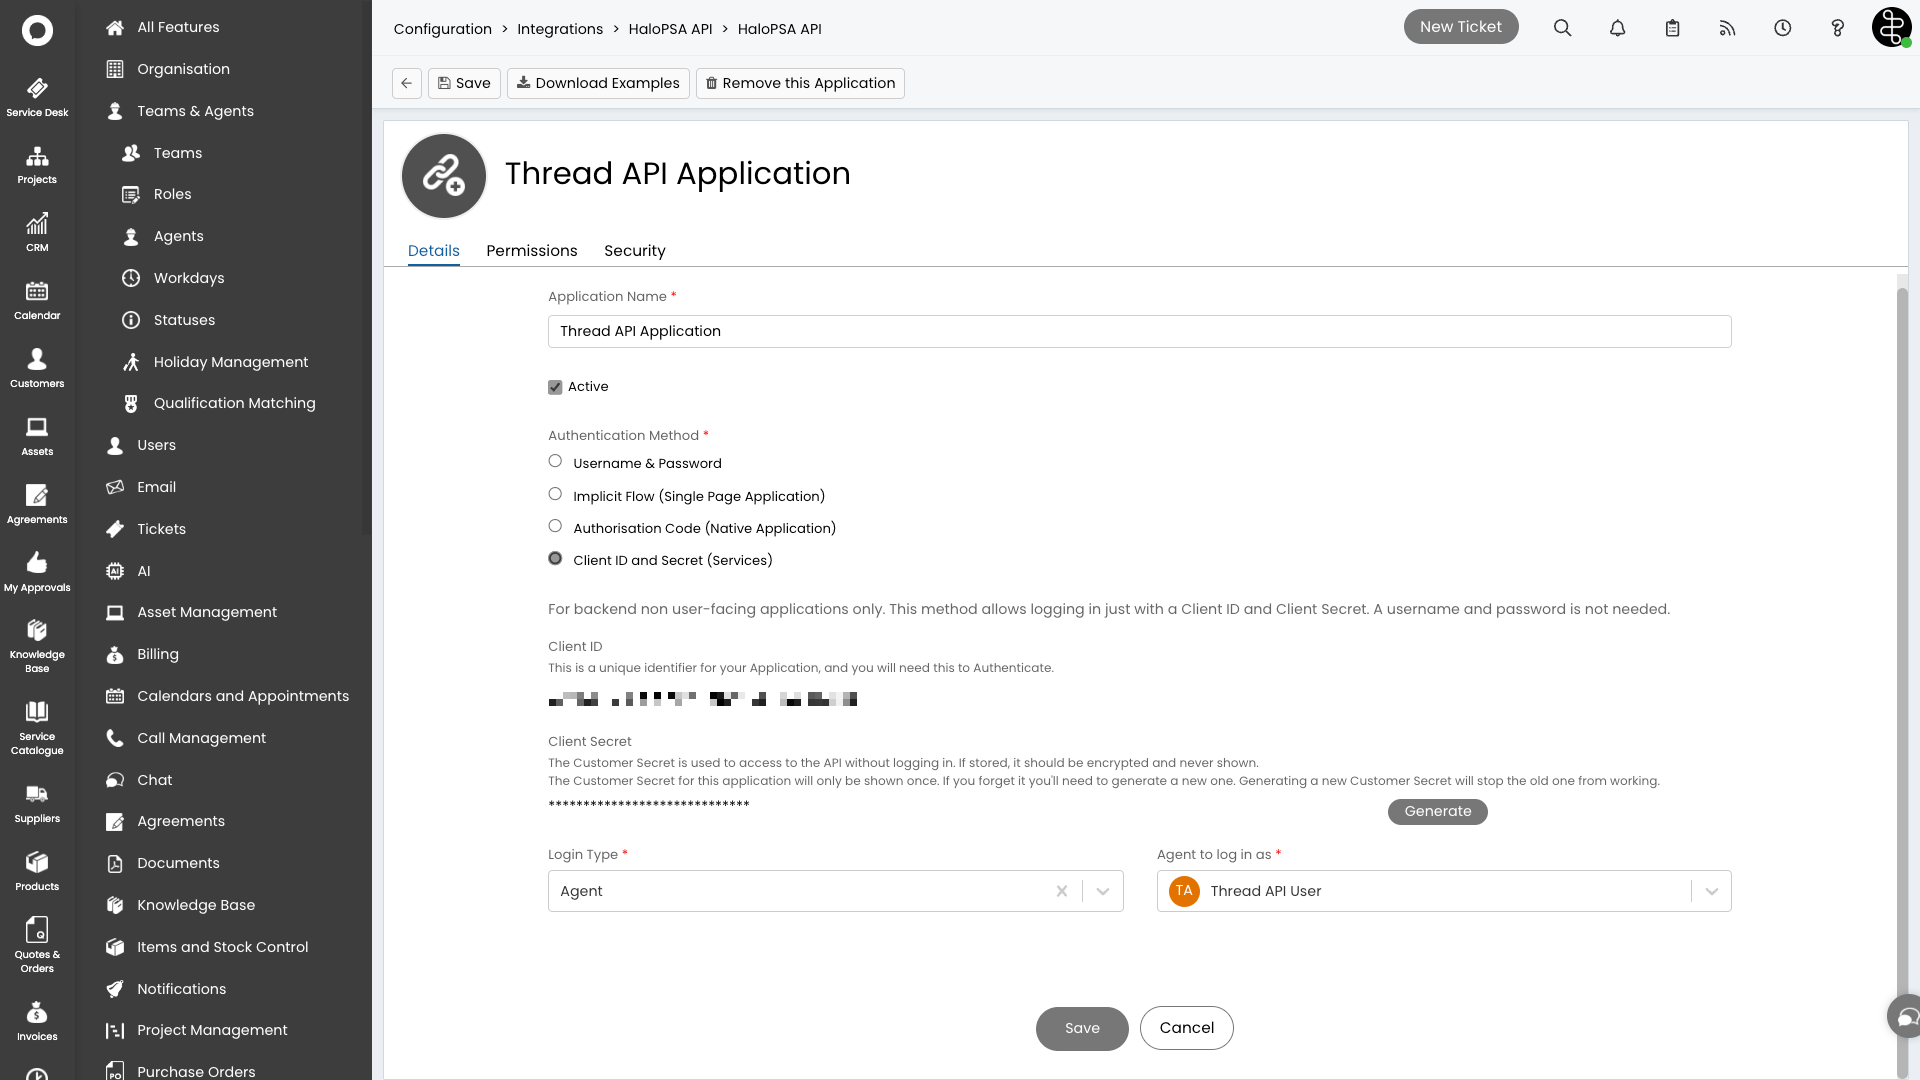
5. Enter an application name (e.g., Thread API Application).
6. For Authentication Method select **Client ID and Client Secret (Services)**.
7. Make sure to keep the **Client ID** and **Client Secret** in a safe place for later.
8. **Login Type** should be selected as **Agent**.
9. Select the **API-only Agent** previously created under **Agent to log in as**.
2. Open a new browser tab or window to proceed to the next step: **Creating an API-Only Agent**.
1. Login to Halo.
2. Navigate to the **Configuration** section.
3. Go to **Team & Agents** → **Agents**.
4. Click **New** in the top-right corner to create a new agent.
5. Give it a username (e.g., **Thread API Agent**).
6. Set the **Is an API-only Agent** checkbox to selected. API-only agents do not take up a license.
7. Select ***No Default Team*** under the **Default Team** dropdown.
8. Select **Default Working Hours** from the dropdown and click save.
9. Click the **Permissions** tab, select the following permissions, and click **Save**.
| Permission | Access |
| -------------------------------------------------------------------------- | --------------------- |
| Tickets Access Level | Read and Modify |
| Customers Access Level | Read and Modify |
| User Access Level | Read and Modify |
| CRM Access Level | Read and Modify |
| Assets Access Level | Read and Modify |
| Calendars and Appointments Access Level | Read and Modify |
| Customer Agreements Access Level | Read Only |
| Timesheets Access Level | Read and Modify (All) |
| Can add new Tickets | Yes |
| Can edit closed Tickets | Yes |
| Can view Unassigned Tickets | Yes |
| Can view Tickets that are assigned to other Agents | Yes |
| Can change a Ticket's Ticket Type | Yes |
| Can Configure Webhooks Access Control | Yes |
| Can Re-assign Tickets | Yes |
| Can Edit Advanced Ticket Details | Yes |
| Can assign to Agents in Teams the Agent is not a member of | Yes |
| Can Edit Tickets Which Are Not Assigned To Them | Yes |
| Can override maximum priority escalation at ticket type level | Yes |
| Can always update Ticket Statuses and re-assign Tickets outside of actions | Yes |
10. Click **Save** to save the newly created API-only Agent.
1. Navigate to the **Configuration** section.
2. Go to **Integrations → HaloPSA API**.
3. Click **View Applications**.
4. Click **New** in the top-right corner to create a new application.
5. Enter an application name (e.g., Thread API Application).
6. For Authentication Method select **Client ID and Client Secret (Services)**.
7. Make sure to keep the **Client ID** and **Client Secret** in a safe place for later.
8. **Login Type** should be selected as **Agent**.
9. Select the **API-only Agent** previously created under **Agent to log in as**.
 10. Click the **Permissions** tab, select the following permissions, and click **Save**.
| Permission | Details |
| ---------------- | ------------------------------------------------------------------------- |
| `all:standard` | Access to everything the Agent has access to, excluding admin privileges. |
| `all:teams` | Access to all Teams regardless of the Agent's permissions. |
| `admin:webhooks` | Remove / Update / Add Webhooks. |
The `all:teams` permission was introduced in HaloPSA **v2.148.1** to grant API access to all Teams/Departments. If you don't have it, upgrade to v2.148 or newer. If you can't upgrade, edit the API-only Agent created earlier, open the **Teams & Departments** tab, and grant access to all Teams/Departments.
11. Click **Save** to save the newly created application.
To ensure seamless integration between Thread and HaloPSA, you need to map three specific actions in the subsequent steps for the following events:
1. Action for sending customer-facing notes
2. Action for sending internal notes
3. Action for emailing contacts
For detailed instructions on configuring actions, please refer to the guide by clicking the button below. Ensure you have created and mapped these custom actions before proceeding to the next step.
Configure and map the custom HaloPSA actions Thread needs to sync notes, emails, and messages.
1. Head back to your other tab from **Step 1: Prepare Your Workspace**.
2. Enter your **HaloPSA API Base URL**. (e.g., [https://threadsandbox.halopsa.com).\*\*Important](https://threadsandbox.halopsa.com\).**Important)\*\*: To ensure full functionality, ensure no trailing '/', subdirectory, or parameter is appended to the url.
3. Copy and paste the **Client ID** and **Client Secret** retrieve from **Step 2: Creation an API-Only Agent**.
4. Click **Continue**. Next, [design your customer chat experience](/onboarding/deploy-chat).
10. Click the **Permissions** tab, select the following permissions, and click **Save**.
| Permission | Details |
| ---------------- | ------------------------------------------------------------------------- |
| `all:standard` | Access to everything the Agent has access to, excluding admin privileges. |
| `all:teams` | Access to all Teams regardless of the Agent's permissions. |
| `admin:webhooks` | Remove / Update / Add Webhooks. |
The `all:teams` permission was introduced in HaloPSA **v2.148.1** to grant API access to all Teams/Departments. If you don't have it, upgrade to v2.148 or newer. If you can't upgrade, edit the API-only Agent created earlier, open the **Teams & Departments** tab, and grant access to all Teams/Departments.
11. Click **Save** to save the newly created application.
To ensure seamless integration between Thread and HaloPSA, you need to map three specific actions in the subsequent steps for the following events:
1. Action for sending customer-facing notes
2. Action for sending internal notes
3. Action for emailing contacts
For detailed instructions on configuring actions, please refer to the guide by clicking the button below. Ensure you have created and mapped these custom actions before proceeding to the next step.
Configure and map the custom HaloPSA actions Thread needs to sync notes, emails, and messages.
1. Head back to your other tab from **Step 1: Prepare Your Workspace**.
2. Enter your **HaloPSA API Base URL**. (e.g., [https://threadsandbox.halopsa.com).\*\*Important](https://threadsandbox.halopsa.com\).**Important)\*\*: To ensure full functionality, ensure no trailing '/', subdirectory, or parameter is appended to the url.
3. Copy and paste the **Client ID** and **Client Secret** retrieve from **Step 2: Creation an API-Only Agent**.
4. Click **Continue**. Next, [design your customer chat experience](/onboarding/deploy-chat).
 See **Integrations** updates in the [changelog](/changelog/q3-2026).
## Related topics
- [Set Up the Autotask PSA Ticketing Integration](/integrations/creating-a-autotask-api-user.md)
- [Set Up the ConnectWise PSA Ticketing Integration](/integrations/creating-a-connect-wise-manage-api-user.md)
- [Set Up Email Support for Magic Agents and Inbox](/ai-agents/setting-up-email-support-for-magic-agents.md)
See **Integrations** updates in the [changelog](/changelog/q3-2026).
## Related topics
- [Set Up the Autotask PSA Ticketing Integration](/integrations/creating-a-autotask-api-user.md)
- [Set Up the ConnectWise PSA Ticketing Integration](/integrations/creating-a-connect-wise-manage-api-user.md)
- [Set Up Email Support for Magic Agents and Inbox](/ai-agents/setting-up-email-support-for-magic-agents.md)