

 Magic Library
Overview
Planner is the scheduling board inside Inbox for MSPs who put ticket work on a technician’s day. You plan which day a thread should be tackled, and (when you need it) set an exact start and end time down to the minute. Plans made in Planner become schedule entries (service calls / appointments) in your PSA, and plans made in your PSA flow back into Planner, so the board and the PSA stay in step. Open Planner from the left navigation menu in Inbox. The board organizes active threads into vertical columns (“swimlanes”), with a fixed Triage column on the left and one column per selected member to its right.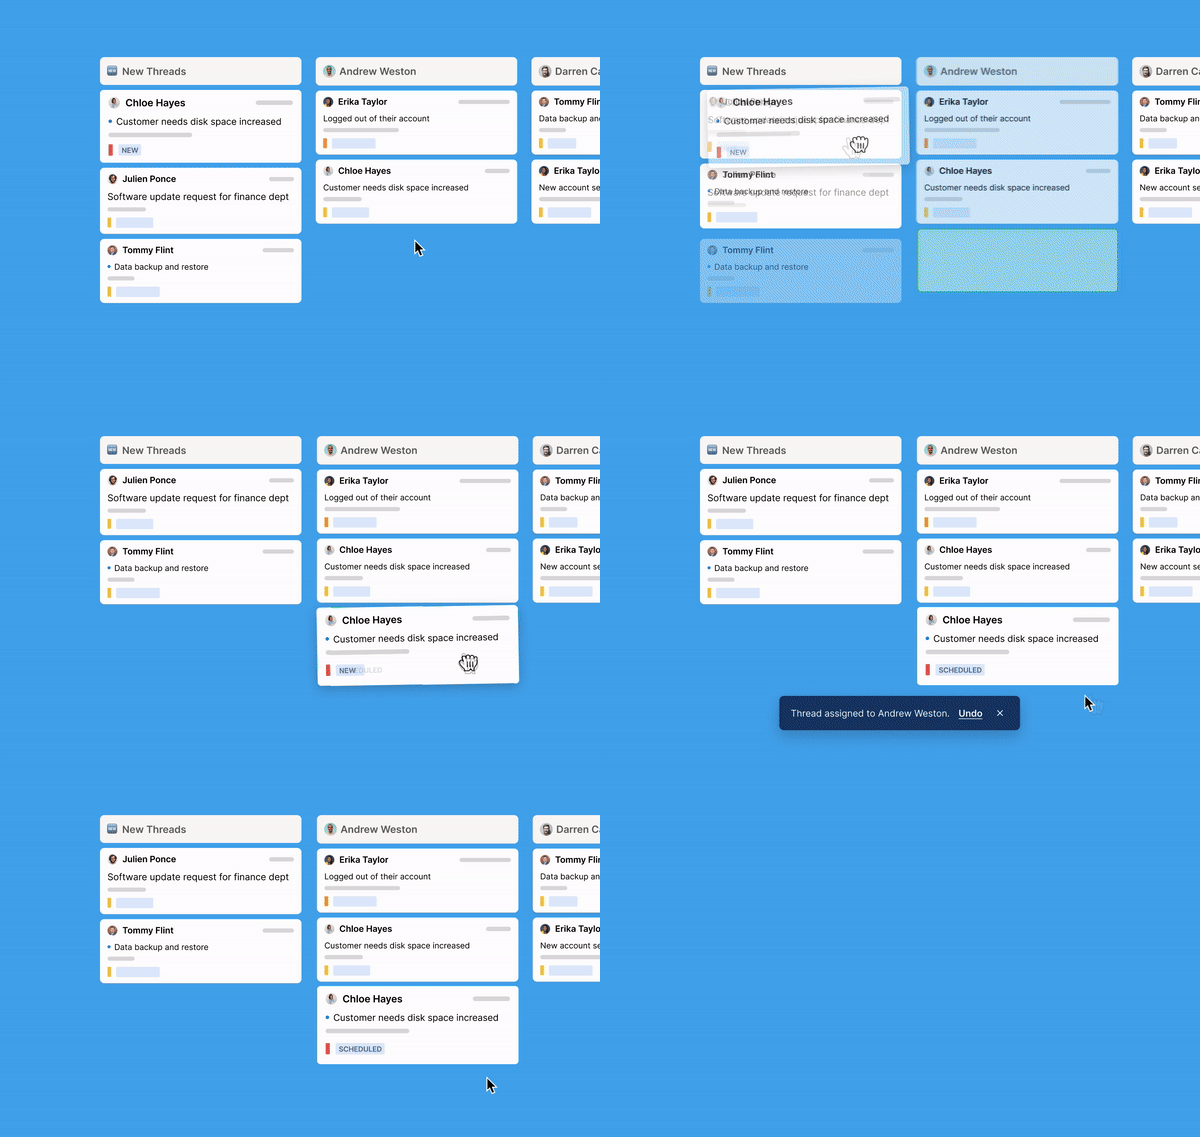
The board: Triage and member swimlanes
Planner has two kinds of column: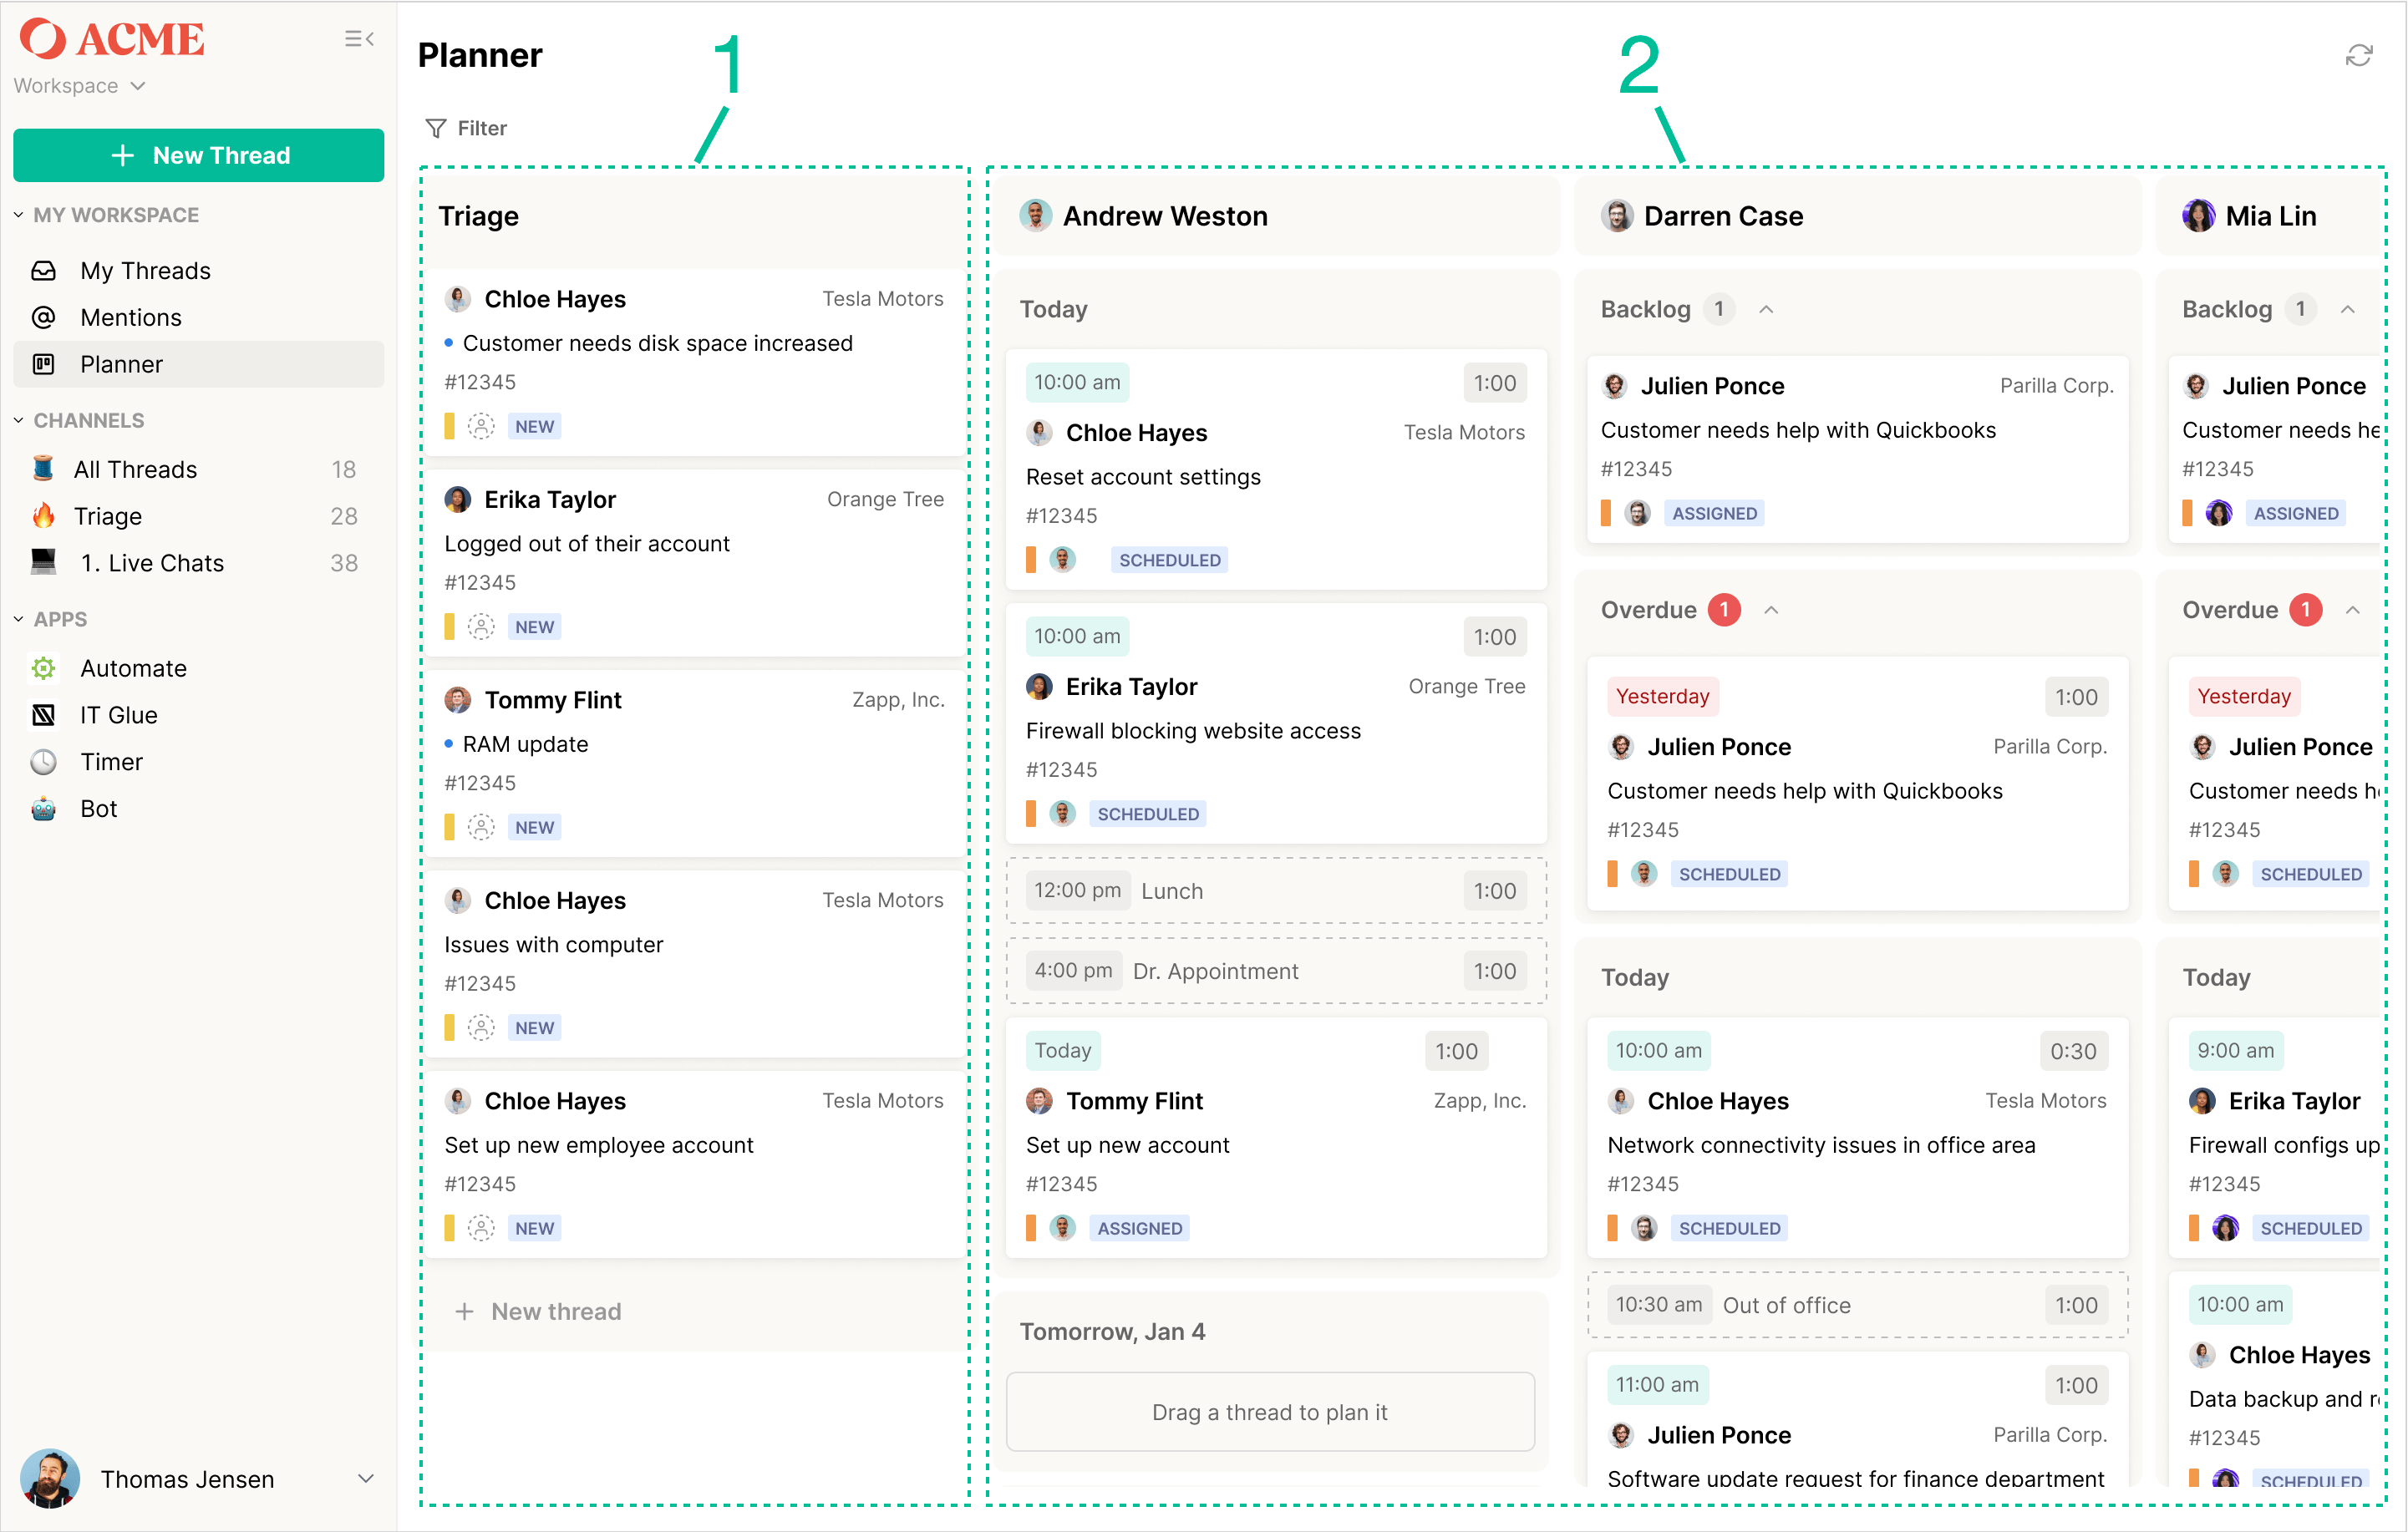
- Triage is the fixed left column. It lists every active thread that has no assignee (“Threads that don’t have an assignee”). Use Triage to find the right owner and create a plan — by dragging a card into a member’s column, or by setting an assignee from the card itself. When Triage is empty it shows Coast is clear 🏄. Cards in Triage are sorted newest-created first.
- Member columns appear to the right of Triage, one per member you choose to show. Each member column lists that member’s active threads, grouped into spaces (below) by the plan set on each thread.
Spaces inside a member column
Within each member column, threads are grouped into spaces: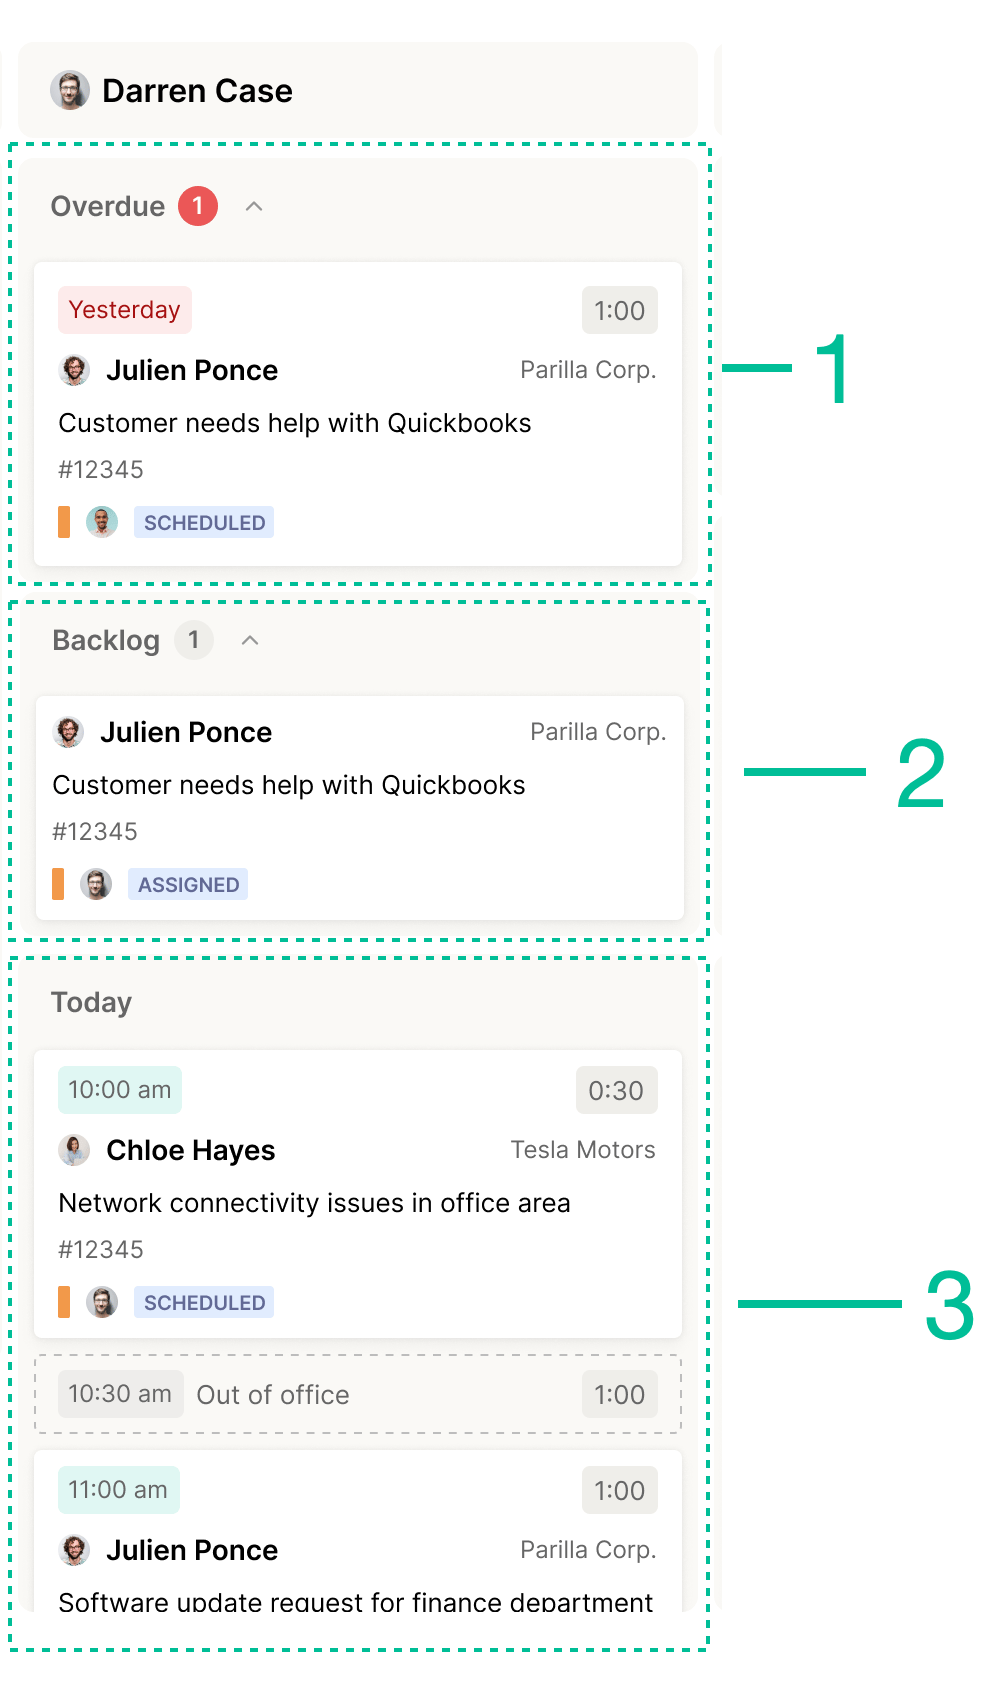
- Overdue: planned threads whose plan ended before today. Use it to review work that may already be done or needs re-planning. Overdue is collapsible and shows a count. It only accepts a card dropped back from within the same member’s Overdue space.
- Assigned: threads assigned to the member that have no plan yet. This is the member’s backlog: “Assigned, yet to be planned 📆”. It’s collapsible and shows a count (for example
10+when more can load). - Day spaces: one space per day, labelled by weekday and date (for example “Monday, May 1”). By default Planner shows today plus the next several days. A thread appears in the day space matching its planned start date.
Display options
The Display options menu (grid icon in the header) toggles what the board shows. A green dot on the icon means you’ve changed something from the defaults. Settings persist per workspace in your browser.Filters
Above the Triage list, the filter bar narrows which threads appear on the board. Filters use the same attributes as Inbox views — you can filter by thread properties and even apply a saved view as a filter. Member and Owner are intentionally excluded from the filter list, because the board already splits work by owner across Triage and member columns. When a filter returns nothing, Planner shows an empty state with a clear filters action. Your filter selection persists per workspace in your browser.Schedule work by drag and drop
Dragging a card is the fastest way to assign and plan. Each drop target changes the thread differently:- Triage → a member column (Assigned space or the column body): assigns the thread to that member. No plan is set yet, so the thread lands in that member’s Assigned space.
- Into a day space: creates a plan for that day and, if the thread was unassigned, assigns it to the column’s member at the same time. Dropping onto a specific time slot within the day sets an exact start time (with a default 30-minute duration); dropping on the day’s untimed area plans it for the day without a time.
- From one day space to another: moves the plan’s date.
- From one member’s column to another: removes the previous plan and assignment and creates a new plan and assignment for the new member.
- Back to Triage: unassigns the thread and clears its plan.
- Back to Assigned (from a day space): keeps the assignment but removes the plan.
Set an exact time
To schedule down to the minute, open the schedule composer — click the calendar button on a card, or drop a card onto a specific time slot. The composer lets you pick a member (“Set plan for…”), then a start day / start time and end day / end time. Times are offered in 15-minute increments; picking a start time suggests an end time 30 minutes later, and the composer defaults the plan to today when no date is set. Save to write the plan (and sync it to your PSA).Create and manage plans from the Control Panel
You can also plan a thread without opening Planner. In the thread’s Control Panel, the Planner card lists the thread’s planned events. Use the + (Add planned event) button to open the same composer, choose a member, set the day and time, and Save. Completed plans move under Marked done, which you can reveal with Show done / Hide done. If no plans exist yet, the card shows “No planned events”.Refresh and manual sync
The refresh button in the header re-fetches the board and forces a pull from your PSA, so you don’t have to wait for the next scheduled sync. This is the fastest way to see PSA-side changes appear in Planner.How Planner syncs with your PSA
Planner keeps schedule entries in step with your PSA in both directions. When you create, move, retime, complete, or delete a plan in Thread, that change is pushed to the PSA immediately. Changes made in the PSA flow back into Planner as described below. Only ticket-based plans sync to the PSA — plans that came in from an Outlook calendar or other non-ticket sources stay in Planner and are not written to the PSA.
Because Autotask and HaloPSA reject overlaps, planning a thread over an existing plan for the same member at the same time returns “A schedule already exists for this member at this date and time.” ConnectWise accepts overlaps, so conflicts are surfaced visually on the board rather than blocked.
Autotask service calls require a start and end time. When you plan a thread for a day without a time, Thread sends Autotask a default start of 12:00 am (and a one-hour default window) for that day, so the plan still lands on the schedule.
Planner also works for workspaces without a PSA — plans are stored natively in Thread. See the separate Planner and Outlook calendar integration guide to bring read-only Outlook events onto the board.
TimeZest integration
If you have a TimeZest account, you can book appointments directly from Thread with bidirectional syncing to your PSA. In Admin → Integrations, open TimeZest to add the integration. Once configured, trigger TimeZest from the Actions tab in the composer or with the/timezest slash command; answer a few prompts, and a booking link is generated to send to your customer. When the customer picks a time, the appointment appears in both Thread Inbox and your PSA.
Frequently asked questions
Can I schedule work down to an exact time?
Can I schedule work down to an exact time?
Yes. Click the calendar button on a card (or drop it onto a time slot) and set a start and end time. Times are offered in 15-minute increments, and selecting a start time suggests an end time 30 minutes later. You can also add a timed plan from the thread’s Control Panel using the Planner card’s + button.
Which PSAs does Planner support?
Which PSAs does Planner support?
Planner works with ConnectWise, Autotask, and HaloPSA, and it also works for Thread-native workspaces that have no PSA connected. Plans sync automatically between Thread and your connected PSA.
How does Planner sync with my PSA?
How does Planner sync with my PSA?
Changes you make in Thread are pushed to the PSA in real time. For changes made in the PSA: ConnectWise pushes updates back to Thread in real time via callbacks (with a background poll roughly every 5 minutes as a backstop), while Autotask and HaloPSA are picked up by that background poll. Use the refresh button in the Planner header to force a pull immediately.
I use Autotask. How does a plan without a time sync?
I use Autotask. How does a plan without a time sync?
Autotask service calls require a start and end time, so when you plan a thread for a day without specifying a time, Thread sets the Autotask start to 12:00 am (with a default one-hour window) for the selected day. The plan still appears on the Autotask schedule.
Why did Planner reject my plan as a conflict?
Why did Planner reject my plan as a conflict?
Autotask and HaloPSA block overlapping schedule entries for the same member at the same time — if you try to plan over an existing entry, Thread returns “A schedule already exists for this member at this date and time.” ConnectWise allows overlaps, so Planner highlights conflicting timed plans on the board instead of blocking them.
What happens when I drag a planned thread back to Triage or Assigned?
What happens when I drag a planned thread back to Triage or Assigned?
Moving a planned thread back to Triage clears both its plan and its assignment; moving it to the Assigned space keeps the assignment but removes the plan. Because this deletes the plan (and the matching PSA entry), Planner asks you to confirm first, and every change offers a brief undo.