Your Voice AI agent already transfers callers to 3CX over a SIP trunk. Add an inbound side to the same trunk so 3CX forwards callers to the agent over SIP, with their real number, instead of over the phone network.
You set up a Thread trunk earlier so your Voice AI agent transfers callers to 3CX over SIP. Today your 3CX forwards callers to the agent’s Thread number over the phone network. These steps add an inbound side to the same trunk, so that forward travels over SIP instead and the agent sees the caller’s real number. Your outbound settings, custom headers and linked agents stay as they are, and one 3CX trunk carries both directions. The steps were written against 3CX v20.To set up both directions from scratch, follow Connect 3CX to Voice AI with a SIP trunk instead.3CX names each direction from its own point of view, so Thread’s names flip:
In Thread
What happens
In 3CX
Inbound trunk
3CX sends a caller to the Voice AI agent
An outbound call: an Outbound Rule sends it out the Thread trunk
Outbound trunk
The agent transfers the caller back to a technician
An incoming call on the same trunk, routed by the DID it arrives on
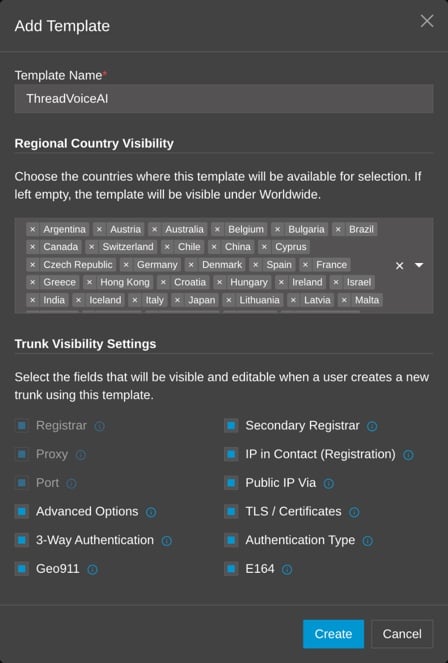
3CX’s built-in Generic SIP Trunk template puts your own 3CX number in the caller fields of calls it sends out, so a forwarded caller would reach the agent as your 3CX number. The Thread Voice AI template sends the original caller instead.Download ThreadVoiceAI.pv.xml and keep the file name as it is. In the 3CX Admin console, go to Advanced > Templates > Provider Templates, select Add, choose the file, and select Create in the dialog that opens.
Keep the defaults and select Create.
2
Switch your transfer trunk to the template
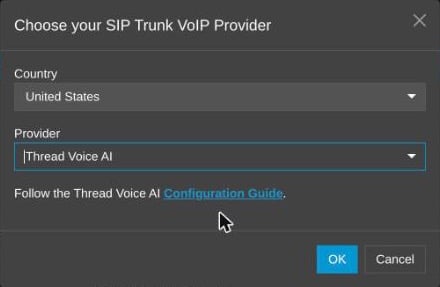
In Voice & Chat, open the menu (⋮) on the trunk that receives Thread’s transfers today and select Switch Template. Set Provider to Thread Voice AI and select OK. Your 3CX keeps using the same trunk for both directions.Switching keeps the trunk’s name, Main Trunk Number, authentication, DIDs, call limit, caller ID and codec settings. It clears Registrar/Server, and on the Options tab it sets Transport Protocol to Any and SRTP Mode to Disabled. 3CX won’t save the trunk until Registrar/Server is filled in again, so nothing changes for live calls yet. Leave the trunk’s settings open; steps 6 to 8 fill them back in.
Switch Template is in the trunk's menu in Voice & Chat.
Pick Thread Voice AI as the provider. It appears once the template is installed.
In Thread: copy Thread’s SIP address and set encryption
3
Open your existing trunk
In a new tab, go to Voice > SIP Trunks & Caller ID and open the trunk. Its outbound side shows Configured with its switch on, and the inbound side shows Optional.
Starting point: outbound only, with your agents linked.
4
Under Inbound trunk, select Set up trunk
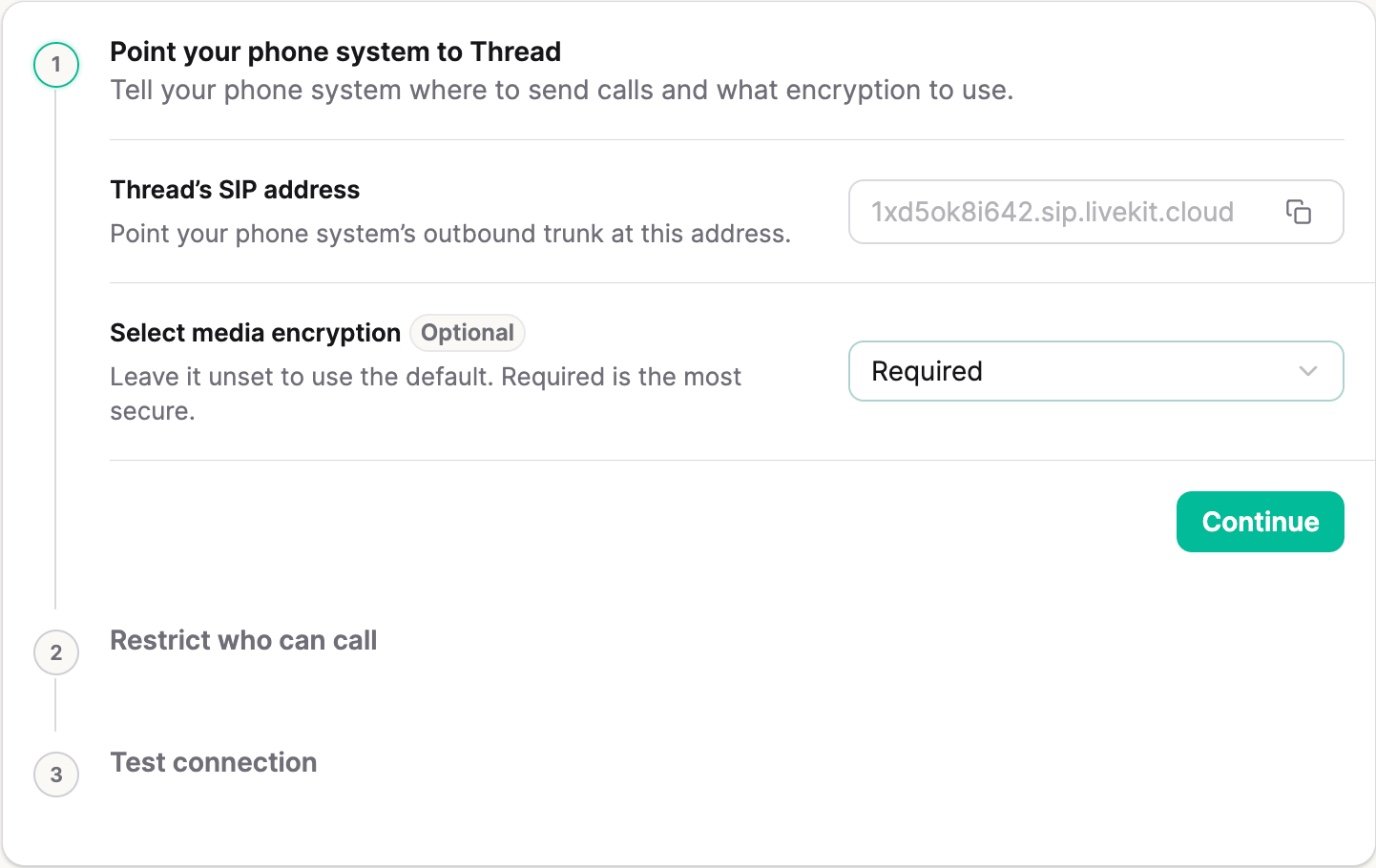
Step 1 shows Thread’s SIP address. Copy it for the 3CX trunk. Set Media encryption to Required (recommended) so the audio of every forwarded call is encrypted with SRTP. Choose Disabled only if you won’t turn SRTP on in 3CX.
Thread's SIP address in the inbound settings
5
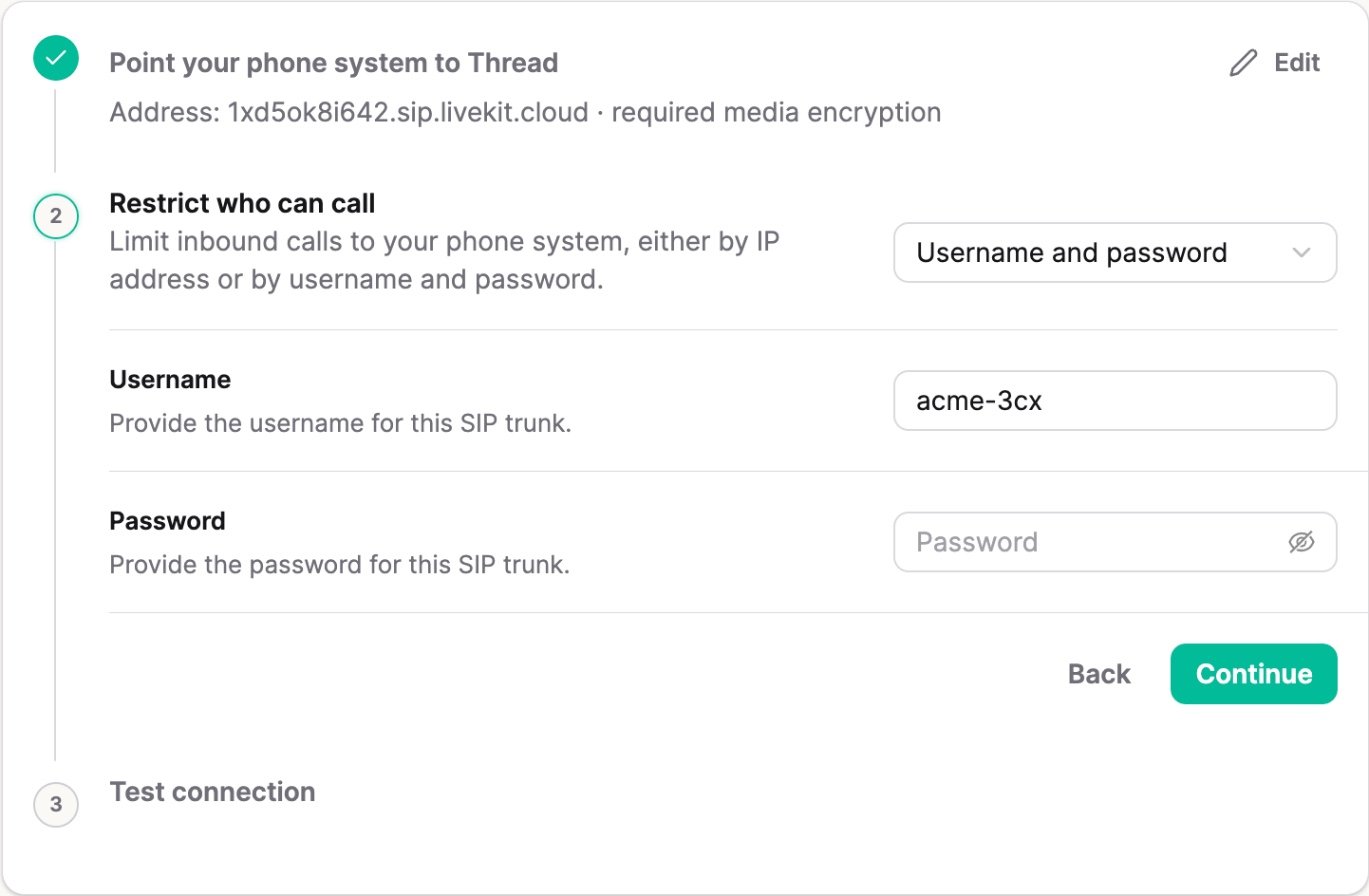
Choose how Thread recognizes your 3CX
Pick one option. The 3CX settings in step 7 change to match.
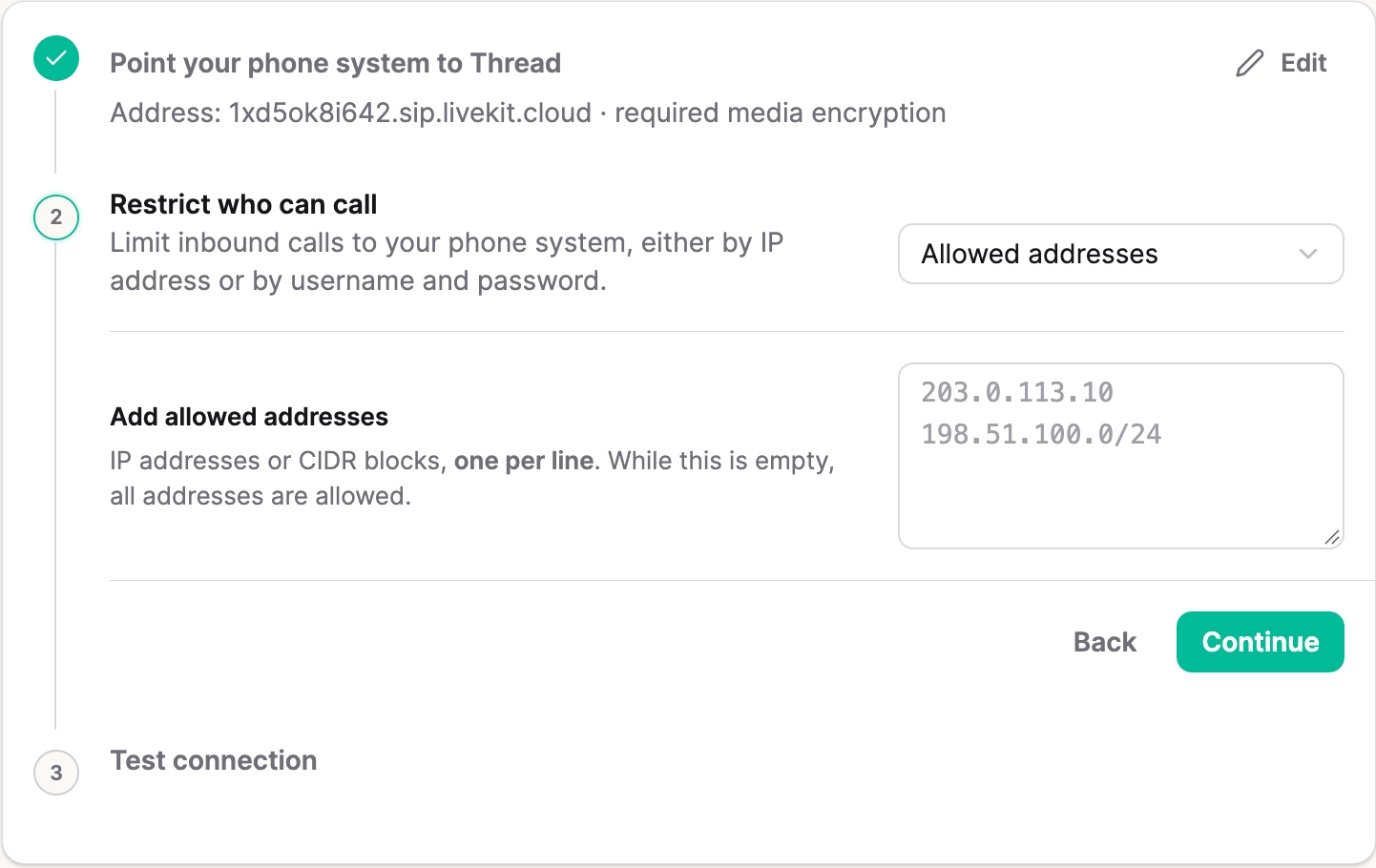
Allowed addresses: Thread accepts calls only from the IPs you list, one per line. 3CX shows its public IP on every trunk page, next to Use this IP for Whitelisting.
Username and password: 3CX answers a challenge on every call. Pick a username unique to this trunk and a long, randomly generated password (20 or more characters from a password manager). Don’t reuse credentials from anywhere else or use defaults like admin/admin. Keep them for step 7. Choose this if your 3CX is hosted and shares an IP with other customers.
Leave the address list empty: Thread accepts calls from any address. Anyone who knows Thread’s SIP address and your agent’s number can then call the agent with any caller number, so prefer one of the options above.
Allowed addresses: one IP or CIDR block per line. Left empty, any address is allowed.
Username and password. These are separate from any outbound credentials.
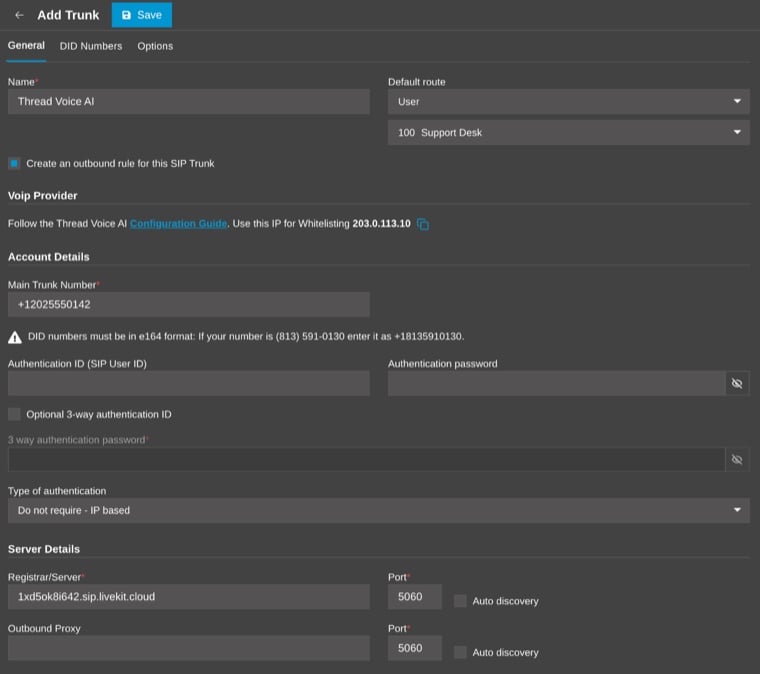
Back on the trunk’s General tab, check its Name and Main Trunk Number. Under Server Details, paste Thread’s SIP address into Registrar/Server and keep Port on 5060. Leave Outbound Proxy empty.
Name, Main Trunk Number and Registrar/Server filled in. Port stays on 5060.
Keep the Registrar port on 5060, because 3CX can’t send calls to Thread over TLS. Thread’s SIP address uses a wildcard certificate (*.sip.livekit.cloud), and 3CX only accepts a certificate that matches the trunk’s Registrar name exactly, with no setting to relax that check. On TLS, 3CX fails the forward with 503 Certificate Name Mismatch (shown as 503 Service Unavailable in the Event Log) before the call reaches Thread. SRTP still encrypts the call audio.
7
Fill in authentication to match step 5
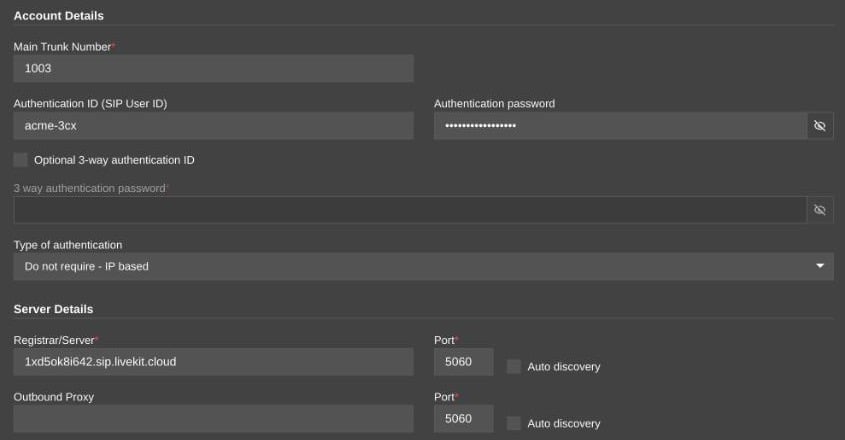
On the same tab, use the row for the option you chose in step 5:
If you chose in Thread
3CX Type of authentication
3CX Authentication ID and Authentication password
Allowed addresses
Do not require - IP based
Leave empty
Username and password
Do not require - IP based
The username and password you chose
The username and password version. For allowed addresses, leave both credential fields empty.
Use Do not require - IP based for both options; 3CX still answers Thread’s password challenge on each call. Outbound - outbound only and Register/Account based make 3CX register with Thread, which answers 405 Method Not Allowed. 3CX then treats the trunk as down, and the call fails or falls through to a backup route.
8
Set encryption to match step 4, then save
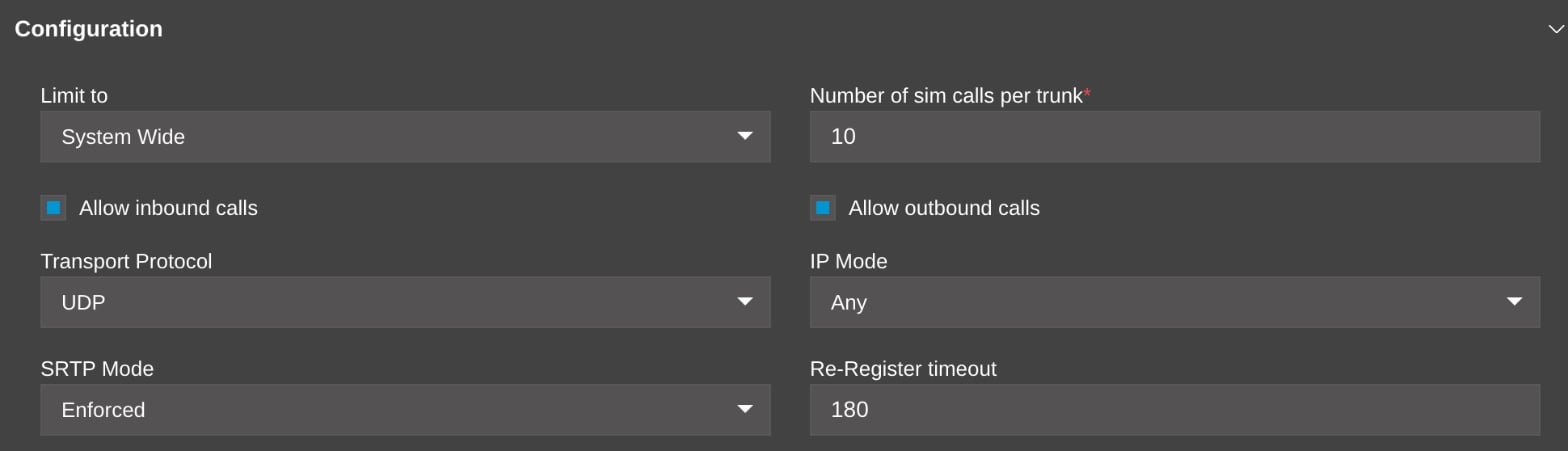
Open the trunk’s Options tab. Switching the template reset SRTP Mode, so set it again to match Thread’s media encryption. Encrypted audio is the recommended choice. Then select Save.
In Thread: inbound media encryption · outbound transport
3CX SRTP Mode
Required · TLS+SRTP (recommended)
Enforced
Disabled · TLS
Disabled
SRTP Mode set to Enforced. Transport Protocol can stay on the template's setting.
9
Check that the transfer number is still a DID
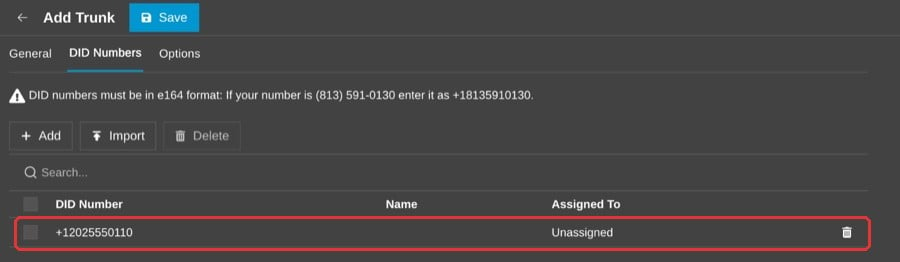
On the trunk’s DID Numbers tab, make sure the number your Thread Attendant agent transfers to is still listed, and add it if it isn’t. 3CX accepts a call from Thread only when it arrives on a DID the trunk knows. Select Save.
The transfer number listed in E.164 format.
10
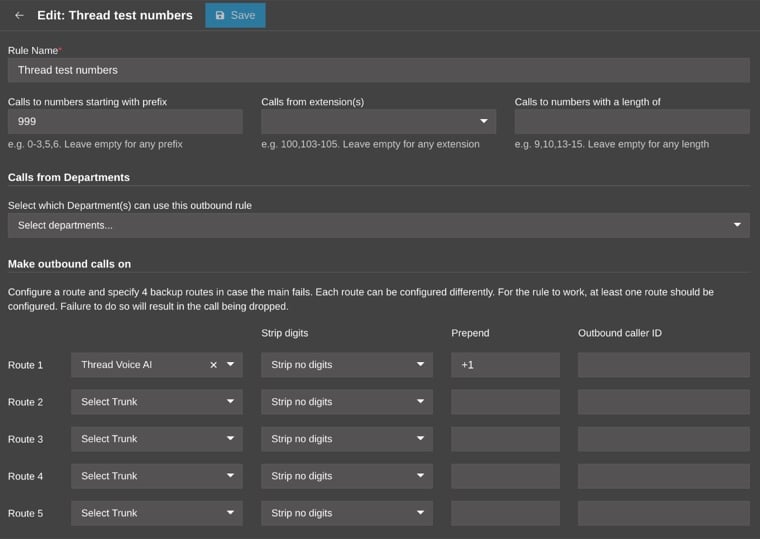
Add an Outbound Rule for Thread's test number
Thread’s test number is in your trunk’s country, from a range that’s never given to real phones, and 3CX dials it as a domestic call. In Outbound Rules, add a rule for it with Route 1 on the Thread trunk and Strip no digits. 3CX compares a number after removing your own country code, so the prefix leaves the country code out and Prepend puts it back:
Trunk country
Test numbers
Prefix
Prepend
US or Canada
+1 999 xxx xxxx
999
+1
United Kingdom
+44 20 7946 0xxx
2079460
+44
Australia
+61 2 5550 xxxx
25550
+61
Netherlands
+31 69 xxx xxxx
69
+31
New Zealand
+64 9 999 xxxx
9999
+64
The next step dials the test number. Make sure no higher rule catches it first. You can delete this rule once the test passes.
A US trunk: prefix 999 without the country code, and Prepend +1 puts it back.
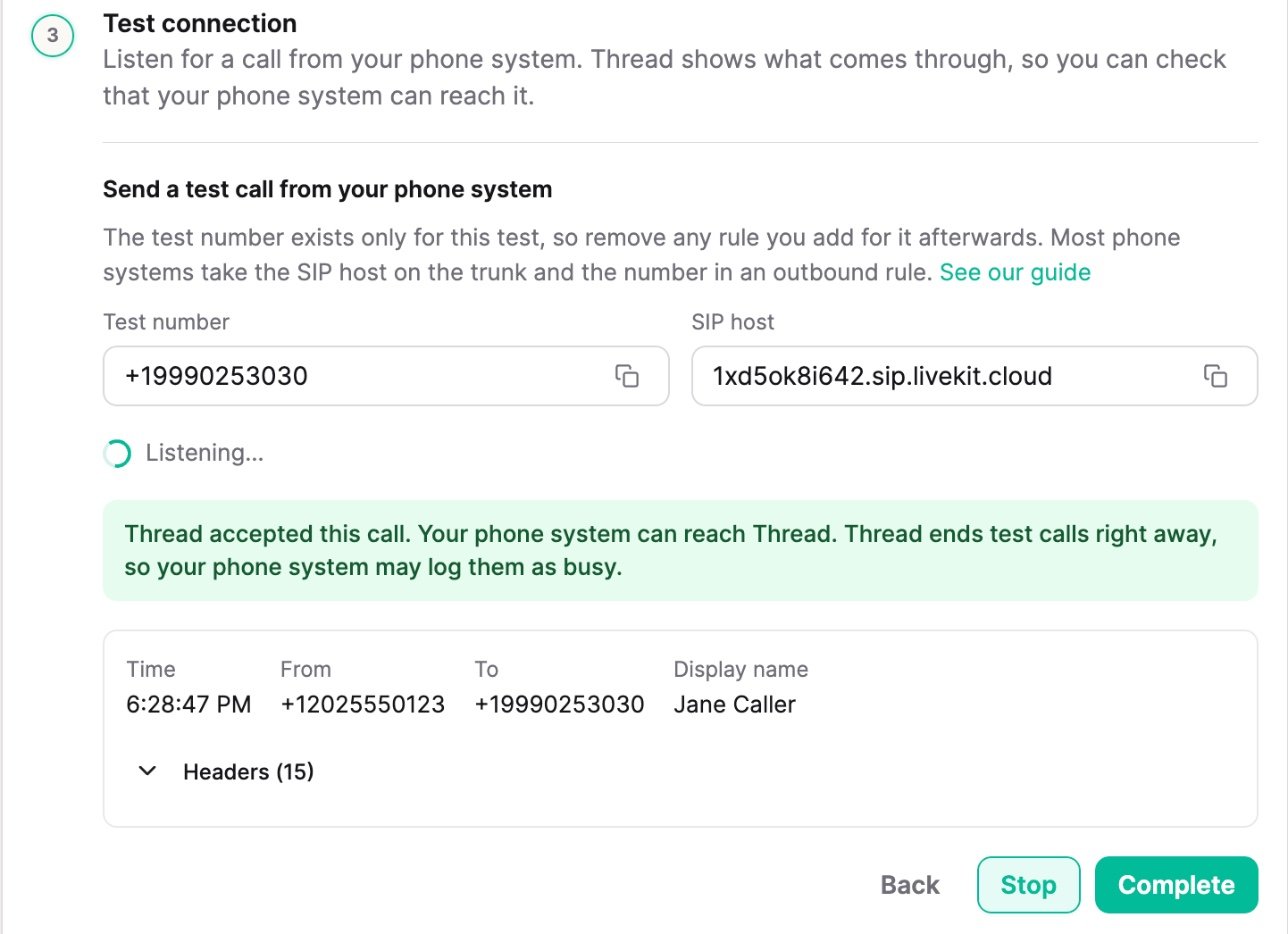
Back on Thread’s inbound page, at step 3 Test connection, select Start listening. Thread shows a test number in your trunk’s country, which the test rule sends to the Thread trunk. Dial the number from a 3CX extension. The call appears in Thread with the caller and the headers 3CX sent, which confirms your address or credentials and encryption work. 3CX may log the call as busy, because Thread ends test calls right away. Select Complete, then Save at the bottom of the inbound page to return to the trunk page.If nothing appears, check the allowed addresses or credentials from steps 5 and 7, that the 3CX trunk sends to port 5060, and that no higher Outbound Rule catches the test number. Thread can only see calls it accepts, so check your 3CX logs to find out why calls are failing.
A call Thread accepted. Expand Headers to see what 3CX sent.
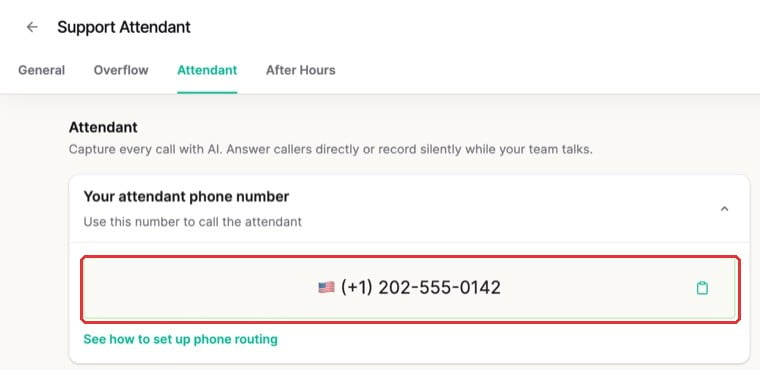
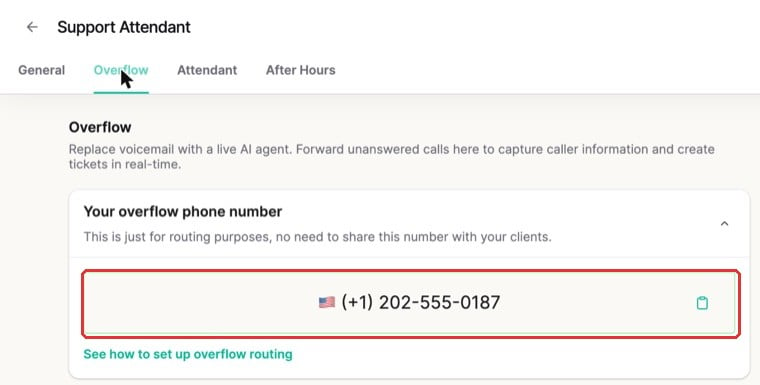
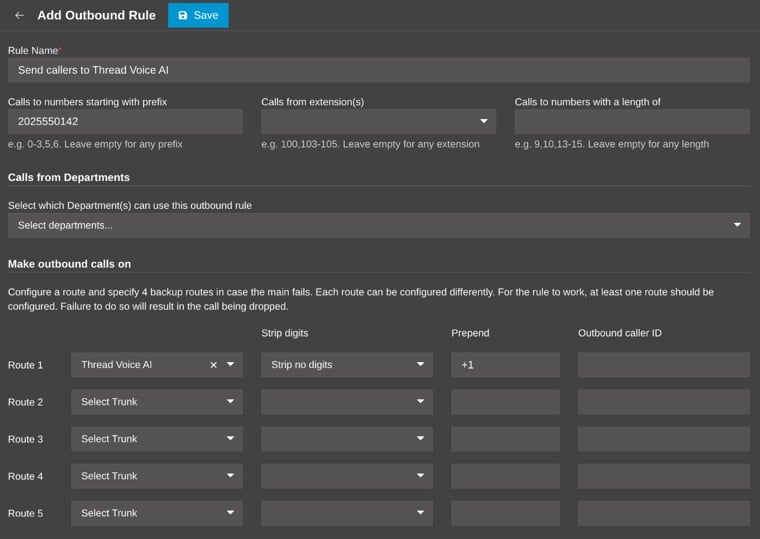
In Outbound Rules, add a rule whose prefix is the agent’s Thread number without the country code (for +1 202 555 0142, enter 2025550142). Set Route 1 to the Thread trunk, Strip no digits, and Prepend the country code, +1 in the US and Canada.The agent’s numbers are in Thread under Voice > Agents: the Attendant number is under Your attendant phone number on the agent’s Attendant tab, and the Overflow number under Your overflow phone number on its Overflow tab. The trunk page also lists both next to the agent. Add a rule for both the Attendant and the Overflow number, so 3CX sends every forward to the agent over SIP.Make sure no higher rule catches the number first. If a call still doesn’t match, Dashboard > Activity logs shows the number 3CX compared on a line like Looking for outbound rule: dialed = [+12025550142], processed: [2025550142]; use the processed form as the prefix. Then delete the test-number rule.
The Attendant number, on the agent's Attendant tab.
The Overflow number, on the agent's Overflow tab.
Route 1 goes to Thread. A backup route can follow, but it will hide failures while you test.
Add this rule before you turn inbound on in the next step. Saving the trunk moves the agent’s number onto the SIP trunk, so a forward still going over the phone network would stop reaching the agent.
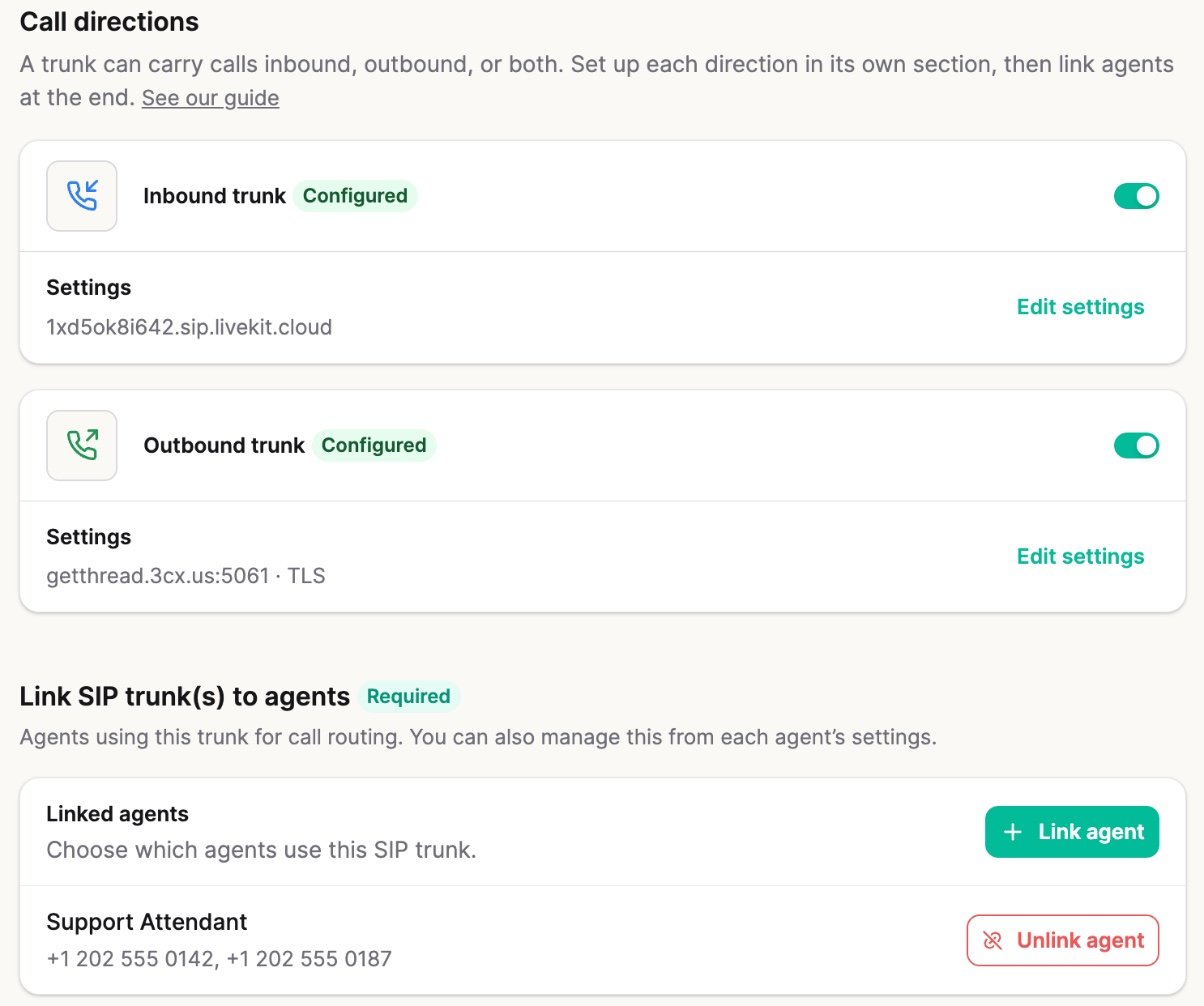
The trunk page now shows both sides as Configured. Agents already linked to the trunk apply to both directions. If you chose Required, also select Edit settings under Outbound trunk and change the transport to TLS+SRTP, so transfers to 3CX are encrypted the same way. Turn on the switch on the Inbound trunk card. It starts off, because your agents are so far linked only to the outbound side. Then select Save at the bottom of the trunk page to turn inbound on.
Both sides configured and switched on, one linked agent. Saving moves the agent's number onto this trunk.
The DID, IVR option or queue that already forwards to the agent’s Thread number doesn’t change. With the rule from step 12, 3CX should now send that forward over SIP instead of the phone network.
15
Place a test call
Call your support number from a mobile. The agent answers and, when it transfers, your technician’s 3CX client shows the caller’s own number.
To stop using one direction later, switch it off on the trunk page in Thread and select Save. Its settings stay, so you can switch it back on. While agents are linked to the trunk, at least one direction has to stay on. To turn off both, select Disconnect all agents from the trunk’s menu in the SIP trunk list.If a forward or transfer fails, see Troubleshoot the connection.
Was this page helpful?
{"docsConfig":{"theme":"mint","$schema":"https://mintlify.com/docs.json","name":"Thread Docs","colors":{"primary":"#00B398","light":"#19D3AB","dark":"#008E78"},"logo":{"light":"https://mintcdn.com/thread/50guKpC0vegpyObR/logo/thread.svg?fit=max\u0026auto=format\u0026n=50guKpC0vegpyObR\u0026q=85\u0026s=86145b5e0fe1e4b555128fc8d8fd9815","dark":"https://mintcdn.com/thread/2AdmqP0mlnyoZLRc/logo/dark.svg?fit=max\u0026auto=format\u0026n=2AdmqP0mlnyoZLRc\u0026q=85\u0026s=be32bb55d8f9cb7540f7c741c3568f92"},"favicon":"https://mintcdn.com/thread/hgBTJ4Ailw9NcSXS/favicon.svg?fit=max\u0026auto=format\u0026n=hgBTJ4Ailw9NcSXS\u0026q=85\u0026s=e5c9cc06837f1f692d72495e146c976a","appearance":{"default":"dark"},"background":{"color":{"light":"#FAF9F6","dark":"#0A0A0B"}},"navbar":{"links":[{"href":"https://www.getthread.com/aisu-community","label":"Community"}],"primary":{"type":"button","label":"Thread Inbox","href":"https://inbox.getthread.com"}},"footer":{"socials":{"website":"https://www.getthread.com","linkedin":"https://www.linkedin.com/company/thread-service","youtube":"https://www.youtube.com/channel/UCAZ535tVfwF94lOE818tVmQ"},"links":[{"header":"Our mission","items":[{"label":"Death to the Ticket","href":"https://www.getthread.com/death-to-ticket"},{"label":"Intelligent Service Delivery","href":"https://www.getthread.com/intelligent-service-delivery-manifesto-the-future-of-msp-operations"}]},{"header":"Popular features","items":[{"label":"AI Agents","href":"https://www.getthread.com/automated-ticket-triage"},{"label":"Automated Triage","href":"https://www.getthread.com/automated-ticket-triage"},{"label":"Service Desk Chatbots","href":"https://www.getthread.com/live-managed-chat-support"},{"label":"Teams Chat Integration","href":"https://www.getthread.com/teams-to-teams"},{"label":"AI for Phone","href":"https://www.getthread.com/voice-ai"}]},{"header":"Company","items":[{"label":"About","href":"https://www.getthread.com/about-thread"},{"label":"Careers","href":"https://www.getthread.com/careers"}]},{"header":"Resources","items":[{"label":"AISU Community","href":"https://www.getthread.com/aisu-community"},{"label":"Thread Crew","href":"https://thread-crew.circle.so/join?invitation_token=8c546a98539fb84b4eb913b8b647a078bb353623-ea2d128e-eaae-42fd-af14-5949e71bf51b"},{"label":"AISU weekly webinar","href":"https://www.getthread.com/aisu-weekly-registration"},{"label":"Events","href":"/events-and-resources"},{"label":"Blog","href":"https://www.getthread.com/service-magic-blog"},{"label":"System Status","href":"https://status.getthread.com/"},{"label":"Feedback","href":"https://feedback.getthread.com/"},{"label":"Contact support","href":"https://help.getthread.com"},{"label":"Trust Center","href":"https://trust.getthread.com"},{"label":"Terms of Service","href":"https://www.getthread.com/terms-of-service"},{"label":"Privacy Policy","href":"https://www.getthread.com/privacy-policy"}]}]},"fonts":{"heading":{"family":"Inter","weight":600},"body":{"family":"Inter"}},"banner":{"content":"Join hundreds of MSPs on the **AI Service Unleashed** weekly call — product releases, beta access, and Super Magic tips. [Register](https://www.getthread.com/aisu-weekly-registration)","dismissible":true},"contextual":{"options":["copy","view","assistant","claude","chatgpt","mcp"],"display":"header"},"styling":{"latex":false},"navigation":{"pages":[]}},"deployment":{"deploymentMetadataValue":{"subdomain":"thread","hasAudioNarration":false,"actualSubdomain":"thread","customDomains":["docs.getthread.com"],"gitSource":{"type":"github","owner":"thread-magic","repo":"mintlify-docs","deployBranch":"main","contentDirectory":"","isPrivate":true,"mountPath":"","label":""},"feedback":{"agentFeedback":true,"thumbs":true,"edits":false},"entitlements":{"AI_CHAT":{"status":"ENABLED"},"REMOVE_BRANDING":{"status":"ENABLED"},"CONTEXTUAL_FEEDBACK":{"status":"ENABLED"},"CODE_SNIPPET_FEEDBACK":{"status":"ENABLED"},"WEB_MCP":{"status":"ENABLED"},"NARRATION":{"status":"ENABLED"}},"buildId":"6af63611dcf49a75000fd4c2","clientVersion":"0.0.4117","searchFilterCounts":[{"language":"default","tag":"Guides","count":212},{"language":"default","tag":"Super Magic \u0026 Thread MCP","count":33},{"language":"default","tag":"By role","count":28},{"language":"default","tag":"Choose your role","count":28},{"language":"default","tag":"Integrations","count":24},{"language":"default","tag":"Messenger","count":22},{"language":"default","tag":"Voice AI","count":19},{"language":"default","tag":"Thread Inbox","count":19},{"language":"default","tag":"Super Magic Tools","count":19},{"language":"default","tag":"Magic Agents","count":16}],"searchSettings":{"isFiltersEnabled":false}},"assistantConfig":{"enableAskAiButton":false,"enableStarterQuestions":false,"enableContextualStarterQuestions":true,"enableAskAiSearchBar":true,"deflection":{"enabled":true,"type":"link","email":"help@getthread.com","url":"https://help.getthread.com/","showHelpButton":true}},"basePath":"","hasChatPermissions":true,"hasWebMcpPermissions":true,"toggles":[{"name":"kill-isr","enabled":true,"variant":{"name":"disabled","enabled":false,"feature_enabled":true},"impressionData":false},{"name":"custom-rbac-roles","enabled":true,"variant":{"name":"disabled","enabled":false,"feature_enabled":true},"impressionData":false},{"name":"agent-mintlify-slack","enabled":true,"variant":{"name":"disabled","enabled":false,"feature_enabled":true},"impressionData":false},{"name":"agent-integrations-settings","enabled":true,"variant":{"name":"disabled","enabled":false,"feature_enabled":true},"impressionData":false},{"name":"rbac-expansion","enabled":true,"variant":{"name":"disabled","enabled":false,"feature_enabled":true},"impressionData":false},{"name":"automations-pr-grouping","enabled":true,"variant":{"name":"disabled","enabled":false,"feature_enabled":true},"impressionData":false},{"name":"custom-prefix","enabled":true,"variant":{"name":"disabled","enabled":false,"feature_enabled":true},"impressionData":false},{"name":"analytics-v7","enabled":true,"variant":{"name":"disabled","enabled":false,"feature_enabled":true},"impressionData":false},{"name":"user-flows-analytics","enabled":true,"variant":{"name":"disabled","enabled":false,"feature_enabled":true},"impressionData":false},{"name":"no-publish-flow","enabled":true,"variant":{"name":"disabled","enabled":false,"feature_enabled":true},"impressionData":false},{"name":"workos-onboarding","enabled":true,"variant":{"name":"disabled","enabled":false,"feature_enabled":true},"impressionData":false},{"name":"snapshot-serving-live","enabled":true,"variant":{"name":"disabled","enabled":false,"feature_enabled":true},"impressionData":false},{"name":"stripTemperatureMiddleware","enabled":true,"variant":{"name":"disabled","enabled":false,"feature_enabled":true},"impressionData":false},{"name":"support-platform-pylon-zendesk","enabled":true,"variant":{"name":"disabled","enabled":false,"feature_enabled":true},"impressionData":false},{"name":"snapshot-serving","enabled":true,"variant":{"name":"disabled","enabled":false,"feature_enabled":true},"impressionData":false},{"name":"instant-rollback","enabled":true,"variant":{"name":"disabled","enabled":false,"feature_enabled":true},"impressionData":false},{"name":"granular-notifications-server","enabled":true,"variant":{"name":"disabled","enabled":false,"feature_enabled":true},"impressionData":false},{"name":"granular-notifications","enabled":true,"variant":{"name":"disabled","enabled":false,"feature_enabled":true},"impressionData":false},{"name":"automations-fable","enabled":true,"variant":{"name":"disabled","enabled":false,"feature_enabled":true},"impressionData":false},{"name":"fixed-ai-action-pricing","enabled":true,"variant":{"name":"disabled","enabled":false,"feature_enabled":true},"impressionData":false},{"name":"automation-resolve-merge-conflict","enabled":true,"variant":{"name":"disabled","enabled":false,"feature_enabled":true},"impressionData":false},{"name":"scoped-publishing","enabled":true,"variant":{"name":"disabled","enabled":false,"feature_enabled":true},"impressionData":false},{"name":"mintql","enabled":true,"variant":{"name":"disabled","enabled":false,"feature_enabled":true},"impressionData":false},{"name":"page-level-analytics","enabled":true,"variant":{"name":"disabled","enabled":false,"feature_enabled":true},"impressionData":false},{"name":"editor-version-history-v2","enabled":true,"variant":{"name":"disabled","enabled":false,"feature_enabled":true},"impressionData":false},{"name":"billing-page-v2","enabled":true,"variant":{"name":"disabled","enabled":false,"feature_enabled":true},"impressionData":false},{"name":"full-page-search","enabled":true,"variant":{"name":"disabled","enabled":false,"feature_enabled":true},"impressionData":false},{"name":"workspace-projects","enabled":true,"variant":{"name":"disabled","enabled":false,"feature_enabled":true},"impressionData":false},{"name":"assistant-v5","enabled":true,"variant":{"name":"disabled","enabled":false,"feature_enabled":true},"impressionData":false},{"name":"fork-pr-previews","enabled":true,"variant":{"name":"disabled","enabled":false,"feature_enabled":true},"impressionData":false},{"name":"revalidation-jwt","enabled":true,"variant":{"name":"disabled","enabled":false,"feature_enabled":true},"impressionData":false},{"name":"workos-sso-scim","enabled":true,"variant":{"name":"disabled","enabled":false,"feature_enabled":true},"impressionData":false},{"name":"hobby-abuse-scan","enabled":true,"variant":{"name":"disabled","enabled":false,"feature_enabled":true},"impressionData":false},{"name":"dashboard-inbox","enabled":true,"variant":{"name":"disabled","enabled":false,"feature_enabled":true},"impressionData":false},{"name":"workos-signup","enabled":true,"variant":{"name":"disabled","enabled":false,"feature_enabled":true},"impressionData":false},{"name":"turbopuffer-dual-write","enabled":true,"variant":{"name":"disabled","enabled":false,"feature_enabled":true},"impressionData":false},{"name":"workos-enabled","enabled":true,"variant":{"name":"disabled","enabled":false,"feature_enabled":true},"impressionData":false},{"name":"approve-review-flow","enabled":true,"variant":{"name":"disabled","enabled":false,"feature_enabled":true},"impressionData":false},{"name":"editor-metadata","enabled":true,"variant":{"name":"disabled","enabled":false,"feature_enabled":true},"impressionData":false},{"name":"sso-setup-deadline-banner","enabled":true,"variant":{"name":"disabled","enabled":false,"feature_enabled":true},"impressionData":false},{"name":"turbopuffer-serve","enabled":true,"variant":{"name":"disabled","enabled":false,"feature_enabled":true},"impressionData":false},{"name":"live-agents","enabled":true,"variant":{"name":"disabled","enabled":false,"feature_enabled":true},"impressionData":false},{"name":"llms-txt-v2","enabled":true,"variant":{"name":"disabled","enabled":false,"feature_enabled":true},"impressionData":false}],"googleFontsInlined":false},"customCss":[{"filePath":"style.css","href":"/_mintlify/custom/thread/0a08f46ff2802e35/style.css"}],"page":{"pagePath":"ai-agents/add-inbound-to-your-3cx-sip-trunk","slug":"/ai-agents/add-inbound-to-your-3cx-sip-trunk","pageMetadata":{"title":"Add inbound to your existing Thread-3CX SIP trunk","description":"Your Voice AI agent already transfers callers to 3CX over a SIP trunk. Add an inbound side to the same trunk so 3CX forwards callers to the agent over SIP, with their real number, instead of over the phone network.","boost":3,"href":"/ai-agents/add-inbound-to-your-3cx-sip-trunk"},"description":{"compiledSource":"\"use strict\";\nconst {jsx: _jsx} = arguments[0];\nconst {useMDXComponents: _provideComponents} = arguments[0];\nfunction _createMdxContent(props) {\n const _components = {\n p: \"p\",\n ..._provideComponents(),\n ...props.components\n };\n return _jsx(_components.p, {\n children: \"Your Voice AI agent already transfers callers to 3CX over a SIP trunk. Add an inbound side to the same trunk so 3CX forwards callers to the agent over SIP, with their real number, instead of over the phone network.\"\n });\n}\nfunction MDXContent(props = {}) {\n const {wrapper: MDXLayout} = {\n ..._provideComponents(),\n ...props.components\n };\n return MDXLayout ? _jsx(MDXLayout, {\n ...props,\n children: _jsx(_createMdxContent, {\n ...props\n })\n }) : _createMdxContent(props);\n}\nreturn {\n default: MDXContent\n};\n","frontmatter":{},"scope":{}},"pageType":"default","mdx":{"mdxSource":{"compiledSource":"\"use strict\";const{Fragment:_Fragment,jsx:_jsx,jsxs:_jsxs}=arguments[0];const{useMDXComponents:_provideComponents}=arguments[0];function _createMdxContent(props){const _components={a:`a`,code:`code`,li:`li`,p:`p`,strong:`strong`,tbody:`tbody`,td:`td`,th:`th`,thead:`thead`,tr:`tr`,ul:`ul`,..._provideComponents(),...props.components},{Frame,Heading,OptimizedImage,Step,Steps,Table,Warning}=_components;if(!Frame)_missingMdxReference(`Frame`,true);if(!Heading)_missingMdxReference(`Heading`,true);if(!OptimizedImage)_missingMdxReference(`OptimizedImage`,true);if(!Step)_missingMdxReference(`Step`,true);if(!Steps)_missingMdxReference(`Steps`,true);if(!Table)_missingMdxReference(`Table`,true);if(!Warning)_missingMdxReference(`Warning`,true);return _jsxs(_Fragment,{children:[_jsx(_components.p,{children:`You set up a Thread trunk earlier so your Voice AI agent transfers callers to 3CX over SIP. Today your 3CX forwards callers to the agent’s Thread number over the phone network. These steps add an inbound side to the same trunk, so that forward travels over SIP instead and the agent sees the caller’s real number. Your outbound settings, custom headers and linked agents stay as they are, and one 3CX trunk carries both directions. The steps were written against 3CX v20.`}),`\n`,_jsxs(_components.p,{children:[`To set up both directions from scratch, follow `,_jsx(_components.a,{href:`/ai-agents/connect-3cx-to-voice-ai-with-a-sip-trunk`,children:`Connect 3CX to Voice AI with a SIP trunk`}),` instead.`]}),`\n`,_jsx(_components.p,{children:`3CX names each direction from its own point of view, so Thread’s names flip:`}),`\n`,_jsxs(Table,{children:[_jsx(_components.thead,{children:_jsxs(_components.tr,{children:[_jsx(_components.th,{children:`In Thread`}),_jsx(_components.th,{children:`What happens`}),_jsx(_components.th,{children:`In 3CX`})]})}),_jsxs(_components.tbody,{children:[_jsxs(_components.tr,{children:[_jsx(_components.td,{children:_jsx(_components.strong,{children:`Inbound trunk`})}),_jsx(_components.td,{children:`3CX sends a caller to the Voice AI agent`}),_jsxs(_components.td,{children:[`An outbound call: an `,_jsx(_components.strong,{children:`Outbound Rule`}),` sends it out the Thread trunk`]})]}),_jsxs(_components.tr,{children:[_jsx(_components.td,{children:_jsx(_components.strong,{children:`Outbound trunk`})}),_jsx(_components.td,{children:`The agent transfers the caller back to a technician`}),_jsx(_components.td,{children:`An incoming call on the same trunk, routed by the DID it arrives on`})]})]})]}),`\n`,_jsx(Heading,{level:`2`,id:`in-3cx-switch-your-trunk-to-the-thread-template`,children:`In 3CX: switch your trunk to the Thread template`}),`\n`,_jsxs(Steps,{children:[_jsxs(Step,{title:`Install the Thread Voice AI template`,stepNumber:1,children:[_jsxs(_components.p,{children:[`3CX’s built-in `,_jsx(_components.strong,{children:`Generic SIP Trunk`}),` template puts your own 3CX number in the caller fields of calls it sends out, so a forwarded caller would reach the agent as your 3CX number. The Thread Voice AI template sends the original caller instead.`]}),_jsxs(_components.p,{children:[`Download `,_jsx(_components.a,{href:`/downloads/3cx/ThreadVoiceAI.pv.xml`,download:`ThreadVoiceAI.pv.xml`,children:`ThreadVoiceAI.pv.xml`}),` and keep the file name as it is. In the 3CX `,_jsx(_components.strong,{children:`Admin`}),` console, go to `,_jsx(_components.strong,{children:`Advanced > Templates > Provider Templates`}),`, select `,_jsx(_components.strong,{children:`Add`}),`, choose the file, and select `,_jsx(_components.strong,{children:`Create`}),` in the dialog that opens.`]}),_jsx(Frame,{caption:`Keep the defaults and select Create.`,children:_jsx(OptimizedImage,{src:`https://mintcdn.com/thread/q5JFhE-rMm8MULaC/images/voice-sip-trunks/3cx-add-template.jpg?fit=max\u0026auto=format\u0026n=q5JFhE-rMm8MULaC\u0026q=85\u0026s=3e79d4f30ce5879c8f5e423462476f19`,alt:`3CX Add Template dialog with the template name ThreadVoiceAI, country and trunk field visibility options, and a Create button`,\"data-og-width\":`448`,width:`448`,\"data-og-height\":`663`,height:`663`,\"data-path\":`images/voice-sip-trunks/3cx-add-template.jpg`,\"data-optimize\":`true`,\"data-opv\":`3`,srcset:`https://mintcdn.com/thread/q5JFhE-rMm8MULaC/images/voice-sip-trunks/3cx-add-template.jpg?w=280\u0026fit=max\u0026auto=format\u0026n=q5JFhE-rMm8MULaC\u0026q=85\u0026s=1866cebf1339a9a8f61205d104e5f58d 280w, https://mintcdn.com/thread/q5JFhE-rMm8MULaC/images/voice-sip-trunks/3cx-add-template.jpg?w=560\u0026fit=max\u0026auto=format\u0026n=q5JFhE-rMm8MULaC\u0026q=85\u0026s=1164c1fcc88e145f5b632bca613ace3d 560w, https://mintcdn.com/thread/q5JFhE-rMm8MULaC/images/voice-sip-trunks/3cx-add-template.jpg?w=840\u0026fit=max\u0026auto=format\u0026n=q5JFhE-rMm8MULaC\u0026q=85\u0026s=e4743a4c26b86be24b5cb25c05e3565d 840w, https://mintcdn.com/thread/q5JFhE-rMm8MULaC/images/voice-sip-trunks/3cx-add-template.jpg?w=1100\u0026fit=max\u0026auto=format\u0026n=q5JFhE-rMm8MULaC\u0026q=85\u0026s=3811db8c8ee41b4c035e7ba64a8adb5f 1100w, https://mintcdn.com/thread/q5JFhE-rMm8MULaC/images/voice-sip-trunks/3cx-add-template.jpg?w=1650\u0026fit=max\u0026auto=format\u0026n=q5JFhE-rMm8MULaC\u0026q=85\u0026s=fbb9491eb2e36ad76c5195ce51d0f090 1650w, https://mintcdn.com/thread/q5JFhE-rMm8MULaC/images/voice-sip-trunks/3cx-add-template.jpg?w=2500\u0026fit=max\u0026auto=format\u0026n=q5JFhE-rMm8MULaC\u0026q=85\u0026s=e0f1fc25255f965c77f76d8a0fc0e4a5 2500w`})})]}),_jsxs(Step,{title:`Switch your transfer trunk to the template`,stepNumber:2,children:[_jsxs(_components.p,{children:[`In `,_jsx(_components.strong,{children:`Voice \u0026 Chat`}),`, open the menu (⋮) on the trunk that receives Thread’s transfers today and select `,_jsx(_components.strong,{children:`Switch Template`}),`. Set `,_jsx(_components.strong,{children:`Provider`}),` to `,_jsx(_components.strong,{children:`Thread Voice AI`}),` and select `,_jsx(_components.strong,{children:`OK`}),`. Your 3CX keeps using the same trunk for both directions.`]}),_jsxs(_components.p,{children:[`Switching keeps the trunk’s name, Main Trunk Number, authentication, DIDs, call limit, caller ID and codec settings. It clears Registrar/Server, and on the `,_jsx(_components.strong,{children:`Options`}),` tab it sets Transport Protocol to Any and SRTP Mode to Disabled. 3CX won’t save the trunk until Registrar/Server is filled in again, so nothing changes for live calls yet. Leave the trunk’s settings open; steps 6 to 8 fill them back in.`]}),_jsx(Frame,{caption:`Switch Template is in the trunk's menu in Voice \u0026 Chat.`,children:_jsx(OptimizedImage,{src:`https://mintcdn.com/thread/q5JFhE-rMm8MULaC/images/voice-sip-trunks/3cx-switch-template.jpg?fit=max\u0026auto=format\u0026n=q5JFhE-rMm8MULaC\u0026q=85\u0026s=1a85250def423376286fcec483ab005c`,alt:`3CX trunk row menu with Edit Trunk, Delete Trunk, Refresh Registration, Check SIP Trunk, Switch Template, Sync Template and View Template`,\"data-og-width\":`203`,width:`203`,\"data-og-height\":`240`,height:`240`,\"data-path\":`images/voice-sip-trunks/3cx-switch-template.jpg`,\"data-optimize\":`true`,\"data-opv\":`3`,srcset:`https://mintcdn.com/thread/q5JFhE-rMm8MULaC/images/voice-sip-trunks/3cx-switch-template.jpg?w=280\u0026fit=max\u0026auto=format\u0026n=q5JFhE-rMm8MULaC\u0026q=85\u0026s=b57b50b6cc286b600fcf05d222f7c73f 280w, https://mintcdn.com/thread/q5JFhE-rMm8MULaC/images/voice-sip-trunks/3cx-switch-template.jpg?w=560\u0026fit=max\u0026auto=format\u0026n=q5JFhE-rMm8MULaC\u0026q=85\u0026s=b0c1d2d7081ace7dcf81937327ea4b9d 560w, https://mintcdn.com/thread/q5JFhE-rMm8MULaC/images/voice-sip-trunks/3cx-switch-template.jpg?w=840\u0026fit=max\u0026auto=format\u0026n=q5JFhE-rMm8MULaC\u0026q=85\u0026s=850c23f512cca63855cb3aaa4955b623 840w, https://mintcdn.com/thread/q5JFhE-rMm8MULaC/images/voice-sip-trunks/3cx-switch-template.jpg?w=1100\u0026fit=max\u0026auto=format\u0026n=q5JFhE-rMm8MULaC\u0026q=85\u0026s=d27da43c65569e614273342fc990af37 1100w, https://mintcdn.com/thread/q5JFhE-rMm8MULaC/images/voice-sip-trunks/3cx-switch-template.jpg?w=1650\u0026fit=max\u0026auto=format\u0026n=q5JFhE-rMm8MULaC\u0026q=85\u0026s=51d1f445ba6fcdedc15b43d71beb8b0e 1650w, https://mintcdn.com/thread/q5JFhE-rMm8MULaC/images/voice-sip-trunks/3cx-switch-template.jpg?w=2500\u0026fit=max\u0026auto=format\u0026n=q5JFhE-rMm8MULaC\u0026q=85\u0026s=c4616275e8ce29ff7a6d269101b7f6cd 2500w`})}),_jsx(Frame,{caption:`Pick Thread Voice AI as the provider. It appears once the template is installed.`,children:_jsx(OptimizedImage,{src:`https://mintcdn.com/thread/q5JFhE-rMm8MULaC/images/voice-sip-trunks/3cx-choose-provider.jpg?fit=max\u0026auto=format\u0026n=q5JFhE-rMm8MULaC\u0026q=85\u0026s=7690b4b2dfb8974378a5e3673a2eea6b`,alt:`3CX Choose your SIP Trunk VoIP Provider dialog with Provider set to Thread Voice AI`,\"data-og-width\":`440`,width:`440`,\"data-og-height\":`287`,height:`287`,\"data-path\":`images/voice-sip-trunks/3cx-choose-provider.jpg`,\"data-optimize\":`true`,\"data-opv\":`3`,srcset:`https://mintcdn.com/thread/q5JFhE-rMm8MULaC/images/voice-sip-trunks/3cx-choose-provider.jpg?w=280\u0026fit=max\u0026auto=format\u0026n=q5JFhE-rMm8MULaC\u0026q=85\u0026s=b5741e12a08d17e280f8e0edaec9a6e4 280w, https://mintcdn.com/thread/q5JFhE-rMm8MULaC/images/voice-sip-trunks/3cx-choose-provider.jpg?w=560\u0026fit=max\u0026auto=format\u0026n=q5JFhE-rMm8MULaC\u0026q=85\u0026s=b59421262cde7ee2ca1051fd9b997d23 560w, https://mintcdn.com/thread/q5JFhE-rMm8MULaC/images/voice-sip-trunks/3cx-choose-provider.jpg?w=840\u0026fit=max\u0026auto=format\u0026n=q5JFhE-rMm8MULaC\u0026q=85\u0026s=8b512d507c838d6fbb4ac911228fc2a1 840w, https://mintcdn.com/thread/q5JFhE-rMm8MULaC/images/voice-sip-trunks/3cx-choose-provider.jpg?w=1100\u0026fit=max\u0026auto=format\u0026n=q5JFhE-rMm8MULaC\u0026q=85\u0026s=6df2896a56d010b79ff19fd401322267 1100w, https://mintcdn.com/thread/q5JFhE-rMm8MULaC/images/voice-sip-trunks/3cx-choose-provider.jpg?w=1650\u0026fit=max\u0026auto=format\u0026n=q5JFhE-rMm8MULaC\u0026q=85\u0026s=4defcd00288a87fca80852198acbe1cb 1650w, https://mintcdn.com/thread/q5JFhE-rMm8MULaC/images/voice-sip-trunks/3cx-choose-provider.jpg?w=2500\u0026fit=max\u0026auto=format\u0026n=q5JFhE-rMm8MULaC\u0026q=85\u0026s=02f8255585623bedfed9459b0d3bd3b7 2500w`})})]})]}),`\n`,_jsx(Heading,{level:`2`,id:`in-thread-copy-thread’s-sip-address-and-set-encryption`,children:`In Thread: copy Thread’s SIP address and set encryption`}),`\n`,_jsxs(Steps,{children:[_jsxs(Step,{title:`Open your existing trunk`,stepNumber:3,children:[_jsxs(_components.p,{children:[`In a new tab, go to `,_jsx(_components.strong,{children:`Voice > SIP Trunks \u0026 Caller ID`}),` and open the trunk. Its outbound side shows `,_jsx(_components.strong,{children:`Configured`}),` with its switch on, and the inbound side shows `,_jsx(_components.strong,{children:`Optional`}),`.`]}),_jsx(Frame,{caption:`Starting point: outbound only, with your agents linked.`,children:_jsx(OptimizedImage,{src:`https://mintcdn.com/thread/q5JFhE-rMm8MULaC/images/voice-sip-trunks/thread-existing-trunk.jpg?fit=max\u0026auto=format\u0026n=q5JFhE-rMm8MULaC\u0026q=85\u0026s=712cde58d434e6256e00dbe38395fc37`,alt:`Trunk page with Inbound trunk Optional and a Set up trunk button, Outbound trunk Configured over TLS+SRTP with its switch on, and one linked agent`,\"data-og-width\":`1279`,width:`1279`,\"data-og-height\":`952`,height:`952`,\"data-path\":`images/voice-sip-trunks/thread-existing-trunk.jpg`,\"data-optimize\":`true`,\"data-opv\":`3`,srcset:`https://mintcdn.com/thread/q5JFhE-rMm8MULaC/images/voice-sip-trunks/thread-existing-trunk.jpg?w=280\u0026fit=max\u0026auto=format\u0026n=q5JFhE-rMm8MULaC\u0026q=85\u0026s=a0b1a9c63df540f6579f2dd8fda4300f 280w, https://mintcdn.com/thread/q5JFhE-rMm8MULaC/images/voice-sip-trunks/thread-existing-trunk.jpg?w=560\u0026fit=max\u0026auto=format\u0026n=q5JFhE-rMm8MULaC\u0026q=85\u0026s=7182a681f6e6abde2fbc18b4dccd70f6 560w, https://mintcdn.com/thread/q5JFhE-rMm8MULaC/images/voice-sip-trunks/thread-existing-trunk.jpg?w=840\u0026fit=max\u0026auto=format\u0026n=q5JFhE-rMm8MULaC\u0026q=85\u0026s=32cd746fd8aa76bcfae78227085eae5c 840w, https://mintcdn.com/thread/q5JFhE-rMm8MULaC/images/voice-sip-trunks/thread-existing-trunk.jpg?w=1100\u0026fit=max\u0026auto=format\u0026n=q5JFhE-rMm8MULaC\u0026q=85\u0026s=e19bf5fcd4ef7e3c1c868d86d1172c36 1100w, https://mintcdn.com/thread/q5JFhE-rMm8MULaC/images/voice-sip-trunks/thread-existing-trunk.jpg?w=1650\u0026fit=max\u0026auto=format\u0026n=q5JFhE-rMm8MULaC\u0026q=85\u0026s=5735b656153853f2ed20f131a722461e 1650w, https://mintcdn.com/thread/q5JFhE-rMm8MULaC/images/voice-sip-trunks/thread-existing-trunk.jpg?w=2500\u0026fit=max\u0026auto=format\u0026n=q5JFhE-rMm8MULaC\u0026q=85\u0026s=34ab4f0cd2a35ace6120b41e63a27f4d 2500w`})})]}),_jsxs(Step,{title:`Under Inbound trunk, select Set up trunk`,stepNumber:4,children:[_jsxs(_components.p,{children:[`Step 1 shows `,_jsx(_components.strong,{children:`Thread’s SIP address`}),`. Copy it for the 3CX trunk. Set `,_jsx(_components.strong,{children:`Media encryption`}),` to `,_jsx(_components.strong,{children:`Required`}),` (recommended) so the audio of every forwarded call is encrypted with SRTP. Choose `,_jsx(_components.strong,{children:`Disabled`}),` only if you won’t turn SRTP on in 3CX.`]}),_jsx(Frame,{caption:`Thread's SIP address in the inbound settings`,children:_jsx(OptimizedImage,{src:`https://mintcdn.com/thread/q5JFhE-rMm8MULaC/images/voice-sip-trunks/inbound-sip-address.jpg?fit=max\u0026auto=format\u0026n=q5JFhE-rMm8MULaC\u0026q=85\u0026s=1b18634c53bc39532e0065d3b602a39e`,alt:`Thread inbound trunk settings step 1, Point your phone system to Thread, with Thread's SIP address and media encryption set to Required`,\"data-og-width\":`1376`,width:`1376`,\"data-og-height\":`868`,height:`868`,\"data-path\":`images/voice-sip-trunks/inbound-sip-address.jpg`,\"data-optimize\":`true`,\"data-opv\":`3`,srcset:`https://mintcdn.com/thread/q5JFhE-rMm8MULaC/images/voice-sip-trunks/inbound-sip-address.jpg?w=280\u0026fit=max\u0026auto=format\u0026n=q5JFhE-rMm8MULaC\u0026q=85\u0026s=d5841fd4a31dab76352db528ccf49405 280w, https://mintcdn.com/thread/q5JFhE-rMm8MULaC/images/voice-sip-trunks/inbound-sip-address.jpg?w=560\u0026fit=max\u0026auto=format\u0026n=q5JFhE-rMm8MULaC\u0026q=85\u0026s=0971effb7d23cb1879ae857589885c25 560w, https://mintcdn.com/thread/q5JFhE-rMm8MULaC/images/voice-sip-trunks/inbound-sip-address.jpg?w=840\u0026fit=max\u0026auto=format\u0026n=q5JFhE-rMm8MULaC\u0026q=85\u0026s=74b40ca6b0c44649b3e6509b762bcd48 840w, https://mintcdn.com/thread/q5JFhE-rMm8MULaC/images/voice-sip-trunks/inbound-sip-address.jpg?w=1100\u0026fit=max\u0026auto=format\u0026n=q5JFhE-rMm8MULaC\u0026q=85\u0026s=fc339d8a7726ab5591f3fb14e6c37247 1100w, https://mintcdn.com/thread/q5JFhE-rMm8MULaC/images/voice-sip-trunks/inbound-sip-address.jpg?w=1650\u0026fit=max\u0026auto=format\u0026n=q5JFhE-rMm8MULaC\u0026q=85\u0026s=f88de61a5a9d122bfe9df49e31ff1c80 1650w, https://mintcdn.com/thread/q5JFhE-rMm8MULaC/images/voice-sip-trunks/inbound-sip-address.jpg?w=2500\u0026fit=max\u0026auto=format\u0026n=q5JFhE-rMm8MULaC\u0026q=85\u0026s=0a6990ad1ff3e3e6458d85764abb608e 2500w`})})]}),_jsxs(Step,{title:`Choose how Thread recognizes your 3CX`,stepNumber:5,children:[_jsx(_components.p,{children:`Pick one option. The 3CX settings in step 7 change to match.`}),_jsxs(_components.ul,{children:[`\n`,_jsxs(_components.li,{children:[_jsx(_components.strong,{children:`Allowed addresses`}),`: Thread accepts calls only from the IPs you list, one per line. 3CX shows its public IP on every trunk page, next to `,_jsx(_components.strong,{children:`Use this IP for Whitelisting`}),`.`]}),`\n`,_jsxs(_components.li,{children:[_jsx(_components.strong,{children:`Username and password`}),`: 3CX answers a challenge on every call. Pick a username unique to this trunk and a long, randomly generated password (20 or more characters from a password manager). Don’t reuse credentials from anywhere else or use defaults like admin/admin. Keep them for step 7. Choose this if your 3CX is hosted and shares an IP with other customers.`]}),`\n`,_jsxs(_components.li,{children:[_jsx(_components.strong,{children:`Leave the address list empty`}),`: Thread accepts calls from any address. Anyone who knows Thread’s SIP address and your agent’s number can then call the agent with any caller number, so prefer one of the options above.`]}),`\n`]}),_jsx(Frame,{caption:`Allowed addresses: one IP or CIDR block per line. Left empty, any address is allowed.`,children:_jsx(OptimizedImage,{src:`https://mintcdn.com/thread/q5JFhE-rMm8MULaC/images/voice-sip-trunks/inbound-restrict-addresses.jpg?fit=max\u0026auto=format\u0026n=q5JFhE-rMm8MULaC\u0026q=85\u0026s=dc8d4da591be260983bac8f120a0ecff`,alt:`Inbound step 2, Restrict who can call, with Allowed addresses chosen and a text area for IP addresses or CIDR blocks`,\"data-og-width\":`1376`,width:`1376`,\"data-og-height\":`868`,height:`868`,\"data-path\":`images/voice-sip-trunks/inbound-restrict-addresses.jpg`,\"data-optimize\":`true`,\"data-opv\":`3`,srcset:`https://mintcdn.com/thread/q5JFhE-rMm8MULaC/images/voice-sip-trunks/inbound-restrict-addresses.jpg?w=280\u0026fit=max\u0026auto=format\u0026n=q5JFhE-rMm8MULaC\u0026q=85\u0026s=d2db5388f437c7a82196e6cd1405d02c 280w, https://mintcdn.com/thread/q5JFhE-rMm8MULaC/images/voice-sip-trunks/inbound-restrict-addresses.jpg?w=560\u0026fit=max\u0026auto=format\u0026n=q5JFhE-rMm8MULaC\u0026q=85\u0026s=334d709f2b0d51ecaa43640a06f8795e 560w, https://mintcdn.com/thread/q5JFhE-rMm8MULaC/images/voice-sip-trunks/inbound-restrict-addresses.jpg?w=840\u0026fit=max\u0026auto=format\u0026n=q5JFhE-rMm8MULaC\u0026q=85\u0026s=154eff8d69503c77c175de7d61607e3e 840w, https://mintcdn.com/thread/q5JFhE-rMm8MULaC/images/voice-sip-trunks/inbound-restrict-addresses.jpg?w=1100\u0026fit=max\u0026auto=format\u0026n=q5JFhE-rMm8MULaC\u0026q=85\u0026s=ec5a536ec81592bc3b2ae1cf63297089 1100w, https://mintcdn.com/thread/q5JFhE-rMm8MULaC/images/voice-sip-trunks/inbound-restrict-addresses.jpg?w=1650\u0026fit=max\u0026auto=format\u0026n=q5JFhE-rMm8MULaC\u0026q=85\u0026s=8d30f58f95711a4cac7907ab4e907bac 1650w, https://mintcdn.com/thread/q5JFhE-rMm8MULaC/images/voice-sip-trunks/inbound-restrict-addresses.jpg?w=2500\u0026fit=max\u0026auto=format\u0026n=q5JFhE-rMm8MULaC\u0026q=85\u0026s=452f5ca4598680096d0f81fe5222e015 2500w`})}),_jsx(Frame,{caption:`Username and password. These are separate from any outbound credentials.`,children:_jsx(OptimizedImage,{src:`https://mintcdn.com/thread/q5JFhE-rMm8MULaC/images/voice-sip-trunks/inbound-restrict-credentials.jpg?fit=max\u0026auto=format\u0026n=q5JFhE-rMm8MULaC\u0026q=85\u0026s=db65ae15c2aabe3f7e0cc981b842a6f8`,alt:`Inbound step 2 with Username and password chosen, a username filled in and the password field below it`,\"data-og-width\":`1369`,width:`1369`,\"data-og-height\":`896`,height:`896`,\"data-path\":`images/voice-sip-trunks/inbound-restrict-credentials.jpg`,\"data-optimize\":`true`,\"data-opv\":`3`,srcset:`https://mintcdn.com/thread/q5JFhE-rMm8MULaC/images/voice-sip-trunks/inbound-restrict-credentials.jpg?w=280\u0026fit=max\u0026auto=format\u0026n=q5JFhE-rMm8MULaC\u0026q=85\u0026s=8e5b0f7b9ecf9f11a5bc2a86dd039814 280w, https://mintcdn.com/thread/q5JFhE-rMm8MULaC/images/voice-sip-trunks/inbound-restrict-credentials.jpg?w=560\u0026fit=max\u0026auto=format\u0026n=q5JFhE-rMm8MULaC\u0026q=85\u0026s=ddae3b0af6f9e05cc02afd320b634508 560w, https://mintcdn.com/thread/q5JFhE-rMm8MULaC/images/voice-sip-trunks/inbound-restrict-credentials.jpg?w=840\u0026fit=max\u0026auto=format\u0026n=q5JFhE-rMm8MULaC\u0026q=85\u0026s=3b8df9135880460c0139dbe4ce9831fd 840w, https://mintcdn.com/thread/q5JFhE-rMm8MULaC/images/voice-sip-trunks/inbound-restrict-credentials.jpg?w=1100\u0026fit=max\u0026auto=format\u0026n=q5JFhE-rMm8MULaC\u0026q=85\u0026s=72e880cbb07d9b6bba983631f75f34ea 1100w, https://mintcdn.com/thread/q5JFhE-rMm8MULaC/images/voice-sip-trunks/inbound-restrict-credentials.jpg?w=1650\u0026fit=max\u0026auto=format\u0026n=q5JFhE-rMm8MULaC\u0026q=85\u0026s=2aeba61b52b47f0b58c6478aece06ae0 1650w, https://mintcdn.com/thread/q5JFhE-rMm8MULaC/images/voice-sip-trunks/inbound-restrict-credentials.jpg?w=2500\u0026fit=max\u0026auto=format\u0026n=q5JFhE-rMm8MULaC\u0026q=85\u0026s=364869e7f8345c606c7bf08bb03fda8f 2500w`})}),_jsxs(_components.p,{children:[`Select `,_jsx(_components.strong,{children:`Continue`}),`, and leave this page open.`]})]})]}),`\n`,_jsx(Heading,{level:`2`,id:`in-3cx-point-the-trunk-at-thread`,children:`In 3CX: point the trunk at Thread`}),`\n`,_jsxs(Steps,{children:[_jsxs(Step,{title:`Name the trunk and paste Thread's SIP address`,stepNumber:6,children:[_jsxs(_components.p,{children:[`Back on the trunk’s `,_jsx(_components.strong,{children:`General`}),` tab, check its `,_jsx(_components.strong,{children:`Name`}),` and `,_jsx(_components.strong,{children:`Main Trunk Number`}),`. Under `,_jsx(_components.strong,{children:`Server Details`}),`, paste Thread’s SIP address into `,_jsx(_components.strong,{children:`Registrar/Server`}),` and keep `,_jsx(_components.strong,{children:`Port`}),` on `,_jsx(_components.code,{children:`5060`}),`. Leave `,_jsx(_components.strong,{children:`Outbound Proxy`}),` empty.`]}),_jsx(Frame,{caption:`Name, Main Trunk Number and Registrar/Server filled in. Port stays on 5060.`,children:_jsx(OptimizedImage,{src:`https://mintcdn.com/thread/q5JFhE-rMm8MULaC/images/voice-sip-trunks/3cx-trunk-name-registrar.jpg?fit=max\u0026auto=format\u0026n=q5JFhE-rMm8MULaC\u0026q=85\u0026s=614ffa99a5ae53564a9a32b4ee4f0fa5`,alt:`3CX trunk General tab with Name Thread Voice AI, a Main Trunk Number, and Registrar/Server set to Thread's SIP address on port 5060`,\"data-og-width\":`760`,width:`760`,\"data-og-height\":`674`,height:`674`,\"data-path\":`images/voice-sip-trunks/3cx-trunk-name-registrar.jpg`,\"data-optimize\":`true`,\"data-opv\":`3`,srcset:`https://mintcdn.com/thread/q5JFhE-rMm8MULaC/images/voice-sip-trunks/3cx-trunk-name-registrar.jpg?w=280\u0026fit=max\u0026auto=format\u0026n=q5JFhE-rMm8MULaC\u0026q=85\u0026s=3d147f44171457afdcad7ec0019e61c9 280w, https://mintcdn.com/thread/q5JFhE-rMm8MULaC/images/voice-sip-trunks/3cx-trunk-name-registrar.jpg?w=560\u0026fit=max\u0026auto=format\u0026n=q5JFhE-rMm8MULaC\u0026q=85\u0026s=a3799baaa42d4082ff001060668efde0 560w, https://mintcdn.com/thread/q5JFhE-rMm8MULaC/images/voice-sip-trunks/3cx-trunk-name-registrar.jpg?w=840\u0026fit=max\u0026auto=format\u0026n=q5JFhE-rMm8MULaC\u0026q=85\u0026s=47f2d20d7b27609f3260bc751c417446 840w, https://mintcdn.com/thread/q5JFhE-rMm8MULaC/images/voice-sip-trunks/3cx-trunk-name-registrar.jpg?w=1100\u0026fit=max\u0026auto=format\u0026n=q5JFhE-rMm8MULaC\u0026q=85\u0026s=91034873315e4a9a3a884670ae45b4c7 1100w, https://mintcdn.com/thread/q5JFhE-rMm8MULaC/images/voice-sip-trunks/3cx-trunk-name-registrar.jpg?w=1650\u0026fit=max\u0026auto=format\u0026n=q5JFhE-rMm8MULaC\u0026q=85\u0026s=f7756e10e75153442a6fb733f2969641 1650w, https://mintcdn.com/thread/q5JFhE-rMm8MULaC/images/voice-sip-trunks/3cx-trunk-name-registrar.jpg?w=2500\u0026fit=max\u0026auto=format\u0026n=q5JFhE-rMm8MULaC\u0026q=85\u0026s=9d3fb9b78fecc0aac8f42048892fd55b 2500w`})}),_jsx(Warning,{children:_jsxs(_components.p,{children:[`Keep the Registrar port on `,_jsx(_components.code,{children:`5060`}),`, because 3CX can’t send calls to Thread over TLS. Thread’s SIP address uses a wildcard certificate (`,_jsx(_components.code,{children:`*.sip.livekit.cloud`}),`), and 3CX only accepts a certificate that matches the trunk’s Registrar name exactly, with no setting to relax that check. On TLS, 3CX fails the forward with `,_jsx(_components.code,{children:`503 Certificate Name Mismatch`}),` (shown as `,_jsx(_components.code,{children:`503 Service Unavailable`}),` in the Event Log) before the call reaches Thread. SRTP still encrypts the call audio.`]})})]}),_jsxs(Step,{title:`Fill in authentication to match step 5`,stepNumber:7,children:[_jsx(_components.p,{children:`On the same tab, use the row for the option you chose in step 5:`}),_jsxs(Table,{children:[_jsx(_components.thead,{children:_jsxs(_components.tr,{children:[_jsx(_components.th,{children:`If you chose in Thread`}),_jsxs(_components.th,{children:[`3CX `,_jsx(_components.strong,{children:`Type of authentication`})]}),_jsxs(_components.th,{children:[`3CX `,_jsx(_components.strong,{children:`Authentication ID`}),` and `,_jsx(_components.strong,{children:`Authentication password`})]})]})}),_jsxs(_components.tbody,{children:[_jsxs(_components.tr,{children:[_jsx(_components.td,{children:_jsx(_components.strong,{children:`Allowed addresses`})}),_jsx(_components.td,{children:_jsx(_components.strong,{children:`Do not require - IP based`})}),_jsx(_components.td,{children:`Leave empty`})]}),_jsxs(_components.tr,{children:[_jsx(_components.td,{children:_jsx(_components.strong,{children:`Username and password`})}),_jsx(_components.td,{children:_jsx(_components.strong,{children:`Do not require - IP based`})}),_jsx(_components.td,{children:`The username and password you chose`})]})]})]}),_jsx(Frame,{caption:`The username and password version. For allowed addresses, leave both credential fields empty.`,children:_jsx(OptimizedImage,{src:`https://mintcdn.com/thread/q5JFhE-rMm8MULaC/images/voice-sip-trunks/3cx-trunk-general.jpg?fit=max\u0026auto=format\u0026n=q5JFhE-rMm8MULaC\u0026q=85\u0026s=ea3737c0c9d672be7d79a863cd528e29`,alt:`3CX trunk General tab with an authentication ID and password filled in, Do not require - IP based authentication, and Thread's SIP address as the registrar on port 5060`,\"data-og-width\":`845`,width:`845`,\"data-og-height\":`440`,height:`440`,\"data-path\":`images/voice-sip-trunks/3cx-trunk-general.jpg`,\"data-optimize\":`true`,\"data-opv\":`3`,srcset:`https://mintcdn.com/thread/q5JFhE-rMm8MULaC/images/voice-sip-trunks/3cx-trunk-general.jpg?w=280\u0026fit=max\u0026auto=format\u0026n=q5JFhE-rMm8MULaC\u0026q=85\u0026s=1f6235df336a2890b011ef8c194bb1df 280w, https://mintcdn.com/thread/q5JFhE-rMm8MULaC/images/voice-sip-trunks/3cx-trunk-general.jpg?w=560\u0026fit=max\u0026auto=format\u0026n=q5JFhE-rMm8MULaC\u0026q=85\u0026s=565f5a994bd3d9cc9144aa37abe9419a 560w, https://mintcdn.com/thread/q5JFhE-rMm8MULaC/images/voice-sip-trunks/3cx-trunk-general.jpg?w=840\u0026fit=max\u0026auto=format\u0026n=q5JFhE-rMm8MULaC\u0026q=85\u0026s=38ee2312e7ad2653c6328b7bcc5549c6 840w, https://mintcdn.com/thread/q5JFhE-rMm8MULaC/images/voice-sip-trunks/3cx-trunk-general.jpg?w=1100\u0026fit=max\u0026auto=format\u0026n=q5JFhE-rMm8MULaC\u0026q=85\u0026s=d208114b2b1df049d6596b9094c58fa5 1100w, https://mintcdn.com/thread/q5JFhE-rMm8MULaC/images/voice-sip-trunks/3cx-trunk-general.jpg?w=1650\u0026fit=max\u0026auto=format\u0026n=q5JFhE-rMm8MULaC\u0026q=85\u0026s=b57c8d2eade3bb83761a1b2f8d2c37eb 1650w, https://mintcdn.com/thread/q5JFhE-rMm8MULaC/images/voice-sip-trunks/3cx-trunk-general.jpg?w=2500\u0026fit=max\u0026auto=format\u0026n=q5JFhE-rMm8MULaC\u0026q=85\u0026s=aaa01bf90ebec13889b5873d8154a163 2500w`})}),_jsx(Warning,{children:_jsxs(_components.p,{children:[`Use `,_jsx(_components.strong,{children:`Do not require - IP based`}),` for both options; 3CX still answers Thread’s password challenge on each call. `,_jsx(_components.strong,{children:`Outbound - outbound only`}),` and `,_jsx(_components.strong,{children:`Register/Account based`}),` make 3CX register with Thread, which answers `,_jsx(_components.code,{children:`405 Method Not Allowed`}),`. 3CX then treats the trunk as down, and the call fails or falls through to a backup route.`]})})]}),_jsxs(Step,{title:`Set encryption to match step 4, then save`,stepNumber:8,children:[_jsxs(_components.p,{children:[`Open the trunk’s `,_jsx(_components.strong,{children:`Options`}),` tab. Switching the template reset SRTP Mode, so set it again to match Thread’s media encryption. Encrypted audio is the recommended choice. Then select `,_jsx(_components.strong,{children:`Save`}),`.`]}),_jsxs(Table,{children:[_jsx(_components.thead,{children:_jsxs(_components.tr,{children:[_jsx(_components.th,{children:`In Thread: inbound media encryption · outbound transport`}),_jsxs(_components.th,{children:[`3CX `,_jsx(_components.strong,{children:`SRTP Mode`})]})]})}),_jsxs(_components.tbody,{children:[_jsxs(_components.tr,{children:[_jsxs(_components.td,{children:[_jsx(_components.strong,{children:`Required`}),` · `,_jsx(_components.strong,{children:`TLS+SRTP`}),` (recommended)`]}),_jsx(_components.td,{children:_jsx(_components.strong,{children:`Enforced`})})]}),_jsxs(_components.tr,{children:[_jsxs(_components.td,{children:[_jsx(_components.strong,{children:`Disabled`}),` · `,_jsx(_components.strong,{children:`TLS`})]}),_jsx(_components.td,{children:_jsx(_components.strong,{children:`Disabled`})})]})]})]}),_jsx(Frame,{caption:`SRTP Mode set to Enforced. Transport Protocol can stay on the template's setting.`,children:_jsx(OptimizedImage,{src:`https://mintcdn.com/thread/q5JFhE-rMm8MULaC/images/voice-sip-trunks/3cx-srtp-mode.jpg?fit=max\u0026auto=format\u0026n=q5JFhE-rMm8MULaC\u0026q=85\u0026s=668cf71b3df7b2817ba29b7cb8aa6c63`,alt:`3CX trunk Options tab, Configuration section, with Transport Protocol UDP and SRTP Mode Enforced`,\"data-og-width\":`1568`,width:`1568`,\"data-og-height\":`451`,height:`451`,\"data-path\":`images/voice-sip-trunks/3cx-srtp-mode.jpg`,\"data-optimize\":`true`,\"data-opv\":`3`,srcset:`https://mintcdn.com/thread/q5JFhE-rMm8MULaC/images/voice-sip-trunks/3cx-srtp-mode.jpg?w=280\u0026fit=max\u0026auto=format\u0026n=q5JFhE-rMm8MULaC\u0026q=85\u0026s=cb77bba78af23992f1de9eefb73b2734 280w, https://mintcdn.com/thread/q5JFhE-rMm8MULaC/images/voice-sip-trunks/3cx-srtp-mode.jpg?w=560\u0026fit=max\u0026auto=format\u0026n=q5JFhE-rMm8MULaC\u0026q=85\u0026s=9322023981ef1078f6f1a3ee888ab9e8 560w, https://mintcdn.com/thread/q5JFhE-rMm8MULaC/images/voice-sip-trunks/3cx-srtp-mode.jpg?w=840\u0026fit=max\u0026auto=format\u0026n=q5JFhE-rMm8MULaC\u0026q=85\u0026s=6ea05e8bd261a58eccb3a5b755ba87d8 840w, https://mintcdn.com/thread/q5JFhE-rMm8MULaC/images/voice-sip-trunks/3cx-srtp-mode.jpg?w=1100\u0026fit=max\u0026auto=format\u0026n=q5JFhE-rMm8MULaC\u0026q=85\u0026s=651fe15ce1e254674c36dc7ca32f52e8 1100w, https://mintcdn.com/thread/q5JFhE-rMm8MULaC/images/voice-sip-trunks/3cx-srtp-mode.jpg?w=1650\u0026fit=max\u0026auto=format\u0026n=q5JFhE-rMm8MULaC\u0026q=85\u0026s=6632759f9640c67cc112a844315cdb74 1650w, https://mintcdn.com/thread/q5JFhE-rMm8MULaC/images/voice-sip-trunks/3cx-srtp-mode.jpg?w=2500\u0026fit=max\u0026auto=format\u0026n=q5JFhE-rMm8MULaC\u0026q=85\u0026s=2ee34ee31e844ccceff4b7a77b96309f 2500w`})})]}),_jsxs(Step,{title:`Check that the transfer number is still a DID`,stepNumber:9,children:[_jsxs(_components.p,{children:[`On the trunk’s `,_jsx(_components.strong,{children:`DID Numbers`}),` tab, make sure the number your Thread Attendant agent transfers to is still listed, and add it if it isn’t. 3CX accepts a call from Thread only when it arrives on a DID the trunk knows. Select `,_jsx(_components.strong,{children:`Save`}),`.`]}),_jsx(Frame,{caption:`The transfer number listed in E.164 format.`,children:_jsx(OptimizedImage,{src:`https://mintcdn.com/thread/q5JFhE-rMm8MULaC/images/voice-sip-trunks/3cx-transfer-did.jpg?fit=max\u0026auto=format\u0026n=q5JFhE-rMm8MULaC\u0026q=85\u0026s=defab4123926164789f78fec7847b537`,alt:`3CX trunk DID Numbers tab with +12025550110 listed as a DID`,\"data-og-width\":`900`,width:`900`,\"data-og-height\":`262`,height:`262`,\"data-path\":`images/voice-sip-trunks/3cx-transfer-did.jpg`,\"data-optimize\":`true`,\"data-opv\":`3`,srcset:`https://mintcdn.com/thread/q5JFhE-rMm8MULaC/images/voice-sip-trunks/3cx-transfer-did.jpg?w=280\u0026fit=max\u0026auto=format\u0026n=q5JFhE-rMm8MULaC\u0026q=85\u0026s=eda063284f06daaca794cbcdc66dd6b8 280w, https://mintcdn.com/thread/q5JFhE-rMm8MULaC/images/voice-sip-trunks/3cx-transfer-did.jpg?w=560\u0026fit=max\u0026auto=format\u0026n=q5JFhE-rMm8MULaC\u0026q=85\u0026s=91afe88ca95df74ecf86fb5687f0dd5d 560w, https://mintcdn.com/thread/q5JFhE-rMm8MULaC/images/voice-sip-trunks/3cx-transfer-did.jpg?w=840\u0026fit=max\u0026auto=format\u0026n=q5JFhE-rMm8MULaC\u0026q=85\u0026s=e1144b01fdcbeee8f90274bda8e8b70f 840w, https://mintcdn.com/thread/q5JFhE-rMm8MULaC/images/voice-sip-trunks/3cx-transfer-did.jpg?w=1100\u0026fit=max\u0026auto=format\u0026n=q5JFhE-rMm8MULaC\u0026q=85\u0026s=4f002a31c3c77ae7a0c7a5fc39188407 1100w, https://mintcdn.com/thread/q5JFhE-rMm8MULaC/images/voice-sip-trunks/3cx-transfer-did.jpg?w=1650\u0026fit=max\u0026auto=format\u0026n=q5JFhE-rMm8MULaC\u0026q=85\u0026s=e3b69b01a04bbe2cb3a0cc7fc25cb25d 1650w, https://mintcdn.com/thread/q5JFhE-rMm8MULaC/images/voice-sip-trunks/3cx-transfer-did.jpg?w=2500\u0026fit=max\u0026auto=format\u0026n=q5JFhE-rMm8MULaC\u0026q=85\u0026s=d9143b255482f7b323fe89a8a3a1f314 2500w`})})]}),_jsxs(Step,{title:`Add an Outbound Rule for Thread's test number`,stepNumber:10,children:[_jsxs(_components.p,{children:[`Thread’s test number is in your trunk’s country, from a range that’s never given to real phones, and 3CX dials it as a domestic call. In `,_jsx(_components.strong,{children:`Outbound Rules`}),`, add a rule for it with `,_jsx(_components.strong,{children:`Route 1`}),` on the Thread trunk and `,_jsx(_components.strong,{children:`Strip no digits`}),`. 3CX compares a number after removing your own country code, so the prefix leaves the country code out and `,_jsx(_components.strong,{children:`Prepend`}),` puts it back:`]}),_jsxs(Table,{children:[_jsx(_components.thead,{children:_jsxs(_components.tr,{children:[_jsx(_components.th,{children:`Trunk country`}),_jsx(_components.th,{children:`Test numbers`}),_jsx(_components.th,{children:`Prefix`}),_jsx(_components.th,{children:`Prepend`})]})}),_jsxs(_components.tbody,{children:[_jsxs(_components.tr,{children:[_jsx(_components.td,{children:`US or Canada`}),_jsx(_components.td,{children:_jsx(_components.code,{children:`+1 999 xxx xxxx`})}),_jsx(_components.td,{\"data-numeric\":`true`,children:_jsx(_components.code,{children:`999`})}),_jsx(_components.td,{\"data-numeric\":`true`,children:_jsx(_components.code,{children:`+1`})})]}),_jsxs(_components.tr,{children:[_jsx(_components.td,{children:`United Kingdom`}),_jsx(_components.td,{\"data-numeric\":`true`,children:_jsx(_components.code,{children:`+44 20 7946 0xxx`})}),_jsx(_components.td,{\"data-numeric\":`true`,children:_jsx(_components.code,{children:`2079460`})}),_jsx(_components.td,{\"data-numeric\":`true`,children:_jsx(_components.code,{children:`+44`})})]}),_jsxs(_components.tr,{children:[_jsx(_components.td,{children:`Australia`}),_jsx(_components.td,{children:_jsx(_components.code,{children:`+61 2 5550 xxxx`})}),_jsx(_components.td,{\"data-numeric\":`true`,children:_jsx(_components.code,{children:`25550`})}),_jsx(_components.td,{\"data-numeric\":`true`,children:_jsx(_components.code,{children:`+61`})})]}),_jsxs(_components.tr,{children:[_jsx(_components.td,{children:`Netherlands`}),_jsx(_components.td,{children:_jsx(_components.code,{children:`+31 69 xxx xxxx`})}),_jsx(_components.td,{\"data-numeric\":`true`,children:_jsx(_components.code,{children:`69`})}),_jsx(_components.td,{\"data-numeric\":`true`,children:_jsx(_components.code,{children:`+31`})})]}),_jsxs(_components.tr,{children:[_jsx(_components.td,{children:`New Zealand`}),_jsx(_components.td,{children:_jsx(_components.code,{children:`+64 9 999 xxxx`})}),_jsx(_components.td,{\"data-numeric\":`true`,children:_jsx(_components.code,{children:`9999`})}),_jsx(_components.td,{\"data-numeric\":`true`,children:_jsx(_components.code,{children:`+64`})})]})]})]}),_jsx(_components.p,{children:`The next step dials the test number. Make sure no higher rule catches it first. You can delete this rule once the test passes.`}),_jsx(Frame,{caption:`A US trunk: prefix 999 without the country code, and Prepend +1 puts it back.`,children:_jsx(OptimizedImage,{src:`https://mintcdn.com/thread/q5JFhE-rMm8MULaC/images/voice-sip-trunks/3cx-test-number-rule.jpg?fit=max\u0026auto=format\u0026n=q5JFhE-rMm8MULaC\u0026q=85\u0026s=fdc540490a2266d64fbb9b235ed1b028`,alt:`3CX outbound rule Thread test numbers with prefix 999, and Route 1 on the Thread Voice AI trunk with Strip no digits and Prepend +1`,\"data-og-width\":`760`,width:`760`,\"data-og-height\":`539`,height:`539`,\"data-path\":`images/voice-sip-trunks/3cx-test-number-rule.jpg`,\"data-optimize\":`true`,\"data-opv\":`3`,srcset:`https://mintcdn.com/thread/q5JFhE-rMm8MULaC/images/voice-sip-trunks/3cx-test-number-rule.jpg?w=280\u0026fit=max\u0026auto=format\u0026n=q5JFhE-rMm8MULaC\u0026q=85\u0026s=691237afdfad018c6bd42312c52034ff 280w, https://mintcdn.com/thread/q5JFhE-rMm8MULaC/images/voice-sip-trunks/3cx-test-number-rule.jpg?w=560\u0026fit=max\u0026auto=format\u0026n=q5JFhE-rMm8MULaC\u0026q=85\u0026s=586f628c357594c9d12c106020404d68 560w, https://mintcdn.com/thread/q5JFhE-rMm8MULaC/images/voice-sip-trunks/3cx-test-number-rule.jpg?w=840\u0026fit=max\u0026auto=format\u0026n=q5JFhE-rMm8MULaC\u0026q=85\u0026s=e737a75fab798d0ab1414dcd4283cf7c 840w, https://mintcdn.com/thread/q5JFhE-rMm8MULaC/images/voice-sip-trunks/3cx-test-number-rule.jpg?w=1100\u0026fit=max\u0026auto=format\u0026n=q5JFhE-rMm8MULaC\u0026q=85\u0026s=99e76e9831333b94dbea9735568abc6f 1100w, https://mintcdn.com/thread/q5JFhE-rMm8MULaC/images/voice-sip-trunks/3cx-test-number-rule.jpg?w=1650\u0026fit=max\u0026auto=format\u0026n=q5JFhE-rMm8MULaC\u0026q=85\u0026s=9a756ae8cd60c2ecdc43a24321df2ad5 1650w, https://mintcdn.com/thread/q5JFhE-rMm8MULaC/images/voice-sip-trunks/3cx-test-number-rule.jpg?w=2500\u0026fit=max\u0026auto=format\u0026n=q5JFhE-rMm8MULaC\u0026q=85\u0026s=af56e8658f935b367b5c1c322071540f 2500w`})})]})]}),`\n`,_jsx(Heading,{level:`2`,id:`in-thread-test-the-inbound-side`,children:`In Thread: test the inbound side`}),`\n`,_jsx(Steps,{children:_jsxs(Step,{title:`Test the inbound side`,stepNumber:11,children:[_jsxs(_components.p,{children:[`Back on Thread’s inbound page, at step 3 `,_jsx(_components.strong,{children:`Test connection`}),`, select `,_jsx(_components.strong,{children:`Start listening`}),`. Thread shows a test number in your trunk’s country, which the test rule sends to the Thread trunk. Dial the number from a 3CX extension. The call appears in Thread with the caller and the headers 3CX sent, which confirms your address or credentials and encryption work. 3CX may log the call as busy, because Thread ends test calls right away. Select `,_jsx(_components.strong,{children:`Complete`}),`, then `,_jsx(_components.strong,{children:`Save`}),` at the bottom of the inbound page to return to the trunk page.`]}),_jsxs(_components.p,{children:[`If nothing appears, check the allowed addresses or credentials from steps 5 and 7, that the 3CX trunk sends to port `,_jsx(_components.code,{children:`5060`}),`, and that no higher Outbound Rule catches the test number. Thread can only see calls it accepts, so check your 3CX logs to find out why calls are failing.`]}),_jsx(Frame,{caption:`A call Thread accepted. Expand Headers to see what 3CX sent.`,children:_jsx(OptimizedImage,{src:`https://mintcdn.com/thread/q5JFhE-rMm8MULaC/images/voice-sip-trunks/inbound-test-call.jpg?fit=max\u0026auto=format\u0026n=q5JFhE-rMm8MULaC\u0026q=85\u0026s=17223a8788186ad7dee959e6408f9de9`,alt:`Inbound Test connection step listening, with the test number and SIP host in copy fields, a green Thread accepted this call banner and one received call showing time, from, to and display name`,\"data-og-width\":`1288`,width:`1288`,\"data-og-height\":`934`,height:`934`,\"data-path\":`images/voice-sip-trunks/inbound-test-call.jpg`,\"data-optimize\":`true`,\"data-opv\":`3`,srcset:`https://mintcdn.com/thread/q5JFhE-rMm8MULaC/images/voice-sip-trunks/inbound-test-call.jpg?w=280\u0026fit=max\u0026auto=format\u0026n=q5JFhE-rMm8MULaC\u0026q=85\u0026s=f04a10a4b80e8b118d76b5cb7b1648bc 280w, https://mintcdn.com/thread/q5JFhE-rMm8MULaC/images/voice-sip-trunks/inbound-test-call.jpg?w=560\u0026fit=max\u0026auto=format\u0026n=q5JFhE-rMm8MULaC\u0026q=85\u0026s=651359c6be98329c59f86f7aa6c7efcc 560w, https://mintcdn.com/thread/q5JFhE-rMm8MULaC/images/voice-sip-trunks/inbound-test-call.jpg?w=840\u0026fit=max\u0026auto=format\u0026n=q5JFhE-rMm8MULaC\u0026q=85\u0026s=248dc97ed9aff16b47b7408d07775c34 840w, https://mintcdn.com/thread/q5JFhE-rMm8MULaC/images/voice-sip-trunks/inbound-test-call.jpg?w=1100\u0026fit=max\u0026auto=format\u0026n=q5JFhE-rMm8MULaC\u0026q=85\u0026s=acf258e7b69ae2106702c7c6d0326d3f 1100w, https://mintcdn.com/thread/q5JFhE-rMm8MULaC/images/voice-sip-trunks/inbound-test-call.jpg?w=1650\u0026fit=max\u0026auto=format\u0026n=q5JFhE-rMm8MULaC\u0026q=85\u0026s=acb5e5268cce1f080c91bb85eaf6b42b 1650w, https://mintcdn.com/thread/q5JFhE-rMm8MULaC/images/voice-sip-trunks/inbound-test-call.jpg?w=2500\u0026fit=max\u0026auto=format\u0026n=q5JFhE-rMm8MULaC\u0026q=85\u0026s=08072df593d0e5da651c357e7a7681bb 2500w`})})]})}),`\n`,_jsx(Heading,{level:`2`,id:`in-3cx-route-the-agents’-numbers-to-thread`,children:`In 3CX: route the agents’ numbers to Thread`}),`\n`,_jsx(Steps,{children:_jsxs(Step,{title:`Add an Outbound Rule for the agent's numbers`,stepNumber:12,children:[_jsxs(_components.p,{children:[`In `,_jsx(_components.strong,{children:`Outbound Rules`}),`, add a rule whose prefix is the agent’s Thread number without the country code (for `,_jsx(_components.code,{children:`+1 202 555 0142`}),`, enter `,_jsx(_components.code,{children:`2025550142`}),`). Set `,_jsx(_components.strong,{children:`Route 1`}),` to the Thread trunk, `,_jsx(_components.strong,{children:`Strip no digits`}),`, and `,_jsx(_components.strong,{children:`Prepend`}),` the country code, `,_jsx(_components.code,{children:`+1`}),` in the US and Canada.`]}),_jsxs(_components.p,{children:[`The agent’s numbers are in Thread under `,_jsx(_components.strong,{children:`Voice > Agents`}),`: the Attendant number is under `,_jsx(_components.strong,{children:`Your attendant phone number`}),` on the agent’s `,_jsx(_components.strong,{children:`Attendant`}),` tab, and the Overflow number under `,_jsx(_components.strong,{children:`Your overflow phone number`}),` on its `,_jsx(_components.strong,{children:`Overflow`}),` tab. The trunk page also lists both next to the agent. Add a rule for both the Attendant and the Overflow number, so 3CX sends every forward to the agent over SIP.`]}),_jsxs(_components.p,{children:[`Make sure no higher rule catches the number first. If a call still doesn’t match, `,_jsx(_components.strong,{children:`Dashboard > Activity logs`}),` shows the number 3CX compared on a line like `,_jsx(_components.code,{children:`Looking for outbound rule: dialed = [+12025550142], processed: [2025550142]`}),`; use the processed form as the prefix. Then delete the test-number rule.`]}),_jsx(Frame,{caption:`The Attendant number, on the agent's Attendant tab.`,children:_jsx(OptimizedImage,{src:`https://mintcdn.com/thread/q5JFhE-rMm8MULaC/images/voice-sip-trunks/agent-attendant-number.jpg?fit=max\u0026auto=format\u0026n=q5JFhE-rMm8MULaC\u0026q=85\u0026s=83473e4dd7e7f5654a7b9d70b608873a`,alt:`Voice agent Attendant tab with Your attendant phone number showing +1 202-555-0142 and a copy button`,\"data-og-width\":`760`,width:`760`,\"data-og-height\":`370`,height:`370`,\"data-path\":`images/voice-sip-trunks/agent-attendant-number.jpg`,\"data-optimize\":`true`,\"data-opv\":`3`,srcset:`https://mintcdn.com/thread/q5JFhE-rMm8MULaC/images/voice-sip-trunks/agent-attendant-number.jpg?w=280\u0026fit=max\u0026auto=format\u0026n=q5JFhE-rMm8MULaC\u0026q=85\u0026s=26f91c8421deff4049bf1ca7340a713c 280w, https://mintcdn.com/thread/q5JFhE-rMm8MULaC/images/voice-sip-trunks/agent-attendant-number.jpg?w=560\u0026fit=max\u0026auto=format\u0026n=q5JFhE-rMm8MULaC\u0026q=85\u0026s=c7eef430e84cb79bc50e5392003e3948 560w, https://mintcdn.com/thread/q5JFhE-rMm8MULaC/images/voice-sip-trunks/agent-attendant-number.jpg?w=840\u0026fit=max\u0026auto=format\u0026n=q5JFhE-rMm8MULaC\u0026q=85\u0026s=d380c2837afc4d9a7697790efdc951f2 840w, https://mintcdn.com/thread/q5JFhE-rMm8MULaC/images/voice-sip-trunks/agent-attendant-number.jpg?w=1100\u0026fit=max\u0026auto=format\u0026n=q5JFhE-rMm8MULaC\u0026q=85\u0026s=15dd6ee992371217698bf0e930070bf6 1100w, https://mintcdn.com/thread/q5JFhE-rMm8MULaC/images/voice-sip-trunks/agent-attendant-number.jpg?w=1650\u0026fit=max\u0026auto=format\u0026n=q5JFhE-rMm8MULaC\u0026q=85\u0026s=f7562baf986e03b9f7673510cba988a7 1650w, https://mintcdn.com/thread/q5JFhE-rMm8MULaC/images/voice-sip-trunks/agent-attendant-number.jpg?w=2500\u0026fit=max\u0026auto=format\u0026n=q5JFhE-rMm8MULaC\u0026q=85\u0026s=7720ed7bd306e81684c27ecfda9d53c2 2500w`})}),_jsx(Frame,{caption:`The Overflow number, on the agent's Overflow tab.`,children:_jsx(OptimizedImage,{src:`https://mintcdn.com/thread/q5JFhE-rMm8MULaC/images/voice-sip-trunks/agent-overflow-number.jpg?fit=max\u0026auto=format\u0026n=q5JFhE-rMm8MULaC\u0026q=85\u0026s=11ac55b8c7f98cbbf9e0b278961c672d`,alt:`Voice agent Overflow tab with Your overflow phone number showing +1 202-555-0187 and a copy button`,\"data-og-width\":`760`,width:`760`,\"data-og-height\":`385`,height:`385`,\"data-path\":`images/voice-sip-trunks/agent-overflow-number.jpg`,\"data-optimize\":`true`,\"data-opv\":`3`,srcset:`https://mintcdn.com/thread/q5JFhE-rMm8MULaC/images/voice-sip-trunks/agent-overflow-number.jpg?w=280\u0026fit=max\u0026auto=format\u0026n=q5JFhE-rMm8MULaC\u0026q=85\u0026s=2149f2e7e075e47db6de9f2d9453071b 280w, https://mintcdn.com/thread/q5JFhE-rMm8MULaC/images/voice-sip-trunks/agent-overflow-number.jpg?w=560\u0026fit=max\u0026auto=format\u0026n=q5JFhE-rMm8MULaC\u0026q=85\u0026s=bd41cee74143e9f35176bc8742b70f1f 560w, https://mintcdn.com/thread/q5JFhE-rMm8MULaC/images/voice-sip-trunks/agent-overflow-number.jpg?w=840\u0026fit=max\u0026auto=format\u0026n=q5JFhE-rMm8MULaC\u0026q=85\u0026s=c919eb51936bb99148fa2659de0e3132 840w, https://mintcdn.com/thread/q5JFhE-rMm8MULaC/images/voice-sip-trunks/agent-overflow-number.jpg?w=1100\u0026fit=max\u0026auto=format\u0026n=q5JFhE-rMm8MULaC\u0026q=85\u0026s=6895f3636cb4dea4b288a0a6ee990e94 1100w, https://mintcdn.com/thread/q5JFhE-rMm8MULaC/images/voice-sip-trunks/agent-overflow-number.jpg?w=1650\u0026fit=max\u0026auto=format\u0026n=q5JFhE-rMm8MULaC\u0026q=85\u0026s=e542e094b51a8106a8663c2ef771d8bf 1650w, https://mintcdn.com/thread/q5JFhE-rMm8MULaC/images/voice-sip-trunks/agent-overflow-number.jpg?w=2500\u0026fit=max\u0026auto=format\u0026n=q5JFhE-rMm8MULaC\u0026q=85\u0026s=21d8ec59713d1227c2f6c38baead9b8d 2500w`})}),_jsx(Frame,{caption:`Route 1 goes to Thread. A backup route can follow, but it will hide failures while you test.`,children:_jsx(OptimizedImage,{src:`https://mintcdn.com/thread/q5JFhE-rMm8MULaC/images/voice-sip-trunks/3cx-outbound-rule.jpg?fit=max\u0026auto=format\u0026n=q5JFhE-rMm8MULaC\u0026q=85\u0026s=c9c8f326a7af8d16b770d617a4316220`,alt:`3CX outbound rule with the agent's number 2025550142 as the prefix, Route 1 on the Thread Voice AI trunk, Strip no digits and Prepend +1`,\"data-og-width\":`760`,width:`760`,\"data-og-height\":`539`,height:`539`,\"data-path\":`images/voice-sip-trunks/3cx-outbound-rule.jpg`,\"data-optimize\":`true`,\"data-opv\":`3`,srcset:`https://mintcdn.com/thread/q5JFhE-rMm8MULaC/images/voice-sip-trunks/3cx-outbound-rule.jpg?w=280\u0026fit=max\u0026auto=format\u0026n=q5JFhE-rMm8MULaC\u0026q=85\u0026s=52e9cc296604d1bcc1ecb778aa25482c 280w, https://mintcdn.com/thread/q5JFhE-rMm8MULaC/images/voice-sip-trunks/3cx-outbound-rule.jpg?w=560\u0026fit=max\u0026auto=format\u0026n=q5JFhE-rMm8MULaC\u0026q=85\u0026s=0f1f56f5266d7ba1dbe958cbcd2f87cd 560w, https://mintcdn.com/thread/q5JFhE-rMm8MULaC/images/voice-sip-trunks/3cx-outbound-rule.jpg?w=840\u0026fit=max\u0026auto=format\u0026n=q5JFhE-rMm8MULaC\u0026q=85\u0026s=271fa86fbb1d7bf2badb014c2bfb032d 840w, https://mintcdn.com/thread/q5JFhE-rMm8MULaC/images/voice-sip-trunks/3cx-outbound-rule.jpg?w=1100\u0026fit=max\u0026auto=format\u0026n=q5JFhE-rMm8MULaC\u0026q=85\u0026s=a27c87875491827b6f947af8c18717a6 1100w, https://mintcdn.com/thread/q5JFhE-rMm8MULaC/images/voice-sip-trunks/3cx-outbound-rule.jpg?w=1650\u0026fit=max\u0026auto=format\u0026n=q5JFhE-rMm8MULaC\u0026q=85\u0026s=2949f958230ba24c3ce35d0b5dcc90fb 1650w, https://mintcdn.com/thread/q5JFhE-rMm8MULaC/images/voice-sip-trunks/3cx-outbound-rule.jpg?w=2500\u0026fit=max\u0026auto=format\u0026n=q5JFhE-rMm8MULaC\u0026q=85\u0026s=cc6cc2dd383f031ea73011fbd4f3f809 2500w`})})]})}),`\n`,_jsx(Warning,{children:_jsxs(_components.p,{children:[`Add this rule before you turn inbound on in the next step. Saving the trunk moves the agent’s number onto the SIP trunk, so `,_jsx(_components.strong,{children:`a forward still going over the phone network would stop reaching the agent.`})]})}),`\n`,_jsx(Heading,{level:`2`,id:`in-thread-turn-inbound-on`,children:`In Thread: turn inbound on`}),`\n`,_jsx(Steps,{children:_jsxs(Step,{title:`Turn inbound on and save the trunk`,stepNumber:13,children:[_jsxs(_components.p,{children:[`The trunk page now shows both sides as `,_jsx(_components.strong,{children:`Configured`}),`. Agents already linked to the trunk apply to both directions. If you chose `,_jsx(_components.strong,{children:`Required`}),`, also select `,_jsx(_components.strong,{children:`Edit settings`}),` under `,_jsx(_components.strong,{children:`Outbound trunk`}),` and change the transport to `,_jsx(_components.strong,{children:`TLS+SRTP`}),`, so transfers to 3CX are encrypted the same way. Turn on the switch on the `,_jsx(_components.strong,{children:`Inbound trunk`}),` card. It starts off, because your agents are so far linked only to the outbound side. Then select `,_jsx(_components.strong,{children:`Save`}),` at the bottom of the trunk page to turn inbound on.`]}),_jsx(Frame,{caption:`Both sides configured and switched on, one linked agent. Saving moves the agent's number onto this trunk.`,children:_jsx(OptimizedImage,{src:`https://mintcdn.com/thread/q5JFhE-rMm8MULaC/images/voice-sip-trunks/two-way-trunk-page.jpg?fit=max\u0026auto=format\u0026n=q5JFhE-rMm8MULaC\u0026q=85\u0026s=6d9de839e33ac6df72d9562124a4aaf6`,alt:`Trunk page with Inbound and Outbound trunk cards both Configured with their switches on, and one linked agent with an Unlink agent button`,\"data-og-width\":`1204`,width:`1204`,\"data-og-height\":`1006`,height:`1006`,\"data-path\":`images/voice-sip-trunks/two-way-trunk-page.jpg`,\"data-optimize\":`true`,\"data-opv\":`3`,srcset:`https://mintcdn.com/thread/q5JFhE-rMm8MULaC/images/voice-sip-trunks/two-way-trunk-page.jpg?w=280\u0026fit=max\u0026auto=format\u0026n=q5JFhE-rMm8MULaC\u0026q=85\u0026s=89a822c2aa2e37a4fec2736014f3cbac 280w, https://mintcdn.com/thread/q5JFhE-rMm8MULaC/images/voice-sip-trunks/two-way-trunk-page.jpg?w=560\u0026fit=max\u0026auto=format\u0026n=q5JFhE-rMm8MULaC\u0026q=85\u0026s=d0eeffea5c053908aea9628a04d34b33 560w, https://mintcdn.com/thread/q5JFhE-rMm8MULaC/images/voice-sip-trunks/two-way-trunk-page.jpg?w=840\u0026fit=max\u0026auto=format\u0026n=q5JFhE-rMm8MULaC\u0026q=85\u0026s=72e6fb99c931ce4562783c15c94d0c33 840w, https://mintcdn.com/thread/q5JFhE-rMm8MULaC/images/voice-sip-trunks/two-way-trunk-page.jpg?w=1100\u0026fit=max\u0026auto=format\u0026n=q5JFhE-rMm8MULaC\u0026q=85\u0026s=9357d3950cd665dfd9c844957da941ba 1100w, https://mintcdn.com/thread/q5JFhE-rMm8MULaC/images/voice-sip-trunks/two-way-trunk-page.jpg?w=1650\u0026fit=max\u0026auto=format\u0026n=q5JFhE-rMm8MULaC\u0026q=85\u0026s=02e0e70b1dcebab5e79db7638b3bcb8e 1650w, https://mintcdn.com/thread/q5JFhE-rMm8MULaC/images/voice-sip-trunks/two-way-trunk-page.jpg?w=2500\u0026fit=max\u0026auto=format\u0026n=q5JFhE-rMm8MULaC\u0026q=85\u0026s=a34d91b204a34c90e0a301d40e2663b6 2500w`})})]})}),`\n`,_jsx(Heading,{level:`2`,id:`in-3cx-send-callers-over-sip`,children:`In 3CX: send callers over SIP`}),`\n`,_jsxs(Steps,{children:[_jsx(Step,{title:`Keep your existing forward`,stepNumber:14,children:_jsx(_components.p,{children:`The DID, IVR option or queue that already forwards to the agent’s Thread number doesn’t change. With the rule from step 12, 3CX should now send that forward over SIP instead of the phone network.`})}),_jsx(Step,{title:`Place a test call`,stepNumber:15,children:_jsx(_components.p,{children:`Call your support number from a mobile. The agent answers and, when it transfers, your technician’s 3CX client shows the caller’s own number.`})})]}),`\n`,_jsxs(_components.p,{children:[`To stop using one direction later, switch it off on the trunk page in Thread and select `,_jsx(_components.strong,{children:`Save`}),`. Its settings stay, so you can switch it back on. While agents are linked to the trunk, at least one direction has to stay on. To turn off both, select `,_jsx(_components.strong,{children:`Disconnect all agents`}),` from the trunk’s menu in the SIP trunk list.`]}),`\n`,_jsxs(_components.p,{children:[`If a forward or transfer fails, see `,_jsx(_components.a,{href:`/ai-agents/connect-3cx-to-voice-ai-with-a-sip-trunk#troubleshoot-the-connection`,children:`Troubleshoot the connection`}),`.`]})]})}function MDXContent(props={}){const{wrapper:MDXLayout}={..._provideComponents(),...props.components};return MDXLayout?_jsx(MDXLayout,{...props,children:_jsx(_createMdxContent,{...props})}):_createMdxContent(props)}return{default:MDXContent};function _missingMdxReference(id,component){throw new Error(`Expected `+(component?`component`:`object`)+\" `\"+id+\"` to be defined: you likely forgot to import, pass, or provide it.\")}","frontmatter":{},"scope":{"config":{},"pageMetadata":{"title":"Add inbound to your existing Thread-3CX SIP trunk","description":"Your Voice AI agent already transfers callers to 3CX over a SIP trunk. Add an inbound side to the same trunk so 3CX forwards callers to the agent over SIP, with their real number, instead of over the phone network.","boost":3,"href":"/ai-agents/add-inbound-to-your-3cx-sip-trunk"}}},"mdxSourceWithNoJs":null},"mdxExtracts":{"tableOfContents":[{"title":"In 3CX: switch your trunk to the Thread template","slug":"in-3cx-switch-your-trunk-to-the-thread-template","depth":2,"children":[]},{"title":"In Thread: copy Thread’s SIP address and set encryption","slug":"in-thread-copy-thread’s-sip-address-and-set-encryption","depth":2,"children":[]},{"title":"In 3CX: point the trunk at Thread","slug":"in-3cx-point-the-trunk-at-thread","depth":2,"children":[]},{"title":"In Thread: test the inbound side","slug":"in-thread-test-the-inbound-side","depth":2,"children":[]},{"title":"In 3CX: route the agents’ numbers to Thread","slug":"in-3cx-route-the-agents’-numbers-to-thread","depth":2,"children":[]},{"title":"In Thread: turn inbound on","slug":"in-thread-turn-inbound-on","depth":2,"children":[]},{"title":"In 3CX: send callers over SIP","slug":"in-3cx-send-callers-over-sip","depth":2,"children":[]}],"codeExamples":{}},"jsLinks":["/_mintlify/custom/thread/e9e74bb66602d208/skill-nav-scroll.js"],"subdomain":"thread","siteName":"Thread Docs","title":"Add inbound to your existing Thread-3CX SIP trunk - Thread Docs","relatedPagesConfig":{"enabled":true,"limit":3,"mode":"automatic"},"contextualStarterQuestions":[{"_id":"6af5cb087af1c74f93c144dc","deploymentId":"6920f01f9d8412afd5a0dff5","questionText":"Why use SIP instead of phone network?","status":"active","generatedBy":"contextual","path":"ai-agents/add-inbound-to-your-3cx-sip-trunk","createdAt":"2026-11-12T14:19:52.755Z","updatedAt":"2026-11-12T14:19:52.755Z","__v":0},{"_id":"6af5cb087af1c74f93c144db","deploymentId":"6920f01f9d8412afd5a0dff5","questionText":"What's the Thread Voice AI template?","status":"active","generatedBy":"contextual","path":"ai-agents/add-inbound-to-your-3cx-sip-trunk","createdAt":"2026-11-12T14:19:52.755Z","updatedAt":"2026-11-12T14:19:52.755Z","__v":0},{"_id":"6af5cb087af1c74f93c144da","deploymentId":"6920f01f9d8412afd5a0dff5","questionText":"How do I add inbound to 3CX?","status":"active","generatedBy":"contextual","path":"ai-agents/add-inbound-to-your-3cx-sip-trunk","createdAt":"2026-11-12T14:19:52.755Z","updatedAt":"2026-11-12T14:19:52.755Z","__v":0}],"navMaps":{"firstHrefInVersion":{},"firstHrefInLanguage":{}},"lastModified":"2026-11-12T14:19:45.484Z","originalFileLocation":"ai-agents/add-inbound-to-your-3cx-sip-trunk.mdx"},"headHtml":"\u003cscript data-mint-head>(function(){var d=document.documentElement,p=null;if(!p){try{p=localStorage.getItem(\"isDarkMode\")}catch(e){}if(p==='true')p='dark';else if(p==='false')p='light';if(p!=='light'\u0026\u0026p!=='dark'\u0026\u0026p!=='system')p=\"dark\"}var r=p==='system'?(matchMedia(\"(prefers-color-scheme: dark)\").matches?'dark':'light'):p;d.classList.remove(r==='dark'?'light':'dark');d.classList.add(r);d.setAttribute(\"data-theme-preference\",p)})();\u003c/script>\u003cmeta data-mint-head name=\"description\" content=\"Your Voice AI agent already transfers callers to 3CX over a SIP trunk. Add an inbound side to the same trunk so 3CX forwards callers to the agent over SIP, with their real number, instead of over the phone network.\">\u003cmeta data-mint-head name=\"application-name\" content=\"Thread Docs\">\u003cmeta data-mint-head name=\"generator\" content=\"Mintlify\">\u003clink data-mint-head rel=\"icon\" type=\"image/png\" sizes=\"192x192\" href=\"/mintlify-assets/_mintlify/favicons/thread/FC7ab3_wzYydgHyM/_generated/favicon/android-chrome-192x192.png\" media=\"(prefers-color-scheme: light)\">\u003clink data-mint-head rel=\"apple-touch-icon\" type=\"image/png\" sizes=\"180x180\" href=\"/mintlify-assets/_mintlify/favicons/thread/FC7ab3_wzYydgHyM/_generated/favicon/apple-touch-icon.png\">\u003clink data-mint-head rel=\"icon\" type=\"image/png\" sizes=\"16x16\" href=\"/mintlify-assets/_mintlify/favicons/thread/FC7ab3_wzYydgHyM/_generated/favicon/favicon-16x16.png\" media=\"(prefers-color-scheme: light)\">\u003clink data-mint-head rel=\"icon\" type=\"image/png\" sizes=\"32x32\" href=\"/mintlify-assets/_mintlify/favicons/thread/FC7ab3_wzYydgHyM/_generated/favicon/favicon-32x32.png\" media=\"(prefers-color-scheme: light)\">\u003clink data-mint-head rel=\"shortcut icon\" type=\"image/x-icon\" href=\"/mintlify-assets/_mintlify/favicons/thread/FC7ab3_wzYydgHyM/_generated/favicon/favicon.ico\" media=\"(prefers-color-scheme: light)\">\u003clink data-mint-head rel=\"icon\" type=\"image/png\" sizes=\"192x192\" href=\"/mintlify-assets/_mintlify/favicons/thread/FC7ab3_wzYydgHyM/_generated/favicon-dark/android-chrome-192x192.png\" media=\"(prefers-color-scheme: dark)\">\u003clink data-mint-head rel=\"icon\" type=\"image/png\" sizes=\"16x16\" href=\"/mintlify-assets/_mintlify/favicons/thread/FC7ab3_wzYydgHyM/_generated/favicon-dark/favicon-16x16.png\" media=\"(prefers-color-scheme: dark)\">\u003clink data-mint-head rel=\"icon\" type=\"image/png\" sizes=\"32x32\" href=\"/mintlify-assets/_mintlify/favicons/thread/FC7ab3_wzYydgHyM/_generated/favicon-dark/favicon-32x32.png\" media=\"(prefers-color-scheme: dark)\">\u003clink data-mint-head rel=\"shortcut icon\" type=\"image/x-icon\" href=\"/mintlify-assets/_mintlify/favicons/thread/FC7ab3_wzYydgHyM/_generated/favicon-dark/favicon.ico\" media=\"(prefers-color-scheme: dark)\">\u003cmeta data-mint-head property=\"og:title\" content=\"Add inbound to your existing Thread-3CX SIP trunk - Thread Docs\">\u003cmeta data-mint-head property=\"og:description\" content=\"Your Voice AI agent already transfers callers to 3CX over a SIP trunk. Add an inbound side to the same trunk so 3CX forwards callers to the agent over SIP, with their real number, instead of over the phone network.\">\u003cmeta data-mint-head property=\"og:site_name\" content=\"Thread Docs\">\u003cmeta data-mint-head property=\"og:url\" content=\"https://docs.getthread.com/ai-agents/add-inbound-to-your-3cx-sip-trunk\">\u003cmeta data-mint-head property=\"og:type\" content=\"website\">\u003cmeta data-mint-head property=\"og:image\" content=\"https://thread.mintlify.site/_mintlify/api/og/v2?division=Connect+your+phone+system\u0026amp;title=Add+inbound+to+your+existing+Thread-3CX+SIP+trunk\u0026amp;description=Your+Voice+AI+agent+already+transfers+callers+to+3CX+over+a+SIP+trunk.+Add+an+inbound+side+to+the+same+trunk+so+3CX+forwards+callers+to+the+agent+over+SIP%2C+with\u0026amp;theme=f724fa3ec041ff897ae11da2\u0026amp;signature=8d3e5ed9d11f9f8b524c53d48c050a52de8817a47139fbda723fab2899410e25\">\u003cmeta data-mint-head property=\"og:image:width\" content=\"1200\">\u003cmeta data-mint-head property=\"og:image:height\" content=\"630\">\u003cmeta data-mint-head name=\"twitter:card\" content=\"summary_large_image\">\u003cmeta data-mint-head name=\"twitter:title\" content=\"Add inbound to your existing Thread-3CX SIP trunk - Thread Docs\">\u003cmeta data-mint-head name=\"twitter:description\" content=\"Your Voice AI agent already transfers callers to 3CX over a SIP trunk. Add an inbound side to the same trunk so 3CX forwards callers to the agent over SIP, with their real number, instead of over the phone network.\">\u003cmeta data-mint-head name=\"twitter:image\" content=\"https://thread.mintlify.site/_mintlify/api/og/v2?division=Connect+your+phone+system\u0026amp;title=Add+inbound+to+your+existing+Thread-3CX+SIP+trunk\u0026amp;description=Your+Voice+AI+agent+already+transfers+callers+to+3CX+over+a+SIP+trunk.+Add+an+inbound+side+to+the+same+trunk+so+3CX+forwards+callers+to+the+agent+over+SIP%2C+with\u0026amp;theme=f724fa3ec041ff897ae11da2\u0026amp;signature=8d3e5ed9d11f9f8b524c53d48c050a52de8817a47139fbda723fab2899410e25\">\u003cmeta data-mint-head name=\"twitter:image:width\" content=\"1200\">\u003cmeta data-mint-head name=\"twitter:image:height\" content=\"630\">\u003cmeta data-mint-head name=\"msapplication-config\" content=\"/mintlify-assets/_mintlify/favicons/thread/FC7ab3_wzYydgHyM/_generated/favicon/browserconfig.xml\">\u003cmeta data-mint-head name=\"apple-mobile-web-app-title\" content=\"Thread Docs\">\u003cmeta data-mint-head name=\"msapplication-TileColor\" content=\"#00B398\">\u003clink data-mint-head rel=\"canonical\" href=\"https://docs.getthread.com/ai-agents/add-inbound-to-your-3cx-sip-trunk\">\u003clink data-mint-head rel=\"alternate\" type=\"application/xml\" href=\"/sitemap.xml\">\u003clink data-mint-head rel=\"alternate\" type=\"text/markdown\" href=\"/ai-agents/add-inbound-to-your-3cx-sip-trunk.md\">\u003cscript data-mint-head type=\"application/ld+json\">{\"@context\":\"https://schema.org\",\"@graph\":[{\"@type\":\"Organization\",\"@id\":\"https://docs.getthread.com/#organization\",\"name\":\"Thread Docs\",\"url\":\"https://docs.getthread.com\",\"logo\":{\"@type\":\"ImageObject\",\"url\":\"https://mintcdn.com/thread/50guKpC0vegpyObR/logo/thread.svg?fit=max\u0026auto=format\u0026n=50guKpC0vegpyObR\u0026q=85\u0026s=86145b5e0fe1e4b555128fc8d8fd9815\"}},{\"@type\":\"WebSite\",\"@id\":\"https://docs.getthread.com#website\",\"name\":\"Thread Docs\",\"url\":\"https://docs.getthread.com\",\"publisher\":{\"@id\":\"https://docs.getthread.com/#organization\"}},{\"@type\":\"WebPage\",\"@id\":\"https://docs.getthread.com/ai-agents/add-inbound-to-your-3cx-sip-trunk#webpage\",\"url\":\"https://docs.getthread.com/ai-agents/add-inbound-to-your-3cx-sip-trunk\",\"name\":\"Add inbound to your existing Thread-3CX SIP trunk\",\"description\":\"Your Voice AI agent already transfers callers to 3CX over a SIP trunk. Add an inbound side to the same trunk so 3CX forwards callers to the agent over SIP, with their real number, instead of over the phone network.\",\"dateModified\":\"2026-11-12T14:19:45.484Z\",\"isPartOf\":{\"@id\":\"https://docs.getthread.com#website\"},\"breadcrumb\":{\"@id\":\"https://docs.getthread.com/ai-agents/add-inbound-to-your-3cx-sip-trunk#breadcrumb\"}},{\"@type\":\"BreadcrumbList\",\"@id\":\"https://docs.getthread.com/ai-agents/add-inbound-to-your-3cx-sip-trunk#breadcrumb\",\"itemListElement\":[{\"@type\":\"ListItem\",\"position\":1,\"name\":\"Voice AI\",\"item\":\"https://docs.getthread.com/ai-agents/voice-ai-setup-phase-1-initial-configuration\"},{\"@type\":\"ListItem\",\"position\":2,\"name\":\"Connect your phone system\",\"item\":\"https://docs.getthread.com/ai-agents/connect-your-phone-system-to-voice-ai\"},{\"@type\":\"ListItem\",\"position\":3,\"name\":\"Add inbound to your existing Thread-3CX SIP trunk\",\"item\":\"https://docs.getthread.com/ai-agents/add-inbound-to-your-3cx-sip-trunk\"}]},{\"@type\":[\"Article\",\"TechArticle\"],\"@id\":\"https://docs.getthread.com/ai-agents/add-inbound-to-your-3cx-sip-trunk#article\",\"headline\":\"Add inbound to your existing Thread-3CX SIP trunk\",\"name\":\"Add inbound to your existing Thread-3CX SIP trunk\",\"description\":\"Your Voice AI agent already transfers callers to 3CX over a SIP trunk. Add an inbound side to the same trunk so 3CX forwards callers to the agent over SIP, with their real number, instead of over the phone network.\",\"url\":\"https://docs.getthread.com/ai-agents/add-inbound-to-your-3cx-sip-trunk\",\"mainEntityOfPage\":{\"@id\":\"https://docs.getthread.com/ai-agents/add-inbound-to-your-3cx-sip-trunk#webpage\"},\"dateModified\":\"2026-11-12T14:19:45.484Z\",\"publisher\":{\"@id\":\"https://docs.getthread.com/#organization\"},\"isPartOf\":{\"@id\":\"https://docs.getthread.com#website\"}}]}\u003c/script>","agentPointerHref":"/ai-agents/add-inbound-to-your-3cx-sip-trunk.md","siteName":"Thread Docs","nav":{"global":null,"tabs":[{"tab":"Start here","icon":"compass","pages":[{"title":"Start here","href":""}]},{"tab":"Onboarding","icon":"graduation-cap","hidden":true,"pages":[{"title":"Onboarding","href":"/onboarding/overview"}]},{"tab":"By role","icon":"users","pages":[{"title":"By role","href":"/start-here/roles/overview"}]},{"tab":"Guides","icon":"book-open","groups":[{"group":"Overview","icon":"book-open","root":{"title":"Product guides","sidebarTitle":"Overview","href":"/guides/overview"},"pages":[]},{"group":"Integrations","icon":"plug","pages":[{"group":"ConnectWise PSA","pages":[{"title":"Set Up the ConnectWise PSA Ticketing Integration","href":"/integrations/creating-a-connect-wise-manage-api-user"},{"title":"Add Thread Pods to ConnectWise Service Tickets","href":"/integrations/how-to-enable-a-pod"},{"title":"Quiet customer emails on a ConnectWise board","href":"/integrations/quiet-customer-emails-on-a-connectwise-board"}]},{"group":"Autotask PSA","pages":[{"title":"Set Up the Autotask PSA Ticketing Integration","href":"/integrations/creating-a-autotask-api-user"},{"title":"Enable Thread Chat \u0026 TimePad Insights in Autotask","href":"/integrations/how-to-enable-chat-and-timepad-insights-in-autotask"},{"title":"Install the Thread for Autotask Chrome extension","href":"/integrations/thread-for-autotask-chrome-extension"},{"title":"Configure Autotask Email Workflow for Thread","href":"/integrations/setting-up-an-email-communication-workflow-in-autotask"},{"title":"Turn off Autotask time entry summary note notifications","href":"/integrations/turn-off-autotask-time-entry-summary-note-notifications"}]},{"group":"Halo PSA","pages":[{"title":"Set Up the HaloPSA Ticketing Integration","href":"/integrations/how-to-setup-halo-psa-integration"},{"title":"Configure HaloPSA Action Mapping for Thread","href":"/integrations/action-mapping-configuration-with-thread"},{"title":"HaloPSA Chat Response Options for Thread","href":"/integrations/halo-response-options"},{"title":"HaloPSA Integration FAQ and Troubleshooting","href":"/integrations/halo-faq"},{"title":"Adding and Removing Contacts in Inbox (HaloPSA)","href":"/inbox/adding-removing-contacts-in-halo-psa"}]},{"group":"PSA Settings","pages":[{"title":"Sync Thread Members with Your PSA Automatically","href":"/integrations/keep-members-in-sync-with-psa-toggle"},{"title":"Log emoji reactions in PSA","href":"/integrations/log-emoji-reactions-in-psa"},{"title":"Manage PSA Board Visibility and Exclusions in Thread","href":"/integrations/managing-board-visibility-in-thread-board-exclusion"}]},{"group":"Other Integrations","pages":[{"title":"Connect Hudu Documentation to Super Magic","href":"/integrations/hudu-integration"},{"title":"Connect IT Glue Documentation to Super Magic","href":"/integrations/it-glue-super-magic"},{"title":"Automate PSA Scheduling with Microsoft Bookings","href":"/integrations/microsoft-bookings-integration-for-psa-scheduling"},{"title":"Connect Pia SmartForms to Thread Triage Agent","href":"/integrations/pia-integration"},{"title":"Connect Auvik Network Monitoring to Thread","href":"/integrations/auvik-integration"},{"title":"Connect CloudRadial to Thread for Client Chat","href":"/integrations/how-to-integrate-cloud-radial"},{"title":"Set Up the ConnectWise Automate Integration","href":"/integrations/how-do-i-set-up-connectwise-automate"},{"title":"Integrate TimeZest Scheduling with Thread Inbox","href":"/integrations/integrating-time-zest-with-thread"}]},{"group":"Push Knowledge Base Articles to IT Glue (beta)","hidden":true,"pages":[{"title":"Push Knowledge Base Articles to IT Glue","href":"/integrations/push-knowledge-base-articles-to-it-glue"}]}]},{"group":"Magic AI","icon":"wand-magic-sparkles","pages":[{"group":"Auto Prioritization","pages":[{"title":"Configure Magic Auto Prioritization","href":"/assistive-ai/how-to-set-up-auto-prioritization"}]},{"group":"Auto Categorization","pages":[{"title":"Configure Auto Categorization in Thread","href":"/assistive-ai/getting-started-with-auto-categorization"},{"title":"Configure Ticket Type Categorization in Autotask and Halo","href":"/assistive-ai/configuring-ticket-type-categorization"}]},{"group":"Auto Title","pages":[{"title":"Configure Magic Title in Thread","href":"/assistive-ai/setting-up-magic-title"},{"title":"Magic Title Rule Creation Guide","href":"/assistive-ai/magic-title-rule-creation-guide"}]},{"group":"Recap Templates","pages":[{"title":"Getting Started with Magic Recap","href":"/assistive-ai/magic-recap"},{"title":"Magic Recap Template Library","href":"/assistive-ai/magic-recap-template-library"}]},{"group":"Sentiment Analysis","pages":[{"title":"Configure Magic Sentiment","href":"/assistive-ai/configure-sentiment"},{"title":"Sentiment Flows, Escalations, and Recap Templates","href":"/assistive-ai/configure-automatic-escalations-and-recap-templates-for-sentiment-analysis"}]},{"group":"Magic AI reference","pages":[{"title":"Using Variables in Magic AI and Magic Agents","href":"/assistive-ai/variables"},{"title":"Best Practices for Writing Magic AI Prompts","href":"/assistive-ai/prompt-best-practices"},{"title":"Prompt engineering tips and tricks","href":"/assistive-ai/prompt-tips-and-tricks"},{"title":"Client Access and how AI runs on tickets","href":"/assistive-ai/client-access-and-run-paths"},{"title":"Magic AI FAQ","href":"/assistive-ai/faq"}]}]},{"group":"Magic Agents","icon":"robot","pages":[{"group":"About Magic Agents","pages":[{"title":"From Triage to Resolution: Agent-Driven Outcomes","href":"/ai-agents/agent-driven-resolutions"}]},{"group":"Triage Agent","pages":[{"title":"Getting Started with Triage Agent","href":"/ai-agents/getting-started-with-triage-agent"},{"title":"Triage Agent Setup User Guide","href":"/ai-agents/setting-up-your-triage-agent-user-guide"},{"title":"Create Your First Triage Agent Intents","href":"/ai-agents/create-your-first-intents"},{"title":"Build Your Magic Agents Service Catalog","href":"/ai-agents/building-your-magic-agents-service-catalog"},{"title":"Intent Creation Assistance Intent","href":"/ai-agents/intent-creation-assistance-intent"},{"title":"Triage Agent Custom Rules (Beta)","href":"/ai-agents/custom-rules-beta-partner-guide"},{"title":"Triage Agent Request Blocking for OOO and Noisy Requests","href":"/ai-agents/triage-agent-request-blocking-and-common-use-cases"},{"title":"Listening Mode for Triage Agents","href":"/ai-agents/listening-mode-for-triage-agents"},{"title":"Automate Approvals with Magic Agents","href":"/ai-agents/approvals"},{"title":"Set Up Email Support for Magic Agents and Inbox","href":"/ai-agents/setting-up-email-support-for-magic-agents"},{"title":"Triage Agent Settings","href":"/ai-agents/triage-agent-settings"},{"title":"Track Magic Agent Activity with a Workflow","href":"/ai-agents/creating-a-workflow-to-track-magic-agent-activity"},{"title":"Trigger Automations with the Triage Agent Automation URL","href":"/ai-agents/magic-agents-automation-url"}]},{"group":"Reminder Agent","pages":[{"title":"Configure Reminder Agent","href":"/ai-agents/reminder-agent"},{"title":"How Reminder Agent Works","href":"/ai-agents/reminder-agent-how-it-works"}]}]},{"group":"Voice AI","icon":"phone","pages":[{"group":"Set up Voice AI","pages":[{"title":"Create your first Voice AI agent","href":"/ai-agents/voice-ai-setup-phase-1-initial-configuration"},{"title":"Answer overflow \u0026 after-hours calls","href":"/ai-agents/voice-ai-setup-phase-2-overflow-after-hours"},{"title":"Replace your phone menu with the Auto-Attendant","href":"/ai-agents/voice-ai-setup-phase-3-the-auto-attendant-walk-run"}]},{"group":"Connect your phone system","pages":[{"title":"Forward your phone system to Voice AI","href":"/ai-agents/connect-your-phone-system-to-voice-ai"},{"title":"Phone system forwarding directory","href":"/ai-agents/phone-system-forwarding-directory"},{"title":"Connect your phone system to Voice AI with a SIP trunk","href":"/ai-agents/voice-ai-sip-trunks-and-caller-id"},{"title":"Connect 3CX to Voice AI with a SIP trunk","description":"Set up one 3CX trunk that sends callers to a Voice AI agent over SIP and receives the agent's transfers back, keeping the caller's real number in both directions.","href":"/ai-agents/connect-3cx-to-voice-ai-with-a-sip-trunk"},{"title":"Add inbound to your existing Thread-3CX SIP trunk","href":"/ai-agents/add-inbound-to-your-3cx-sip-trunk"}]},{"group":"Tune agent behaviour","pages":[{"title":"Minimal vs Advanced AI mode","description":"Compare Minimal and Advanced AI modes for the Voice AI Attendant, why Minimal Mode plays hold music and creates bare tickets, and how to switch modes.","href":"/ai-agents/voice-ai-attendant-modes"},{"title":"Voice AI Contact Mapping","href":"/ai-agents/contact-mapping"},{"title":"Voice Shield: Safer Existing-Ticket Handling","href":"/ai-agents/voice-ai-voice-shield"},{"title":"Voice AI Pronunciation Guide","href":"/ai-agents/voice-ai-pronunciation-guide"}]},{"group":"Numbers \u0026 calling","pages":[{"title":"Voice AI Outbound Calling Setup","href":"/ai-agents/voice-ai-outbound-calling"},{"title":"Enable Teams Pay-As-You-Go Calling for Resource Accounts","href":"/ai-agents/microsoft-teams-pay-as-you-go-resource-account-calling"},{"title":"Call an on-call technician from a Flow","href":"/ai-agents/voice-ai-on-call-escalation"}]},{"group":"Troubleshoot","pages":[{"title":"Troubleshoot Voice AI","href":"/ai-agents/voice-ai-troubleshooting"},{"title":"Voice AI FAQ","href":"/ai-agents/voice-ai-faq"}]},{"group":"Changelog","pages":[{"title":"Voice AI updates 2026","sidebarTitle":"2026","href":"/ai-agents/voice-ai-changelog"},{"title":"Voice AI updates 2025","sidebarTitle":"2025","href":"/ai-agents/voice-ai-changelog-2025"}]}]},{"group":"Messenger","icon":"comments","pages":[{"group":"Messenger settings","pages":[{"title":"Messenger Settings: Configure Chat, Design, and Hours","href":"/inbox/messenger"},{"title":"Multi-language support in Messenger","href":"/messenger/multi-language-support"}]},{"group":"Teams Service App","pages":[{"title":"Deploy the Teams Service App to a customer","href":"/messenger/deploy-the-teams-service-app"},{"title":"Design a Custom Teams App for Your Customers","href":"/messenger/create-teams-app"},{"title":"How to Roll Out the Teams Service App to Specific Users","href":"/messenger/how-to-roll-out-the-teams-service-app-to-specific-users"},{"title":"Enterprise Teams Support: Shared M365 Tenants","href":"/messenger/enterprise-teamssupport"},{"title":"How to Uninstall the Microsoft Teams Service App","href":"/messenger/how-to-uninstall-the-microsoft-teams-thread-service-app"},{"title":"Microsoft Teams 2.0 FAQs","href":"/messenger/microsoft-teams-2-0-faqs"},{"group":"Legacy","pages":[{"title":"Cloning a Legacy Teams App","href":"/messenger/cloning-a-legacy-teams-app"},{"title":"How to Upgrade your Legacy Teams App","href":"/messenger/how-to-upgrade-your-legacy-teams-app"}]}]},{"group":"Desktop Service App","pages":[{"title":"Deploy Messenger on Windows via command line","href":"/messenger/deploying-messenger-on-windows"},{"title":"Deploying Messenger to Mac","href":"/messenger/deploying-messenger-to-mac"},{"title":"How to Deploy Desktop Messenger with SSO","href":"/messenger/how-to-deploy-desktop-messenger-with-sso"},{"title":"Kiosk Mode","href":"/messenger/kiosk-mode"}]},{"group":"Web Service App","pages":[{"title":"Embedding Messenger on a Landing Page","href":"/messenger/embedding-messenger-on-landing-page"},{"title":"Messenger Portal Auto Authentication","href":"/messenger/messenger-identity-verification"},{"title":"Emoji reactions in Messenger","href":"/messenger/emoji-reactions"}]},{"group":"Slack Service App","pages":[{"title":"Deploy the Slack Service App to a customer","href":"/messenger/deploy-the-slack-service-app"}]},{"group":"Messenger FAQ","pages":[{"title":"How Configurations and Assets Work in Messenger Chat","href":"/messenger/configurations-in-messenger"}]},{"group":"Chat routing \u0026 entry points","pages":[{"title":"Add a Chat Now Button to PSA Ticket Emails","href":"/messenger/add-chat-now-button-email"},{"title":"Route chats to the right board","href":"/messenger/route-chats-to-the-right-board"},{"title":"Show All Tickets in Chat and Excluded Boards","href":"/messenger/show-all-tickets-in-chat-and-excluded-board-source"}]},{"group":"Client Portal (Beta)","hidden":true,"pages":[{"title":"Give a client's site contacts a Client Portal","href":"/messenger/client-portal-for-site-contacts"}]}]},{"group":"Thread Inbox","icon":"inbox","pages":[{"group":"Tour Inbox","pages":[{"title":"Inbox Navigation: Rail, Side Panel, and Views","href":"/inbox/inbox-navigation"},{"title":"Inside a View: Inbox vs. List Display Modes","href":"/inbox/inside-a-view"},{"title":"Navigating a Thread in Inbox","href":"/inbox/navigating-a-thread"},{"title":"Thread Control Panel: Contact, TimePad, and AI Insights","href":"/inbox/thread-control-panel"}]},{"group":"Set up teams \u0026 dispatch","pages":[{"title":"Set Up Thread Inbox by Service Team Structure","href":"/inbox/service-team-structure"},{"title":"Inbox Teams: Group Members and Share Views at Scale","href":"/inbox/inbox-teams"},{"title":"Views and Insights in Thread Inbox","href":"/inbox/views-and-insights"},{"title":"Set up XLA Profiles in Thread","href":"/inbox/sla-timers-and-response-settings"}]},{"group":"Work tickets","pages":[{"title":"Create an Email Signature Using Thread Snippets","hidden":true,"href":"/inbox/how-to-create-an-email-signature-using-snippets"},{"title":"Set Up a SmileBack CSAT Survey with Snippets","href":"/inbox/how-to-setup-a-csat-survey"},{"title":"Approvals in Inbox: Request and Manage Decisions","href":"/inbox/approvals-in-inbox"},{"title":"Configure Autotask UDFs for Thread Approvals","href":"/inbox/autotask-approval-configuration"},{"title":"Default Work Role and Type Logic in Time Entries","href":"/inbox/default-work-role-type-logic"},{"title":"Track your time with TimePad","href":"/inbox/track-your-time-with-timepad"}]},{"group":"Plan work","pages":[{"title":"Planner and Outlook Calendar Integration","href":"/inbox/planner-outlook-calendar-integration"},{"title":"Schedule work in Planner","href":"/inbox/using-planner"}]},{"group":"Business hours","pages":[{"title":"Business Hours, Holidays, and Custom Closures","href":"/inbox/holidays-and-custom-closures"}]},{"group":"Email channel (Beta)","hidden":true,"pages":[{"title":"Turn a Microsoft 365 mailbox into a ticket channel","href":"/inbox/turn-a-microsoft-365-mailbox-into-a-ticket-channel"}]},{"group":"What's new (Beta)","hidden":true,"pages":[{"title":"See what's new in Thread from Inbox and Admin Panel","href":"/inbox/see-whats-new-in-thread"}]},{"group":"Global search","pages":[{"title":"Global search","sidebarTitle":"Global search","icon":"magnifying-glass","href":"/inbox/global-search"},{"title":"Find a ticket by its ticket number in Inbox","href":"/inbox/find-a-ticket-by-its-number"}]},{"group":"Status colors","pages":[{"title":"Customize PSA status colors in Thread","href":"/inbox/customize-status-colors"}]}]},{"group":"Flows","icon":"diagram-project","pages":[{"group":"Flows","pages":[{"title":"Flows: Automate Thread Routing and Actions in Inbox","href":"/inbox/flows"},{"title":"Flows Audit Log: Review Every Run","sidebarTitle":"Flows Audit Log","href":"/inbox/flows-audit-log"},{"title":"See what an agent did during a flow run","href":"/inbox/see-what-a-super-magic-agent-did-during-a-flow-run"},{"title":"Status Automations: Auto-Update Thread Statuses","href":"/inbox/status-automations"}]},{"group":"Workflows (Beta)","hidden":true,"pages":[{"title":"Build an automation with Workflows in Thread Admin","href":"/inbox/build-automations-with-workflows"}]},{"group":"CSAT survey action (Beta)","hidden":true,"pages":[{"title":"Send a CSAT survey from a Flow","sidebarTitle":"Send CSAT survey action","href":"/inbox/send-a-csat-survey-from-a-flow"},{"title":"Crewhu CSAT Survey Integration","href":"/crewhu-csat-survey-integration"}]},{"group":"Thread CSAT surveys (Beta)","hidden":true,"pages":[{"title":"Send Thread's built-in CSAT survey when a ticket closes","sidebarTitle":"Thread CSAT surveys","href":"/inbox/send-thread-csat-surveys"}]},{"group":"CSAT ratings report (Beta)","hidden":true,"pages":[{"title":"Review and export CSAT ratings in Thread Admin","sidebarTitle":"CSAT ratings report","href":"/inbox/review-csat-ratings-in-thread-admin"}]},{"group":"Status mapping","pages":[{"title":"Configure Status Mapping in Thread","href":"/get-started/status-mapping-in-thread"}]}]},{"group":"Agent Builder","icon":"robot","pages":[{"title":"Build an agent with Agent Builder","href":"/super-magic/build-a-super-magic-agent"},{"title":"Chaining skills","href":"/super-magic/chaining-skills"}]},{"group":"Auto Dispatch","icon":"route","pages":[{"group":"Auto-dispatch","hidden":false,"pages":[{"title":"Auto-dispatch profiles","hidden":false,"href":"/inbox/auto-dispatch-profiles"},{"title":"Set your availability for auto-dispatch","hidden":false,"href":"/inbox/available-for-dispatch"},{"title":"Team Home for Auto-dispatch","hidden":false,"href":"/inbox/team-home"},{"title":"Scheduling and work schedules for Auto-dispatch","sidebarTitle":"Scheduling and work schedules","hidden":false,"href":"/inbox/scheduling-and-work-schedules"}]},{"group":"Work schedules (Beta)","pages":[{"title":"Create and manage work schedules","href":"/inbox/create-and-manage-work-schedules"}]},{"group":"Dispatch scenarios","pages":[{"title":"Tiered dispatch","href":"/inbox/dispatch-scenarios/tiered-dispatch-on-a-shared-board"}]}]},{"group":"Super Magic \u0026 Thread MCP","icon":"sparkles","pages":[{"group":"Using Super Magic","pages":[{"title":"Meet Super Magic: Your AI Agent in Inbox","href":"/super-magic/meet-super-magic-your-ai-assistant-in-the-inbox"},{"title":"Super Magic Admin Guide: Setup, Access \u0026 Safety","href":"/super-magic/super-magic-admin-guide-setup-access-safety"},{"title":"Proactive Suggestions in Super Magic","href":"/super-magic/proactive-suggestions"},{"title":"Share Super Magic chats with teammates","href":"/super-magic/share-super-magic-chats-with-teammates"},{"title":"Tag teammates in ticket notes with Super Magic","href":"/super-magic/tag-teammates-in-ticket-notes-with-super-magic"},{"title":"Connect Knowledge Sources to Super Magic","href":"/super-magic/connect-it-glue-hudu-time-zest-knowledge-sources-to-super-magic"},{"title":"Super Magic prompting 101","href":"/super-magic/prompting-101"},{"title":"Super Magic FAQ","href":"/super-magic/faq"}]},{"group":"Super Magic Tools","pages":[{"title":"Add External Tools to Super Magic with Connectors","href":"/super-magic/add-external-tools-to-super-magic-with-connectors-super-mcp"},{"title":"Add a custom MCP connector to Super Magic","href":"/super-magic/add-a-custom-mcp-connector-to-super-magic"},{"title":"Connect Halo MCP to Super Magic","href":"/super-magic/connect-halo-mcp-to-super-magic"},{"title":"Connect NinjaOne to Super Magic","href":"/super-magic/connecting-ninja-one-to-super-magic"},{"title":"Use Hudu with Super Magic","href":"/super-magic/use-hudu-with-super-magic"},{"title":"Use ImmyBot with Super Magic","href":"/super-magic/use-immybot-with-super-magic"},{"title":"Use IT Glue with Super Magic","href":"/super-magic/use-it-glue-with-super-magic"},{"title":"Use Linear with Super Magic","href":"/super-magic/use-linear-with-super-magic"},{"title":"Use Liongard with Super Magic","href":"/super-magic/use-liongard-with-super-magic"},{"title":"Use Notion with Super Magic","href":"/super-magic/use-notion-with-super-magic"},{"title":"Use TimeZest with Super Magic","href":"/super-magic/use-time-zest-with-super-magic"},{"title":"Use Zapier with Super Magic","href":"/super-magic/use-zapier-with-super-magic"},{"title":"Use Atlassian (Jira and Confluence) with Super Magic","href":"/super-magic/use-atlassian-with-super-magic"},{"title":"Use CIPP with Super Magic","href":"/super-magic/use-cipp-with-super-magic"},{"title":"Use ClickUp with Super Magic","href":"/super-magic/use-clickup-with-super-magic"},{"title":"Use Cloudflare with Super Magic","href":"/super-magic/use-cloudflare-with-super-magic"},{"title":"Use monday.com with Super Magic","href":"/super-magic/use-monday-with-super-magic"},{"title":"Use Vanta with Super Magic","href":"/super-magic/use-vanta-with-super-magic"},{"title":"Use ConnectWise RMM with Super Magic","href":"/super-magic/connect-connectwise-rmm"}]},{"group":"Thread MCP","pages":[{"title":"Thread MCP Server: Developer Guide","href":"/super-magic/thread-mcp-server-developer-guide"},{"title":"Control who can connect AI apps to Thread MCP","sidebarTitle":"Control who can connect AI apps","href":"/super-magic/control-who-can-connect-ai-apps-to-thread-mcp"},{"title":"Super Magic Tool Reference","href":"/super-magic/super-magic-tool-reference"}]},{"group":"MCP automation keys","hidden":false,"pages":[{"title":"Issue MCP automation keys for team members","href":"/super-magic/issue-mcp-automation-keys-for-team-members"}]},{"group":"Personal service agents (Beta)","hidden":true,"pages":[{"title":"Create a personal service agent in Super Magic","href":"/super-magic/create-a-personal-service-agent-in-super-magic"}]},{"group":"Auto mode (Beta)","hidden":true,"pages":[{"title":"Let Super Magic make changes without asking (Auto mode)","href":"/super-magic/let-super-magic-make-changes-without-asking-auto-mode"}]},{"group":"Developer reference","pages":[{"title":"Webhooks \u0026 APIs: How Thread Talks to Your PSA","href":"/get-started/webhooks-apis-how-thread-talks-to-your-psa"},{"title":"Trigger Rewst Workflows from Thread Magic Intents","href":"/integrations/thread-rewst-integration"}]}]},{"group":"Companion Apps","icon":"puzzle-piece","pages":[{"group":"Teams Companion App","pages":[{"title":"Install the Teams Companion App","href":"/companion-apps/install-the-teams-companion-app"}]},{"group":"Slack Companion App","pages":[{"title":"Install the Slack Companion App","href":"/companion-apps/install-the-slack-companion-app"},{"title":"How to Use the Slack Companion App for Service Teams","href":"/companion-apps/how-to-use-the-slack-companion-app-for-service-teams"}]},{"group":"Channel settings","pages":[{"title":"Choose which ticket updates post to a channel","href":"/companion-apps/choose-which-ticket-updates-post-to-channel"}]},{"group":"Super Magic in Companion Apps (Beta)","hidden":true,"pages":[{"title":"Use Super Magic in Microsoft Teams and Slack","href":"/companion-apps/use-super-magic-in-teams-and-slack"}]}]},{"group":"Service Intelligence","icon":"brain","pages":[{"group":"Contact Intelligence","pages":[{"title":"Contact Intelligence Overview","href":"/ai-agents/contact-intelligence"},{"title":"Contact Intelligence FAQ","href":"/ai-agents/contact-intelligence-faq"}]},{"group":"Knowledge Intelligence","pages":[{"title":"Getting Started with Client Intelligence","href":"/ai-agents/getting-started-with-knowledge"},{"title":"Client Intelligence Service Tech Guide","href":"/ai-agents/knowledge-intelligence-service-tech-guide"}]}]},{"group":"Magic Analytics","icon":"chart-line","pages":[{"group":"Get started","pages":[{"title":"Getting Started with Magic Analytics","href":"/analytics/getting-started-with-magic-analytics"},{"title":"Magic Analytics Topics You Can Explore","href":"/analytics/topics-you-can-explore"}]},{"group":"Dashboards","pages":[{"title":"ROI Value Realization Dashboard","href":"/analytics/roi-value-realization-dashboard"},{"title":"Assistive AI Accuracy Dashboard","href":"/analytics/assistive-ai-accuracy-dashboard"},{"title":"Triage Agent Summary Dashboard","href":"/analytics/triage-agent-dashboard"},{"title":"Voice AI Analytics dashboard","href":"/analytics/voice-ai-dashboard"},{"title":"Messenger Analytics Dashboard","href":"/analytics/messenger-analytics-dashboard"},{"title":"Service Team Performance \u0026 AI Usage Dashboard","href":"/analytics/service-team-performance-dashboard"},{"title":"Super Magic Usage Dashboard","href":"/analytics/super-magic-usage-dashboard"}]},{"group":"Work with your data","pages":[{"title":"Dashboard Agent: query Magic Analytics in plain English","href":"/analytics/dashboard-agent"},{"title":"Downloads, Alerts, and Scheduled Delivery","href":"/analytics/downloading-alerts-scheduling"}]},{"group":"Reference","pages":[{"title":"Magic Analytics: Things to Know and Gotchas","href":"/analytics/things-to-know-and-gotchas"},{"title":"Magic Analytics FAQs","href":"/analytics/faqs"}]}]},{"group":"Workspace administration","icon":"sliders","pages":[{"group":"Workspace \u0026 branding","pages":[{"title":"Workspace Defaults: Time Zone and TimePad Settings","href":"/inbox/workspace"},{"title":"Member and Contact Avatars in Inbox and Messenger","href":"/inbox/avatars"},{"title":"Dark mode and themes","sidebarTitle":"Dark mode and themes","href":"/inbox/dark-mode-and-themes"}]},{"group":"Members \u0026 access","pages":[{"title":"Managing Members in Thread Admin","href":"/inbox/members-management"},{"title":"Team Admin Role: Scoped Admin Permissions","href":"/inbox/team-admin-role"},{"title":"Restrict a member's access to specific clients","href":"/inbox/restrict-member-access-to-specific-clients"},{"title":"Set Up Single Sign-On (SSO) with Microsoft 365","href":"/inbox/how-to-setup-single-sign-on-sso"}]},{"group":"Clients","pages":[{"title":"Clients Tab: Managing Companies and Messenger Deployment","href":"/inbox/clients-tab"}]},{"group":"End-user verification","pages":[{"title":"Thread Verify","sidebarTitle":"Thread Verify","href":"/inbox/verify"}]}]},{"group":"Notifications","icon":"bell","pages":[{"group":"For your Team","pages":[{"title":"How Notifications Work for your Team","href":"/notifications/how-will-notifications-work-internally"},{"title":"How to Manage Your Inbox Notifications","href":"/notifications/managing-your-inbox-notifications"}]},{"group":"For your Customers","pages":[{"title":"How Notifications Work for your Customers","href":"/notifications/how-notifications-work-externally"}]}]},{"group":"Security \u0026 compliance","icon":"shield-halved","pages":[{"group":"Security reviews","pages":[{"title":"Thread Trust Center","href":"/security-billing/soc-2-and-compliance-status"}]},{"group":"Data \u0026 AI handling","pages":[{"title":"Data \u0026 Encryption","href":"/security-billing/data-encryption"},{"title":"Magic AI Privacy \u0026 Security Overview","href":"/security-billing/magic-ai-privacy-security"},{"title":"Claude on AWS Bedrock","href":"/security-billing/claude-on-aws-bedrock"},{"title":"Thread Sub-Processors List","href":"/security-billing/list-of-sub-processors"}]},{"group":"Network \u0026 app permissions","pages":[{"title":"Thread IP Addresses and Domains to Allowlist","href":"/security-billing/what-if-my-organization-has-ip-restrictions"},{"title":"Microsoft Teams App Permissions Reference","href":"/security-billing/microsoft-teams-app-permissions"},{"title":"Slack App Permissions Guide","href":"/security-billing/slack-permissions-guide"}]}]},{"group":"Plans \u0026 billing","icon":"credit-card","pages":[{"group":"Plans \u0026 licensing","pages":[{"title":"Access Your Thread Billing Portal","href":"/security-billing/how-to-access-your-thread-billing-portal"},{"title":"Plans and Licenses: AI and Chat License Management","href":"/inbox/plans-licenses"}]}]},{"group":"Automagically","icon":"wand-magic-sparkles","pages":[{"group":"Get started","pages":[{"title":"Automagically: Getting Started","sidebarTitle":"Getting started","href":"/automagically/automagically-getting-started"},{"group":"Running Runbooks","pages":[{"title":"Automagically: Running Runbooks","sidebarTitle":"Running Runbooks","href":"/automagically/automagically-running-runbooks"},{"title":"Running from Automagically","href":"/automagically/running-runbooks/running-from-automagically"},{"title":"Running from the ticket","href":"/automagically/running-runbooks/running-from-the-ticket"},{"title":"Running from Super Magic","href":"/automagically/running-runbooks/running-from-super-magic"},{"title":"Runbook Execution Results","href":"/automagically/running-runbooks/runbook-execution-results"}]},{"title":"Automagically: Approving Runbooks","sidebarTitle":"Approving Runbooks","href":"/automagically/automagically-approving-runbooks"},{"title":"Modifying a Runbook","sidebarTitle":"Modifying a Runbook","href":"/automagically/modifying-a-runbook"},{"title":"Connect Microsoft 365 clients","sidebarTitle":"Connect Microsoft 365 clients","href":"/automagically/connect-microsoft-365-clients"},{"title":"Automagically: Building a Runbook","sidebarTitle":"Building a Runbook","href":"/automagically/building-a-runbook"}]},{"group":"Configure","hidden":true,"pages":[{"title":"Automagically: Client Access","href":"/automagically/automagically-client-access"},{"title":"Managing Microsoft 365 client connections","href":"/automagically/automagically-microsoft-365-integrations"},{"title":"Microsoft 365 permissions reference","href":"/automagically/automagically-microsoft-365-permissions"}]},{"group":"Security \u0026 compliance","pages":[{"title":"Automagically security and compliance controls","href":"/automagically/automagically-security-controls"}]}]}]},{"tab":"Magic Library","icon":"https://mintlify.s3.us-west-1.amazonaws.com/thread/logo/stars.svg","pages":[{"title":"Magic Library","href":"/skill-library/overview"}]},{"tab":"Resources","icon":"folder-open","pages":[{"title":"Resources","href":"/events-and-resources"}]}]},"basePath":"","title":"Add inbound to your existing Thread-3CX SIP trunk - Thread Docs","buildId":"dpl_41S5Z2jG9QnfDRwN1KZrLdBwj7DM","deploymentId":"dpl_41S5Z2jG9QnfDRwN1KZrLdBwj7DM","dynamics":["10e4515597","07c022d89b","a74be98ba7","a9bb46feb3"],"chunks":["BannerMarkdown-CRkbAgbc.js","dist-CI2D8R2Y.js","lib-DuNMoZ05.js","lib-B8HbPgcC.js","clsx-C8f2yC9R.js","html-void-elements-mCSPHezU.js","katex-YMM-FMeD.js","marked.esm-CZWythHk.js","Frame-rZ_6yn08.js","DynamicMarkdown-D3RQ-fEj.js","zoom-image-lightbox-CMHgNu49.js","lightbox-handle-r17bVUz3.js","Markdown-CMT1uFWQ.js","AssistantPageLink-k78Wrw_e.js"]}


 Magic Library