One Thread SIP trunk and one 3CX trunk carry calls in both directions. Your 3CX sends callers to the Voice AI agent over SIP, and the agent transfers them back to your technicians over SIP, with the caller’s real number all the way through. You’ll move between 3CX and the trunk’s settings in Thread, which Connect your phone system to Voice AI with a SIP trunk describes in full. The steps were written against 3CX v20. If your agent already transfers to 3CX over a SIP trunk and you only need the inbound side, follow Add inbound to your existing Thread-3CX SIP trunk instead. 3CX names each direction from its own point of view, so Thread’s names flip: Start a trunk in 3CX from the Thread template, copy Thread’s SIP address and choose encryption in Thread, then finish the 3CX trunk so it can both reach Thread and receive its transfers. Test and finish the trunk in Thread, and send callers over SIP last.

In 3CX: start a trunk from the Thread template

1

Install the Thread Voice AI template

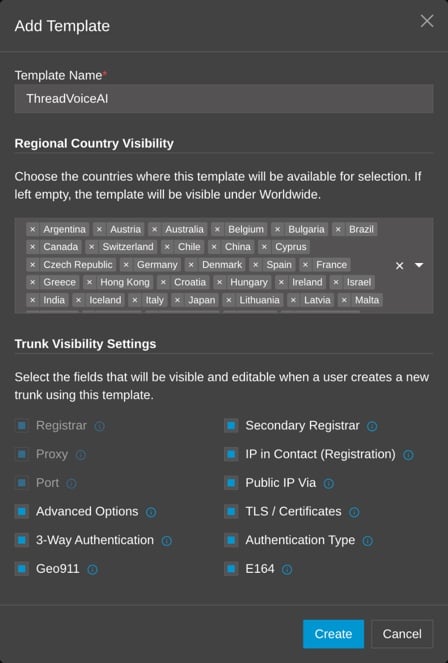
3CX’s built-in Generic SIP Trunk template puts your own 3CX number in the caller fields of calls it sends out, so a forwarded caller would reach the agent as your 3CX number. The Thread Voice AI template sends the original caller instead.Download ThreadVoiceAI.pv.xml and keep the file name as it is. In the 3CX Admin console, go to Advanced > Templates > Provider Templates, select Add, choose the file, and select Create in the dialog that opens.
3CX Add Template dialog with the template name ThreadVoiceAI, country and trunk field visibility options, and a Create button

Keep the defaults and select Create.

2

Create a trunk from the template

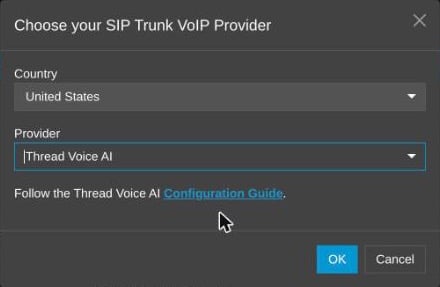
In Voice & Chat, select Add Trunk, set Provider to Thread Voice AI and select OK. 3CX opens the new trunk’s settings. Leave this page open; you fill it in once Thread gives you its SIP address.
3CX Choose your SIP Trunk VoIP Provider dialog with Provider set to Thread Voice AI

Thread Voice AI appears as a provider once the template is installed.

In Thread: copy Thread’s SIP address and set encryption

3

Select Add SIP Trunk and name it

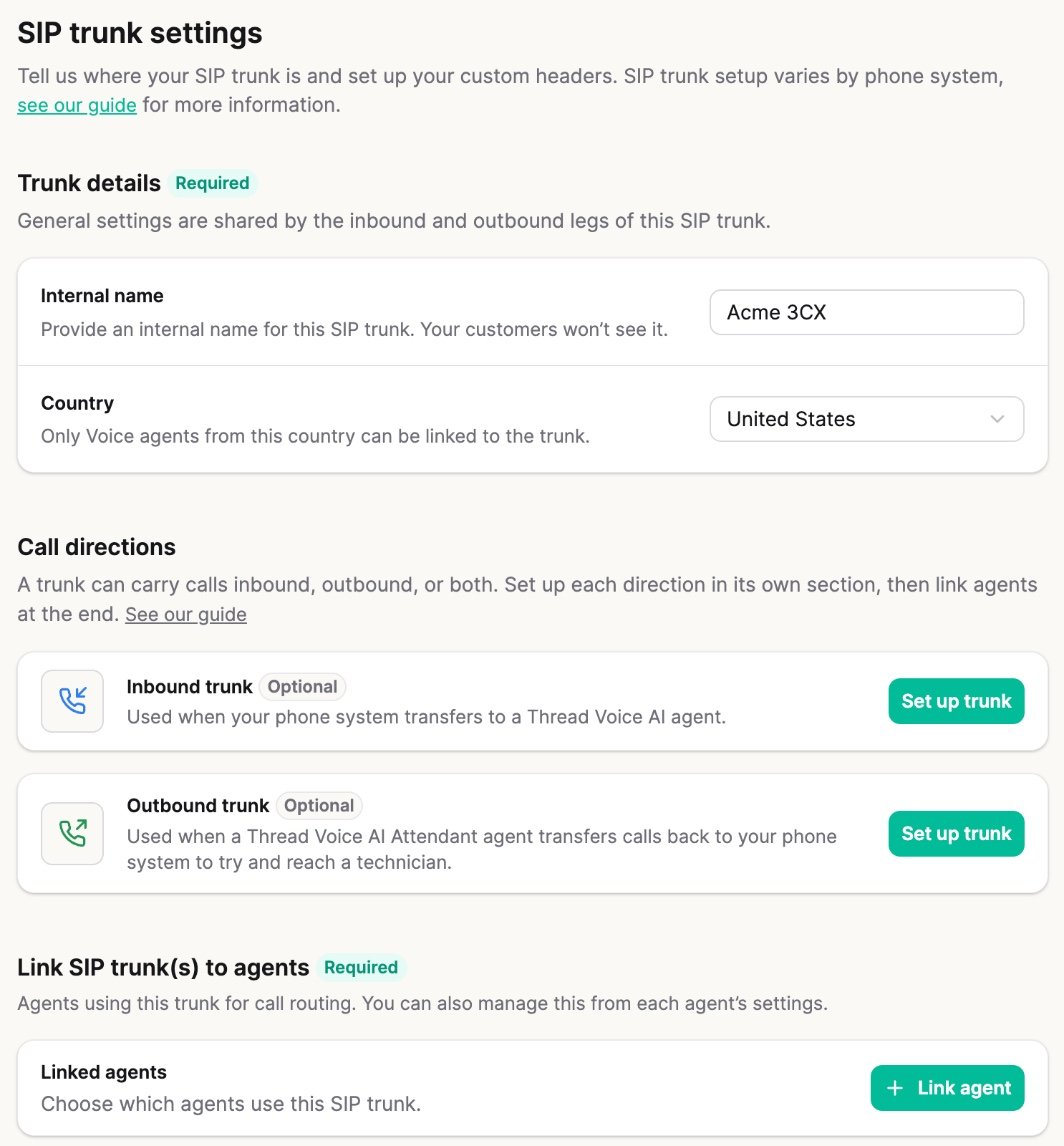
In a new tab, go to Voice > SIP Trunks & Caller ID and select Add SIP Trunk. Pick the Country carefully: only agents with a number in that country can be linked, and it can’t change after the trunk is created.
Set up a SIP Trunk page with internal name Acme 3CX, country United States, inbound and outbound trunk cards both Optional, and Link agent

New trunk: both directions start as Optional.

4

Under Inbound trunk, select Set up trunk
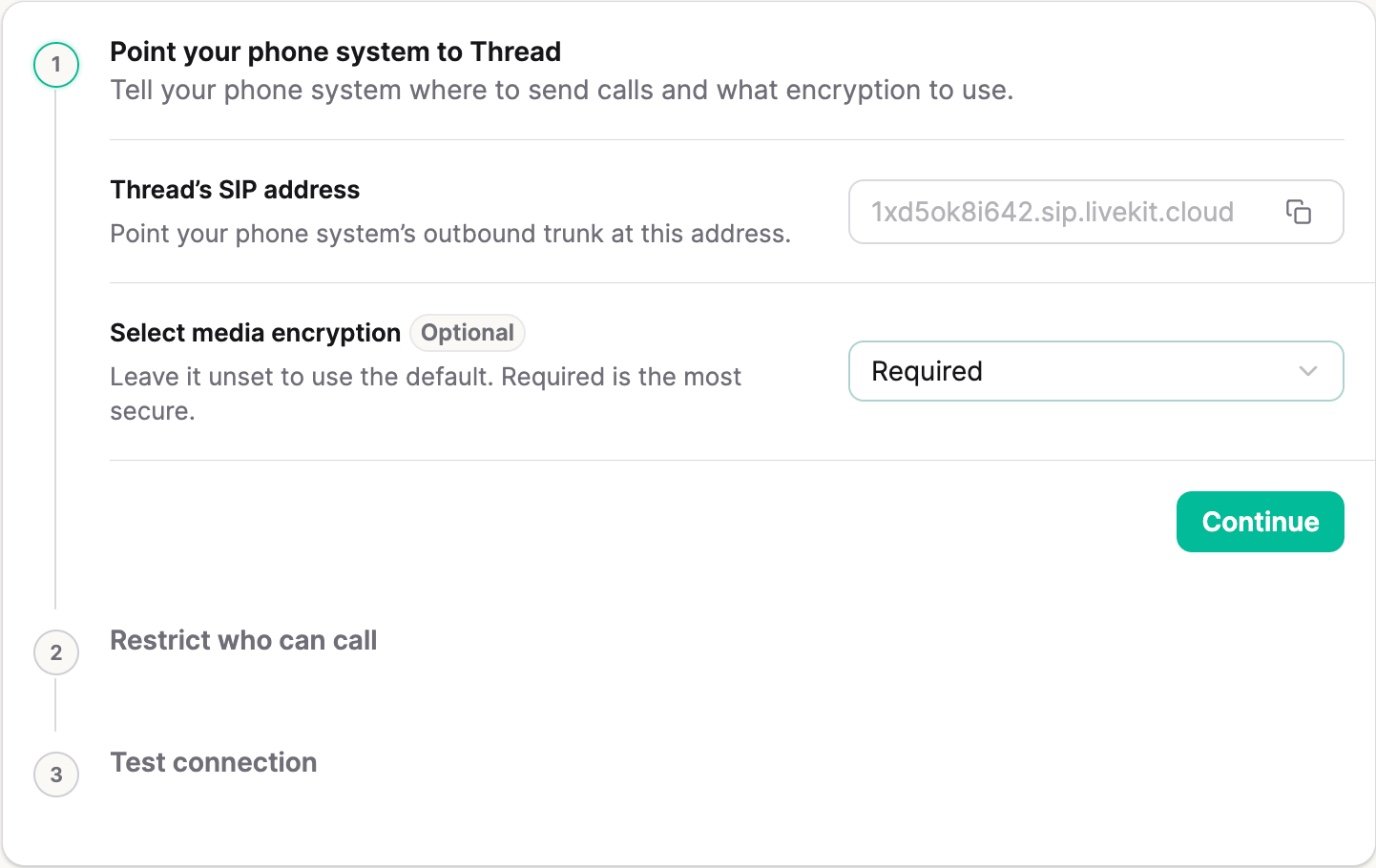
Step 1 shows Thread’s SIP address. Copy it for the 3CX trunk. Set Media encryption to Required (recommended) so the audio of every forwarded call is encrypted with SRTP. Choose Disabled only if you won’t turn SRTP on in 3CX.
Thread inbound trunk settings step 1, Point your phone system to Thread, with Thread's SIP address and media encryption set to Required

Thread's SIP address in the inbound settings

5

Choose how Thread recognizes your 3CX

Pick one option. The 3CX settings in step 7 change to match.
  • Allowed addresses: list your 3CX public IP, shown next to Use this IP for Whitelisting on any 3CX trunk page.
  • Username and password: pick a username unique to this trunk and a long, randomly generated password (20 or more characters from a password manager). Don’t reuse credentials from anywhere else or use defaults like admin/admin. Keep them for step 7. Choose this if your 3CX is hosted and shares an IP with other customers.
  • Leave the address list empty: Thread accepts calls from any address. Anyone who knows Thread’s SIP address and your agent’s number can then call the agent with any caller number, so prefer one of the options above.
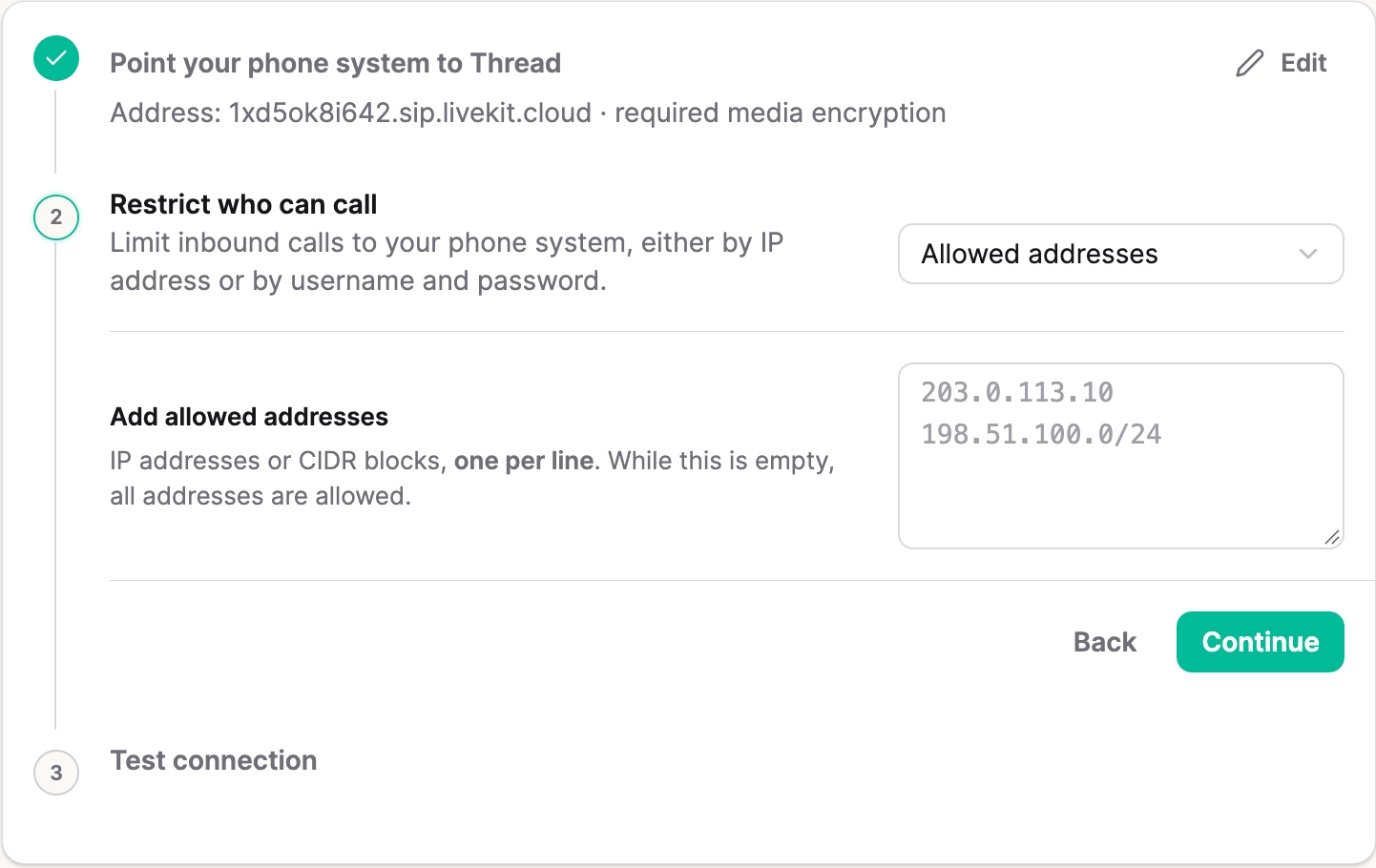
Inbound step 2, Restrict who can call, with Allowed addresses chosen and a text area for IP addresses or CIDR blocks

Allowed addresses: one IP or CIDR block per line. Left empty, any address is allowed.
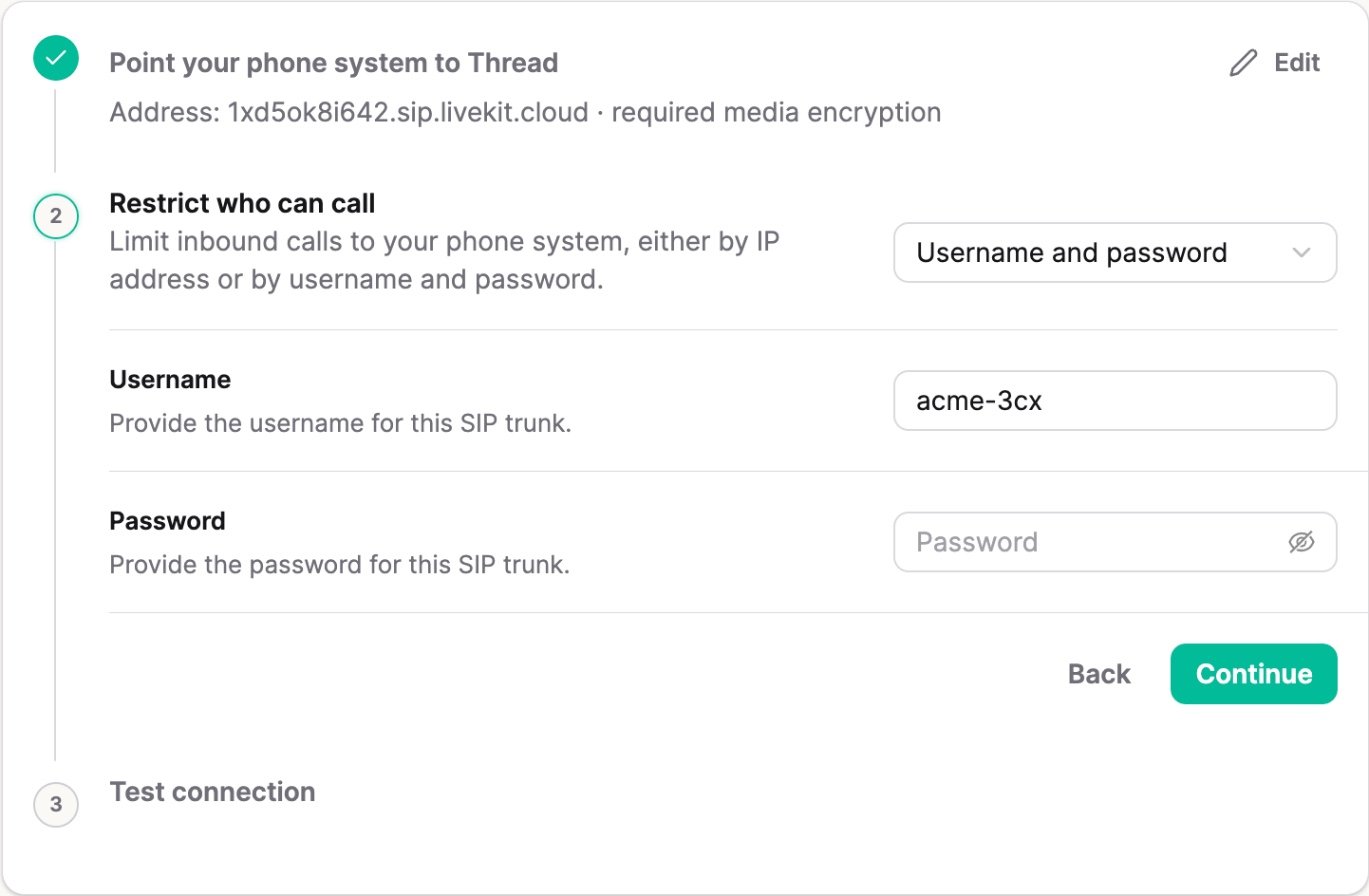
Inbound step 2 with Username and password chosen, a username filled in and the password field below it

Username and password: Thread checks these on every call from 3CX.

Optionally, under Pass headers to your outbound trunk, list X- headers 3CX sends that you want back on Thread’s transfers. Select Continue, and leave this page open.

In 3CX: point the trunk at Thread

6

Name the trunk and paste Thread's SIP address

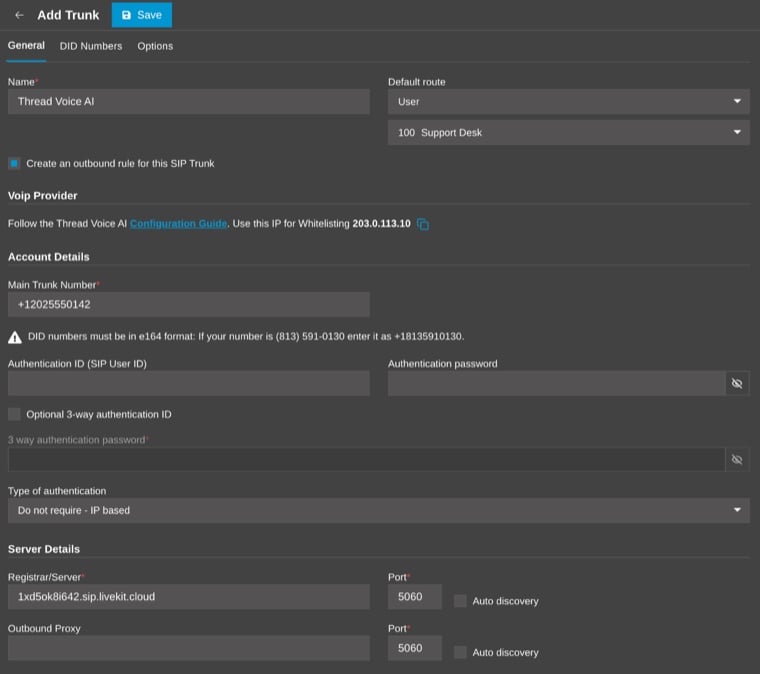
Back on the new trunk’s General tab, give it a Name and a Main Trunk Number not used on another trunk. Under Server Details, paste Thread’s SIP address into Registrar/Server and keep Port on 5060. Leave Outbound Proxy empty.
3CX Add Trunk General tab with Name Thread Voice AI, a Main Trunk Number, and Registrar/Server set to Thread's SIP address on port 5060

Name, Main Trunk Number and Registrar/Server filled in. Port stays on 5060.

Keep the Registrar port on 5060, because 3CX can’t send calls to Thread over TLS. Thread’s SIP address uses a wildcard certificate (*.sip.livekit.cloud), and 3CX only accepts a certificate that matches the trunk’s Registrar name exactly, with no setting to relax that check. On TLS, 3CX fails the forward with 503 Certificate Name Mismatch (shown as 503 Service Unavailable in the Event Log) before the call reaches Thread. SRTP still encrypts the call audio.
7

Fill in authentication to match step 5
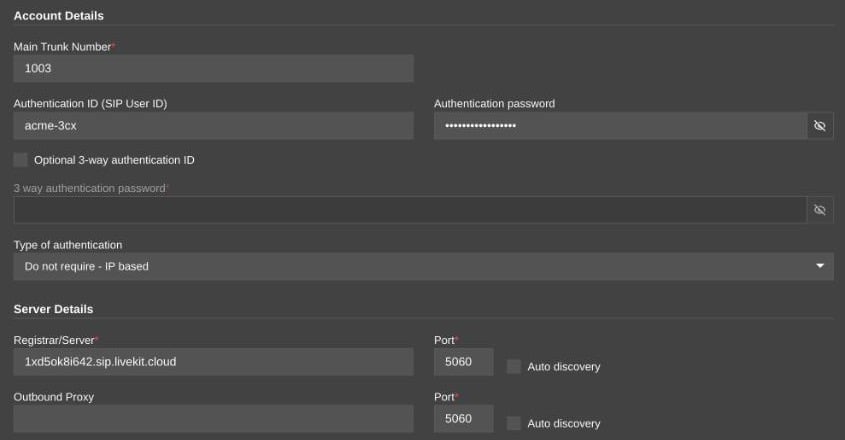
On the same tab, use the row for the option you chose in step 5:
3CX trunk General tab with an authentication ID and password filled in, Do not require - IP based authentication, and Thread's SIP address as the registrar on port 5060

The username and password version. For allowed addresses, leave both credential fields empty.

Use Do not require - IP based for both options; 3CX still answers Thread’s password challenge on each call. Outbound - outbound only and Register/Account based make 3CX register with Thread, which answers 405 Method Not Allowed. 3CX then treats the trunk as down, and the call fails or falls through to a backup route.
8

Set encryption to match step 4, then save
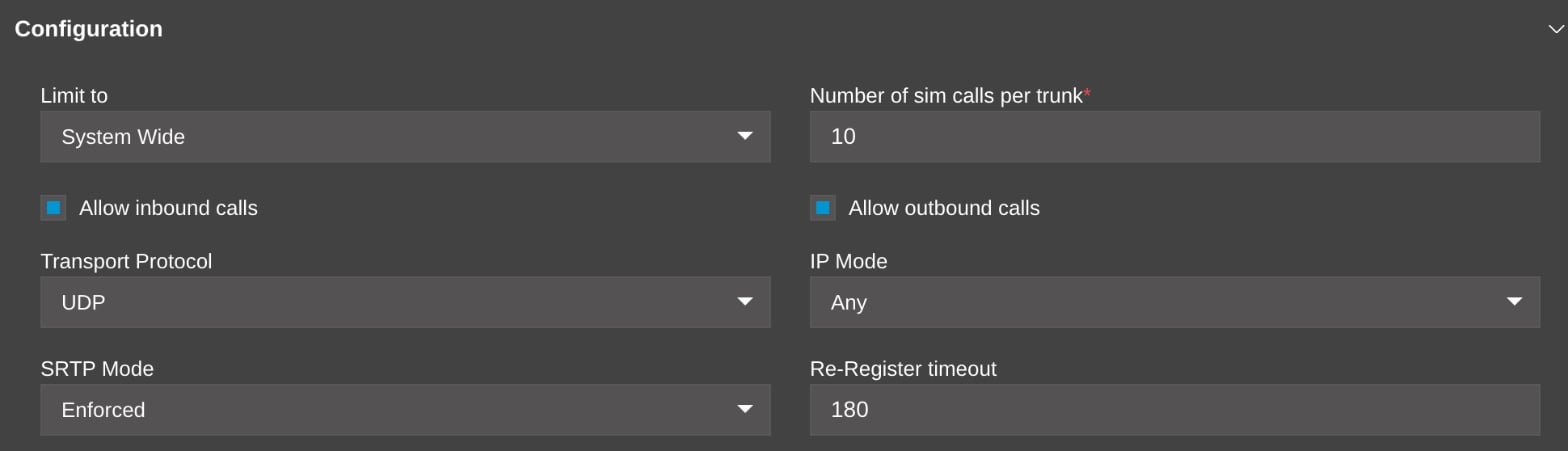
Open the trunk’s Options tab and set SRTP Mode to match Thread’s media encryption. You set Thread’s outbound transport to match in step 11. Encrypted audio is the recommended choice. Then select Save.
3CX trunk Options tab, Configuration section, with Transport Protocol UDP and SRTP Mode Enforced

SRTP Mode set to Enforced. Transport Protocol can stay on the template's setting.

9

Add an Outbound Rule for Thread's test number
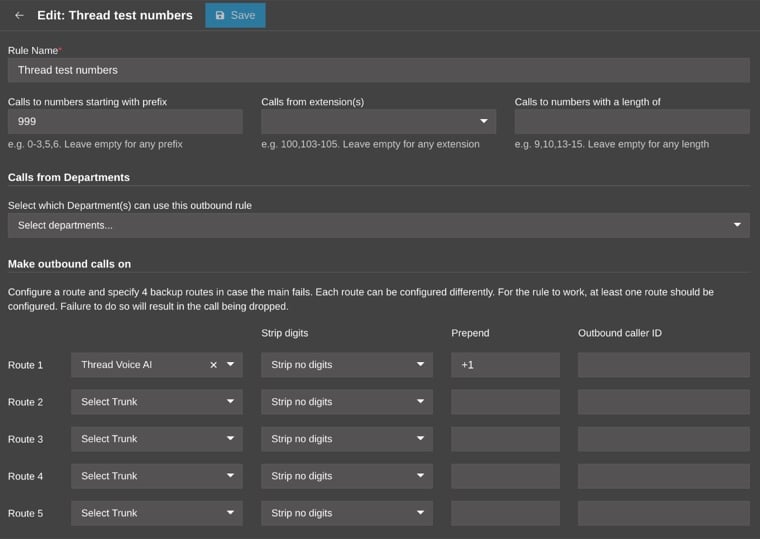
Thread’s test number is in your trunk’s country, from a range that’s never given to real phones, and 3CX dials it as a domestic call. In Outbound Rules, add a rule for it with Route 1 on the Thread Voice AI trunk and Strip no digits. 3CX compares a number after removing your own country code, so the prefix leaves the country code out and Prepend puts it back:The next step dials the test number. Make sure no higher rule catches it first. You can delete this rule once the test passes.
3CX outbound rule Thread test numbers with prefix 999, and Route 1 on the Thread Voice AI trunk with Strip no digits and Prepend +1

A US trunk: prefix 999 without the country code, and Prepend +1 puts it back.

In Thread: test inbound and set up the outbound side

10

Test the inbound side

Back on Thread’s inbound page, at step 3 Test connection, select Start listening. Thread shows a test number in your trunk’s country, which the test rule sends to the Thread trunk. Dial the number from a 3CX extension. The call appears in Thread with the caller and the headers 3CX sent, which confirms your address or credentials and encryption work. 3CX may log the call as busy, because Thread ends test calls right away. Select Complete, then Save at the bottom of the inbound page to return to the trunk page.If nothing appears, check the allowed addresses or credentials from steps 5 and 7, that the 3CX trunk sends to port 5060, and that no higher Outbound Rule catches the test number. Thread can only see calls it accepts, so check your 3CX logs to find out why calls are failing.
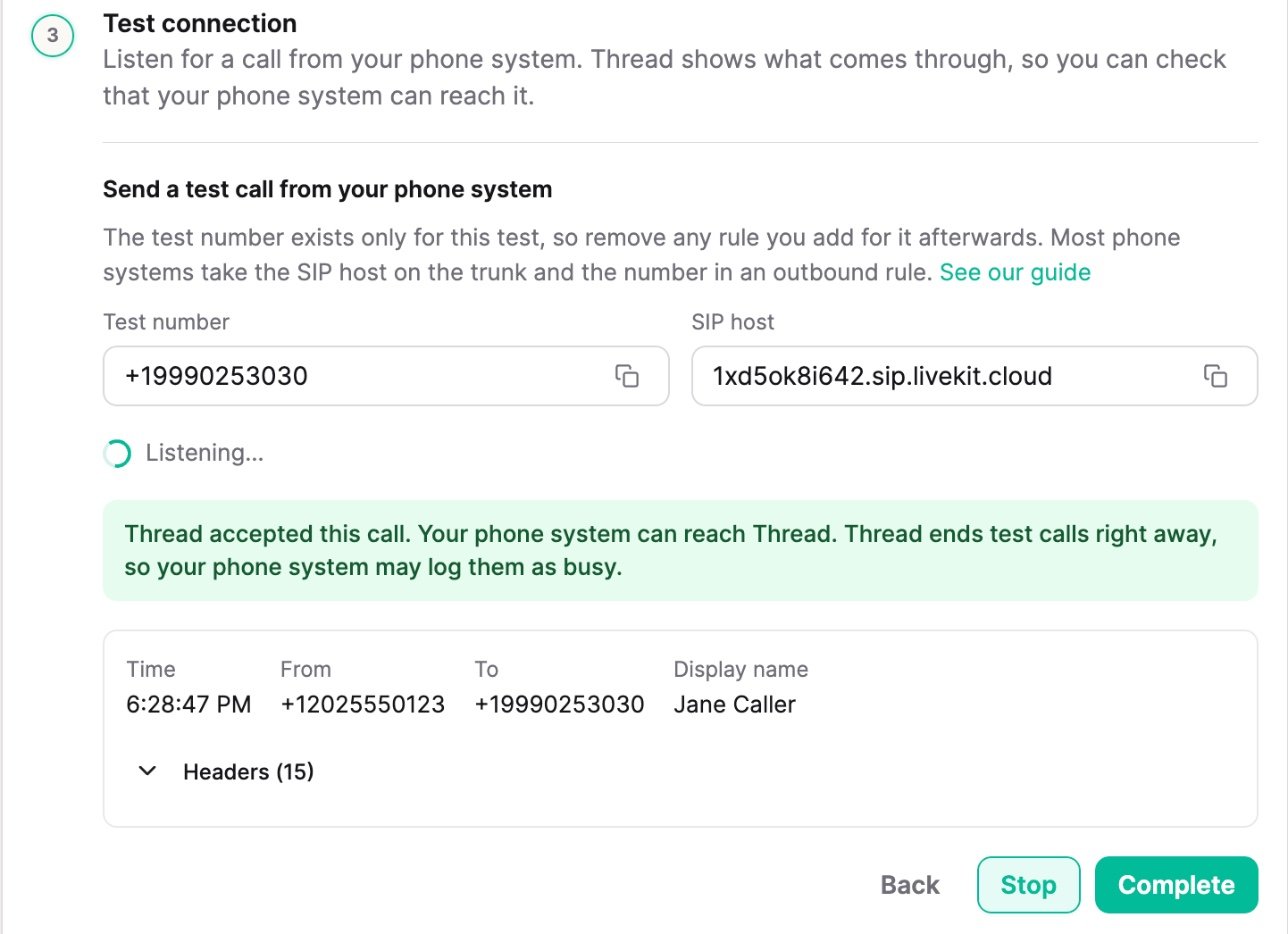
Inbound Test connection step listening, with the test number and SIP host in copy fields, a green Thread accepted this call banner and one received call showing time, from, to and display name

A call Thread accepted. Expand Headers to see what 3CX sent.

11

Set up the outbound side

Under Outbound trunk, select Set up trunk. Choose TLS+SRTP (recommended: it encrypts the call setup and the audio), or TLS if you set SRTP Mode to Disabled in step 8. Enter your 3CX address, for example yourcompany.3cx.us (port 5061 is filled in). Copy Thread’s three SIP IP ranges for step 12, and leave this page open.
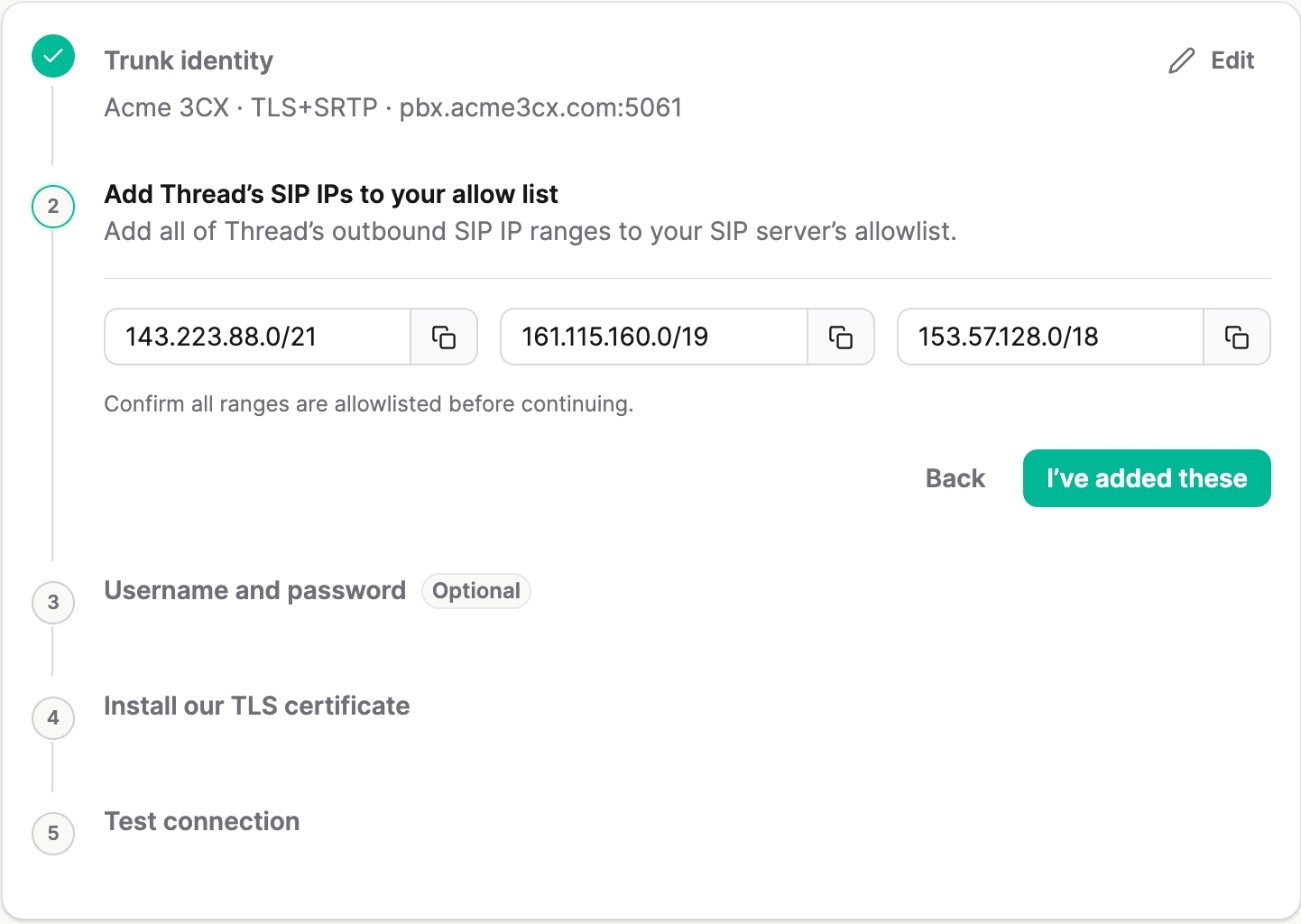
Thread doesn’t have fixed SIP IP addresses for Australia and New Zealand yet. For a trunk in either country, Thread skips the allow-list step and goes straight to Username and password, and you skip step 12 in 3CX.
Outbound step 2, Add Thread's SIP IPs to your allow list, listing 143.223.88.0/21, 161.115.160.0/19 and 153.57.128.0/18

Thread's SIP IP ranges for your 3CX allow list

In 3CX: allow Thread’s IP ranges

12

Allow Thread's SIP IP ranges

Add Thread’s three SIP IP ranges from step 11 to the allow list, so 3CX’s anti-hacking protection never blocks Thread. In Admin > Advanced > IP Blacklist, select Add, choose Add a range of IP Addresses, enter the network address and subnet mask, and set Action to Allow. Repeat for each range: 143.223.88.0/21, 161.115.160.0/19 and 153.57.128.0/18. Skip this for a trunk in Australia or New Zealand.
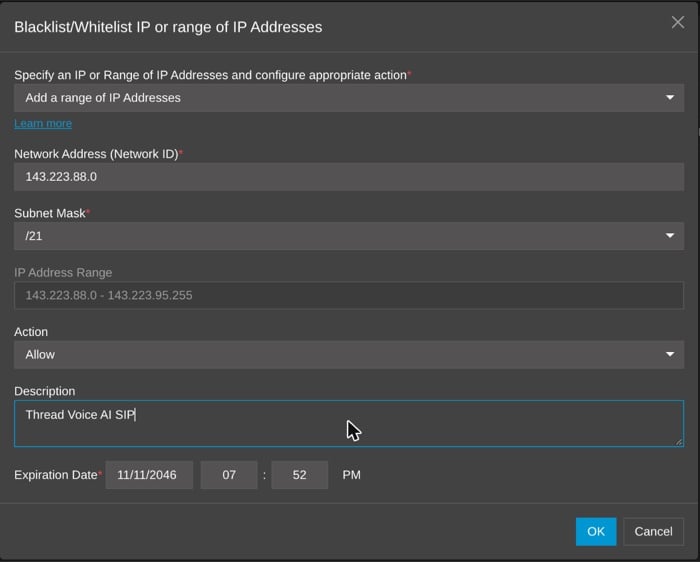
3CX Blacklist/Whitelist IP dialog adding the range 143.223.88.0 with subnet mask /21, covering 143.223.88.0 to 143.223.95.255, with Action set to Allow

One entry per range, with Action set to Allow.

In Thread: skip credentials and find the transfer number

13

Leave Username and password empty

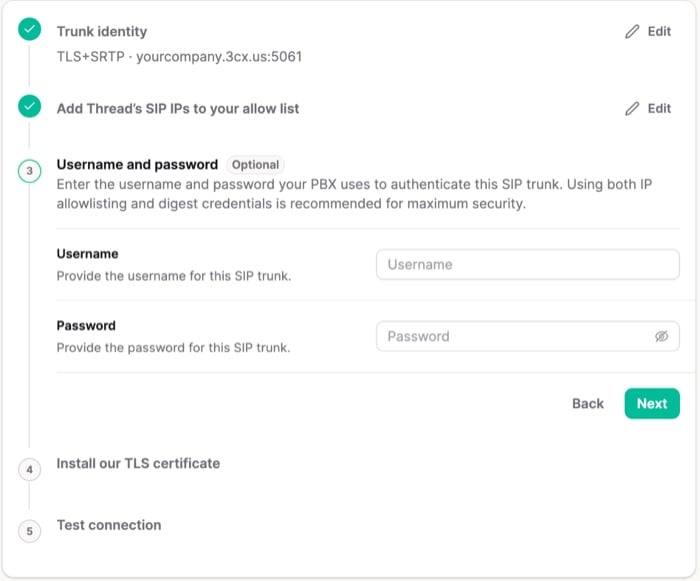
Back in Thread’s outbound settings, select I’ve added these under Add Thread’s SIP IPs to your allow list (Australian and New Zealand trunks don’t have this step). At Username and password, leave both fields empty and select Next. Thread only sends them if your phone system challenges its transfers, and 3CX accepts them by DID and IP. The credentials 3CX uses are the inbound ones from step 5.
Outbound trunk settings at step 3, Username and password, marked Optional, with both fields empty and a Next button

Optional. Leave both empty for 3CX.

14

Find the agent's transfer number

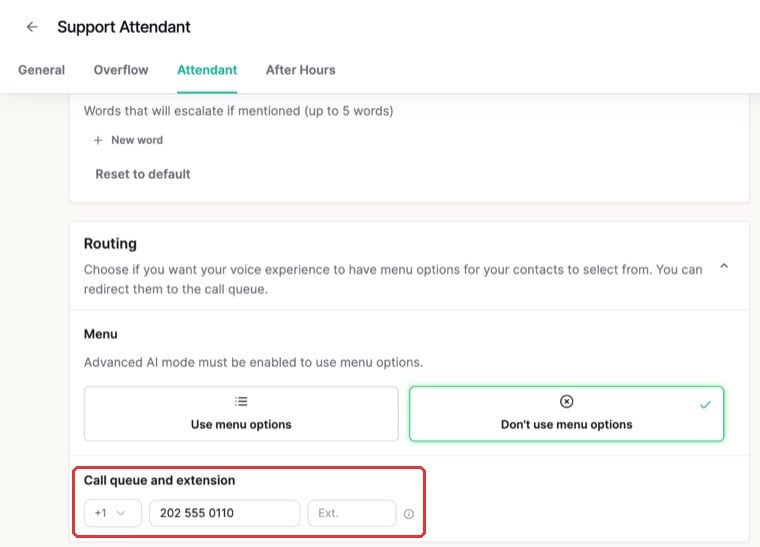
In Thread, open the voice agent and go to its Attendant tab. Under Routing, Call queue and extension is the number the agent transfers callers to. That’s the number 3CX needs to answer, and the one you test with in step 16.
Voice agent Attendant tab, Routing section with Don't use menu options selected and Call queue and extension set to +1 202 555 0110

Without menu options: one transfer number, in Call queue and extension.
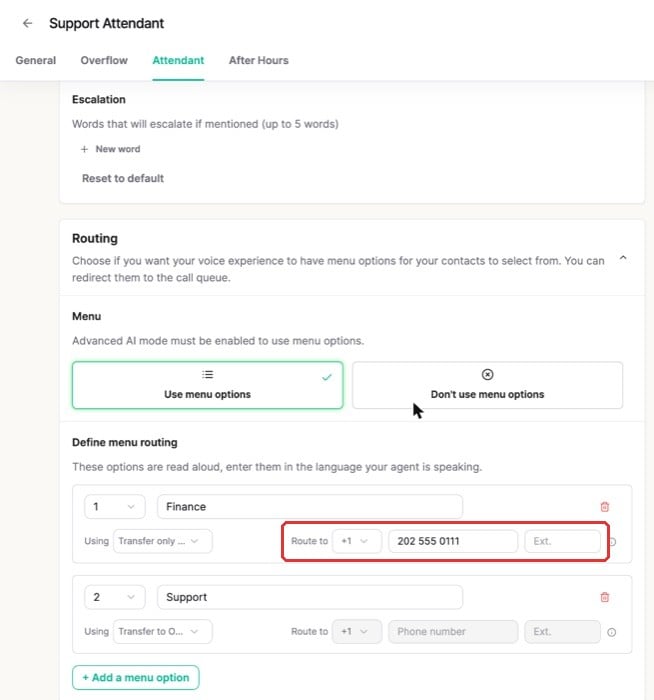
If the agent uses menu options (an IVR), the numbers are under Define menu routing instead. Each option that transfers to a phone number, such as Transfer only (no AI or ticket), has its own Route to number, and each of those needs to be a DID in step 15. Options set to Transfer to Overflow stay in Thread and don’t need one.
Voice agent Attendant tab with Use menu options selected; option 1 Finance uses Transfer only and routes to +1 202 555 0111, option 2 Support uses Transfer to Overflow with no number

With menu options: option 1 transfers to +1 202 555 0111 and needs a DID; option 2 stays in Thread.

In 3CX: add the transfer number

15

Add the transfer number as a DID, then save

On the 3CX trunk’s DID Numbers tab, select Add, enter each transfer number from step 14 in E.164 format (for +1 202 555 0110, enter +12025550110), and add the row. 3CX accepts a call from Thread only when it arrives on a DID the trunk knows. Calls on the trunk go to the Default route on its General tab, so set that to the extension, ring group or queue that should answer transfers. Select Save.
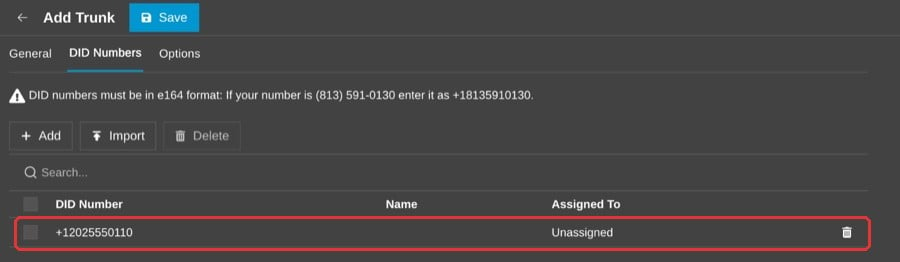
3CX trunk DID Numbers tab with +12025550110 added as a DID

The transfer number from step 14, in E.164 format.

In Thread: test transfers and finish the trunk

16

Skip the certificate and test the connection
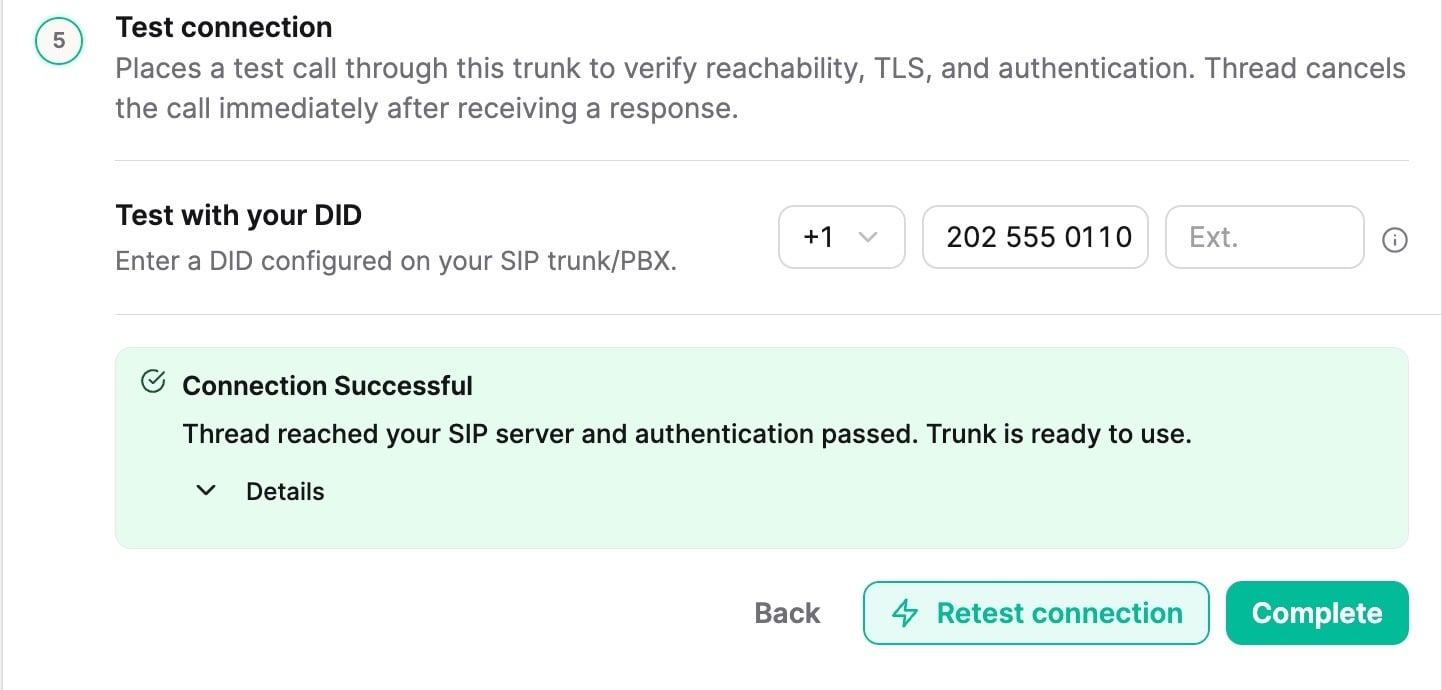
3CX doesn’t need Thread’s CA chain: Thread connects to 3CX, and 3CX doesn’t check the certificate of a server calling in, so there’s nothing to import. Select I’ve installed it to move on. Under Test connection, enter the transfer number from step 14, which you added as a DID in step 15. 3CX only accepts a call from Thread on a DID the trunk knows, so a number that isn’t on the trunk fails here. Then select Test connection. Thread hangs up as soon as 3CX answers. When it succeeds, select Complete.
Outbound Test connection step with a DID entered, a green Connection Successful message, and Back, Retest connection and Complete buttons

Connection Successful means TLS and routing to 3CX both work.

17

Link the agent and save

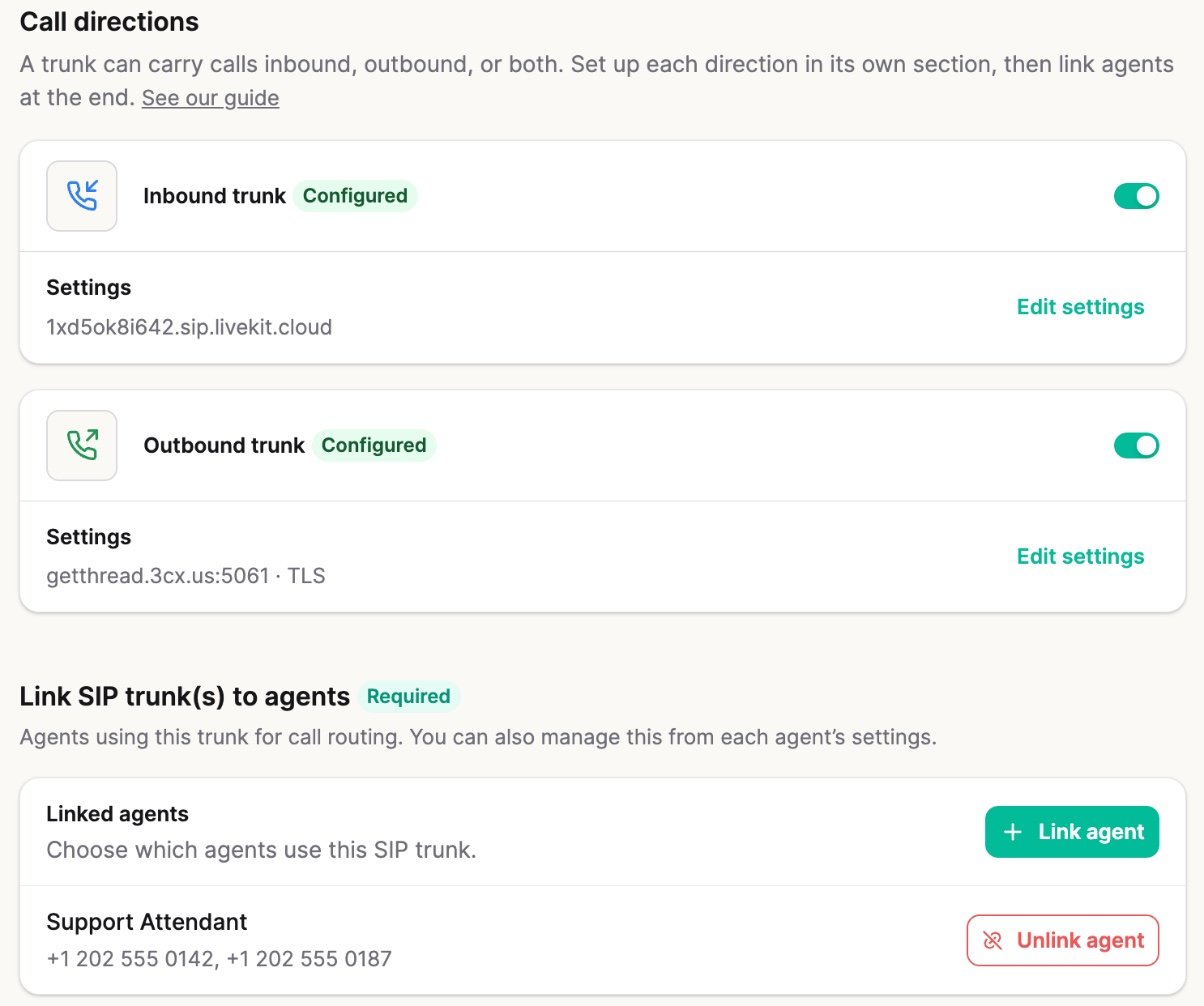
Select Link agent, pick the agent, then Save. Linking covers both of the agent’s numbers, Attendant and Overflow, and 3CX should forward to both over SIP. Both cards’ switches turn on, and the agent uses this trunk in both directions. You can also pick an agent’s trunk later under Use SIP Trunks in the agent’s settings.
Trunk page with Inbound and Outbound trunk cards both Configured with their switches on, and one linked agent with an Unlink agent button

Both sides configured and switched on, one linked agent.

In 3CX: send callers to Thread over SIP

18

Add an Outbound Rule for the agent's numbers

In Outbound Rules, add a rule whose prefix is the agent’s Thread number without the country code (for +1 202 555 0142, enter 2025550142). Set Route 1 to the Thread Voice AI trunk, Strip no digits, and Prepend the country code, +1 in the US and Canada.The agent’s numbers are in Thread under Voice > Agents: the Attendant number is under Your attendant phone number on the agent’s Attendant tab, and the Overflow number under Your overflow phone number on its Overflow tab. The trunk page also lists both next to the agent you linked in step 17. Add a rule for both the Attendant and the Overflow number, so 3CX sends every forward to the agent over SIP.Make sure no higher rule catches the number first. If a call still doesn’t match, Dashboard > Activity logs shows the number 3CX compared on a line like Looking for outbound rule: dialed = [+12025550142], processed: [2025550142]; use the processed form as the prefix. Then delete the test-number rule.
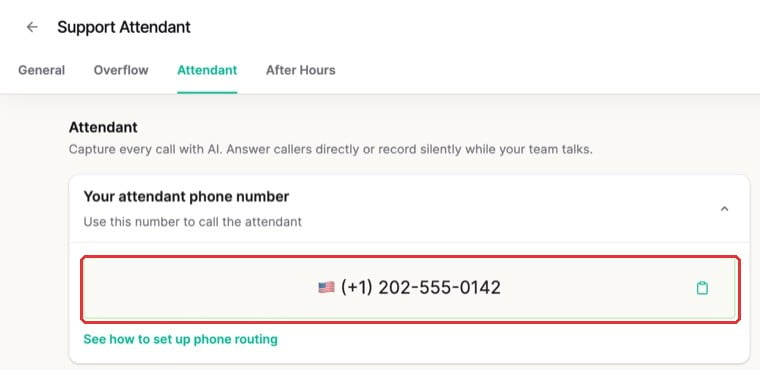
Voice agent Attendant tab with Your attendant phone number showing +1 202-555-0142 and a copy button

The Attendant number, on the agent's Attendant tab.
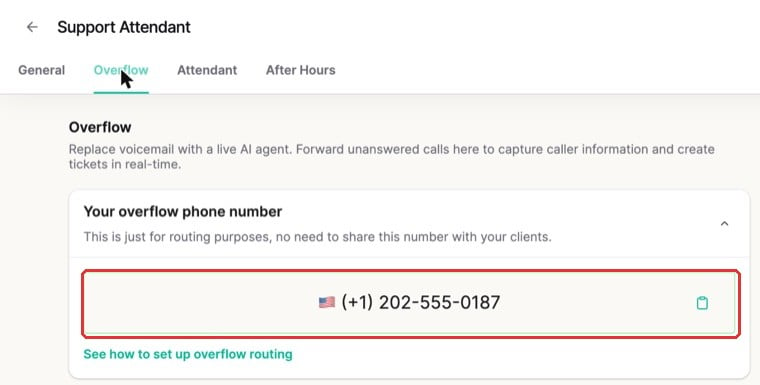
Voice agent Overflow tab with Your overflow phone number showing +1 202-555-0187 and a copy button

The Overflow number, on the agent's Overflow tab.
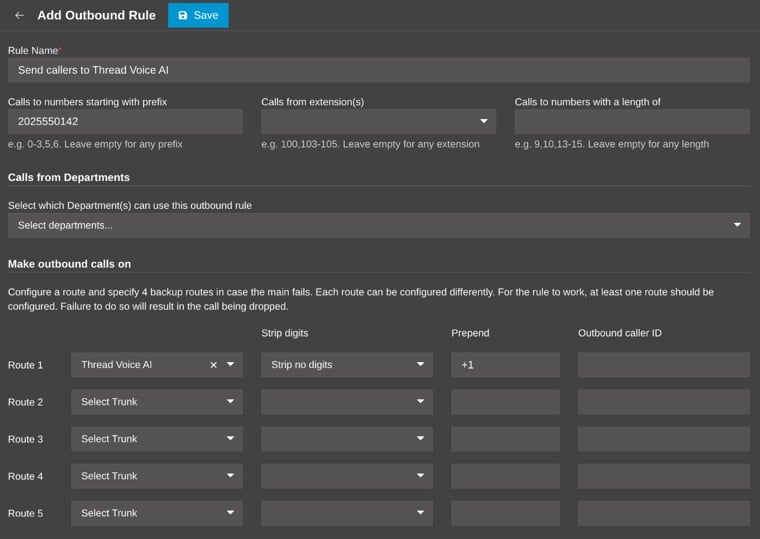
3CX outbound rule with the agent's number 2025550142 as the prefix, Route 1 on the Thread Voice AI trunk, Strip no digits and Prepend +1

Route 1 goes to the same trunk that receives Thread's transfers.

19

Forward callers to the agent's number

On the DID, IVR option or queue where support calls land, set the destination to External number and enter the agent’s Thread number. 3CX sends it through the rule from step 18, over SIP. If the forward never connects, check that Allow forwarding to external numbers in Ring Groups and Queues is turned on; see 3CX has two hidden blockers.
20

Place a test call

Call your support number. The agent answers, transfers over the outbound side, and the technician sees the caller’s number.
To stop using one direction later, switch it off on the trunk page in Thread and select Save. Its settings stay, so you can switch it back on. While agents are linked to the trunk, at least one direction has to stay on. To turn off both, select Disconnect all agents from the trunk’s menu in the SIP trunk list.

Troubleshoot the connection

Check the 3CX Event Log first. It names the trunk and the response for each failed call.