Configuring Auto Categorization
Auto Categorization is a powerful AI-driven feature that automatically assigns a ticket’s category properties based on definitions you set in the Thread admin panel.
Key Benefits of Auto-Categorization
- ⚡ Saves Time: Instantly classifies incoming IT tickets without manual effort.
- 🗂 Improves Organization: Keeps your PSA data clean and consistent by automatically setting Type, Subtype, and Item.
- 🎯 Boosts Accuracy: Reduces human error and ensures tickets are routed correctly from the start.
- 🔄 Streamlines Workflow: Works automatically on ticket creation, board changes, or via flows—no extra clicks required.
Use Cases
- New Ticket Creation: When a ticket is created, Auto-Categorization can immediately classify it using AI-driven rules.
- Board Changes: Automatically re-categorize tickets when moved between boards to maintain accurate reporting.
- Automated Flows: Combine Auto-Categorization with custom flows to ensure every ticket lands in the right category without human review.
Categorization Support by PSA Platform
Thread offers automatic categorization for various PSA systems, with the level of categorization varying by platform. Here's how it works for each:
PSA System | Categorization |
ConnectWise PSA | ✅ Type, Sub-Type, Item |
Autotask PSA | ✅ Issue Type, Sub-Issue Type, Ticket Type (Configuring Ticket Type Categorization) |
HaloPSA | ✅ Category 1 Values, Ticket Type (Configuring Ticket Type Categorization) |
Setting up Auto-Categorization is done in two steps: Configuring Access and Editing Rules.
1. Configure Access
- Navigate to the Admin Panel
- Go to Admin Panel → Assistive AI → Categorization: Manage Access
- Configure Automation Triggers
Here you will see two sections: Apply when and Apply to.
Categorization can be triggerd on two toggleable triggers: thread creation and board change. Toggle these on if you would like to trigger Categorization when a ticket arrives in Thread or when a ticket changes boards.
In Apply to, we can now configure what tickets the above triggers will affect. We can do this by restricting access by Clients, Boards, and Sources.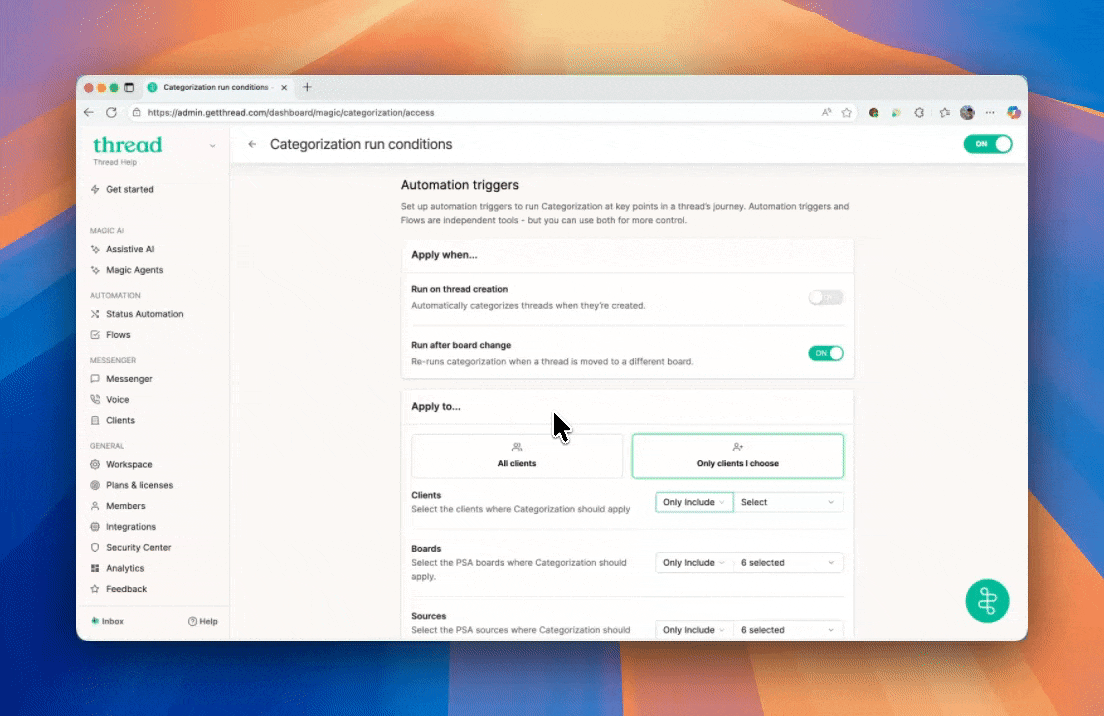
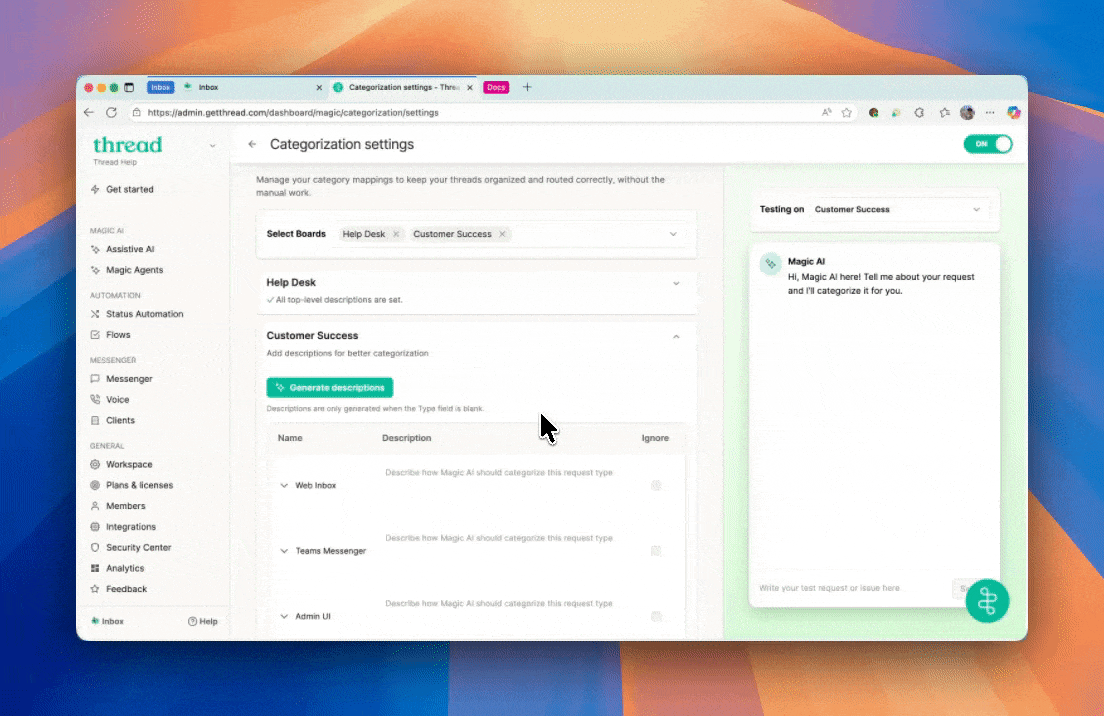
2. Configure Categorization Rules
- Navigate to the Admin Panel
- Go to Admin Panel → Assistive AI → Categorization: Edit
- Add Definitions for at least one one service board
- Start by clicking on Generate descriptions.
Thread will now use AI to auto generate descriptions for for your Types, provideing a great baseline for Auto-Categorization! From here, feel free to tweak and adjust to your liking.
- Optional: Ignore Certain Types
If you don’t want Magic AI to automatically assign certain category values, click the Ignore checkbox.
- Optional: Define Subtypes/Items
While Auto-Categorization works great out of the box, Subtypes and Items can be defined as well. These can be found as drop downs under their respective Types. - Test Auto Categorization Using the Emulator
After configuring Auto Categorization, you can test how Magic AI categorizes tickets using the emulator on the right. Try real-world scenarios like "I need a password reset" or copy and paste descriptions from recent service requests to see firsthand how Magic AI categorizes them.
- Continue to Iterate and Define Categories
Whenever Auto Categorization is triggered on a ticket, Thread will append an internal note explaining the categorization decision. This allows you to review and tweak your configuration on the fly to further train Magic AI as needed.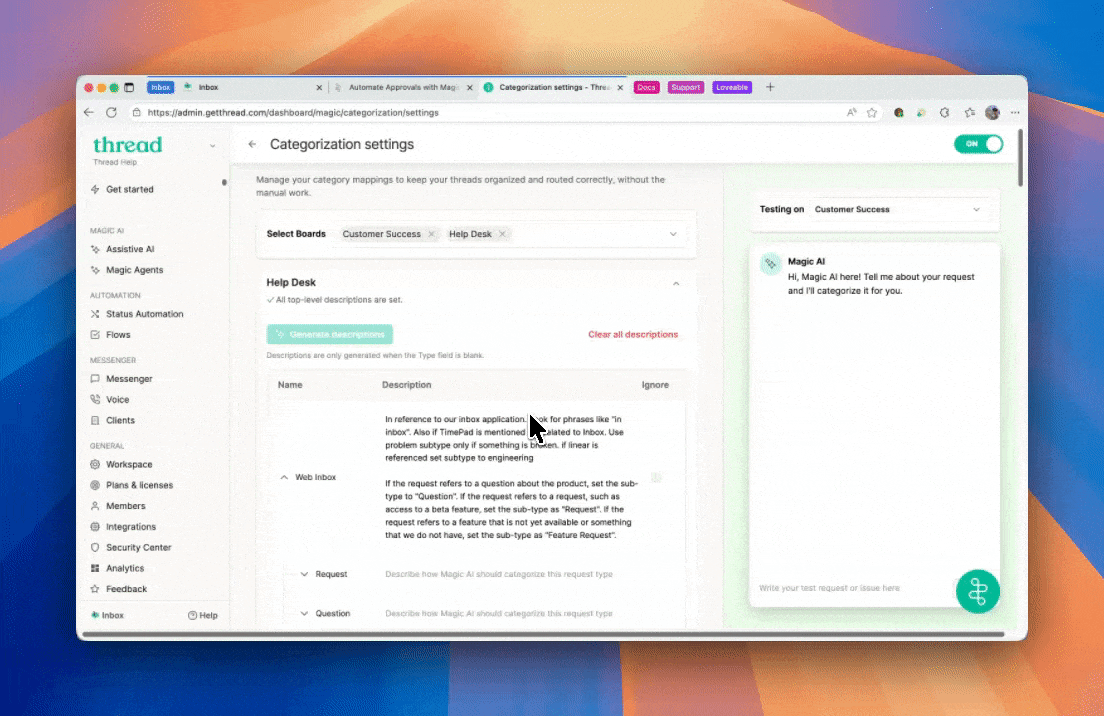
3. Configure a Flow to run Auto-Categorization (optional)
To run Auto-Categorization outside of thread creation or board change, follow the steps below. This set up is great for running Auto-Categorization when a thread is escalated to a new team, a thread is closed, and many more situations. This ensures that all the way through the thread lifecycle, the Categorization stays true, even when new information is added.
How to Configure the Flow
If you’ve already set up auto prioritization from earlier, you can add an additional action for categorization in the same flow. Otherwise, you can use the template below to set up auto categorization.
- Navigate to Flows
- Go to Admin Panel → Flows → Templates -> Auto-Categorization
- Apply Filters
Apply filters for when and you want the flow to run. For example, you can set the filters to specific types, territories, agreements, and much more! For more Flow examples, see our Flows guide - Ensure Auto Categorize Action Is Added
The Auto Categorize action is already included in the template. If you’re building your flow from scratch in the Flow Builder, scroll to the bottom, click +, then select Actions → Magic → Auto Categorize. - Save and Test
Save the flow changes, then test it by submitting a new service request that matches the ticket criteria you set in the flow.