Setting up Triage Agent

Setting Up Access
Let's get started! Triage Agent can start triaging your service tickets with just 5 minutes worth of setup!
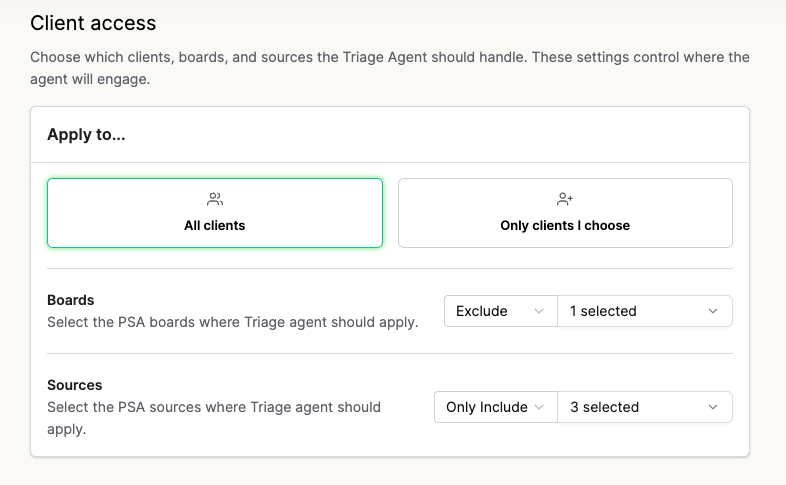
- Navigate to Thread Admin -> Magic Agents -> Triage Agent -> Manage Access
- Select which specific companies you want to run Triage Agent on, or select all of them!Recommended Setup
You will need to choose at least one company here to be able to test out Magic Agents. We recommend starting with your internal company. - Select which boards to run on. You can choose to either include specific boards or exclude.
- Select which sources should run Triage Agent. Again, you can choose to include/exclude.
Contact filtering
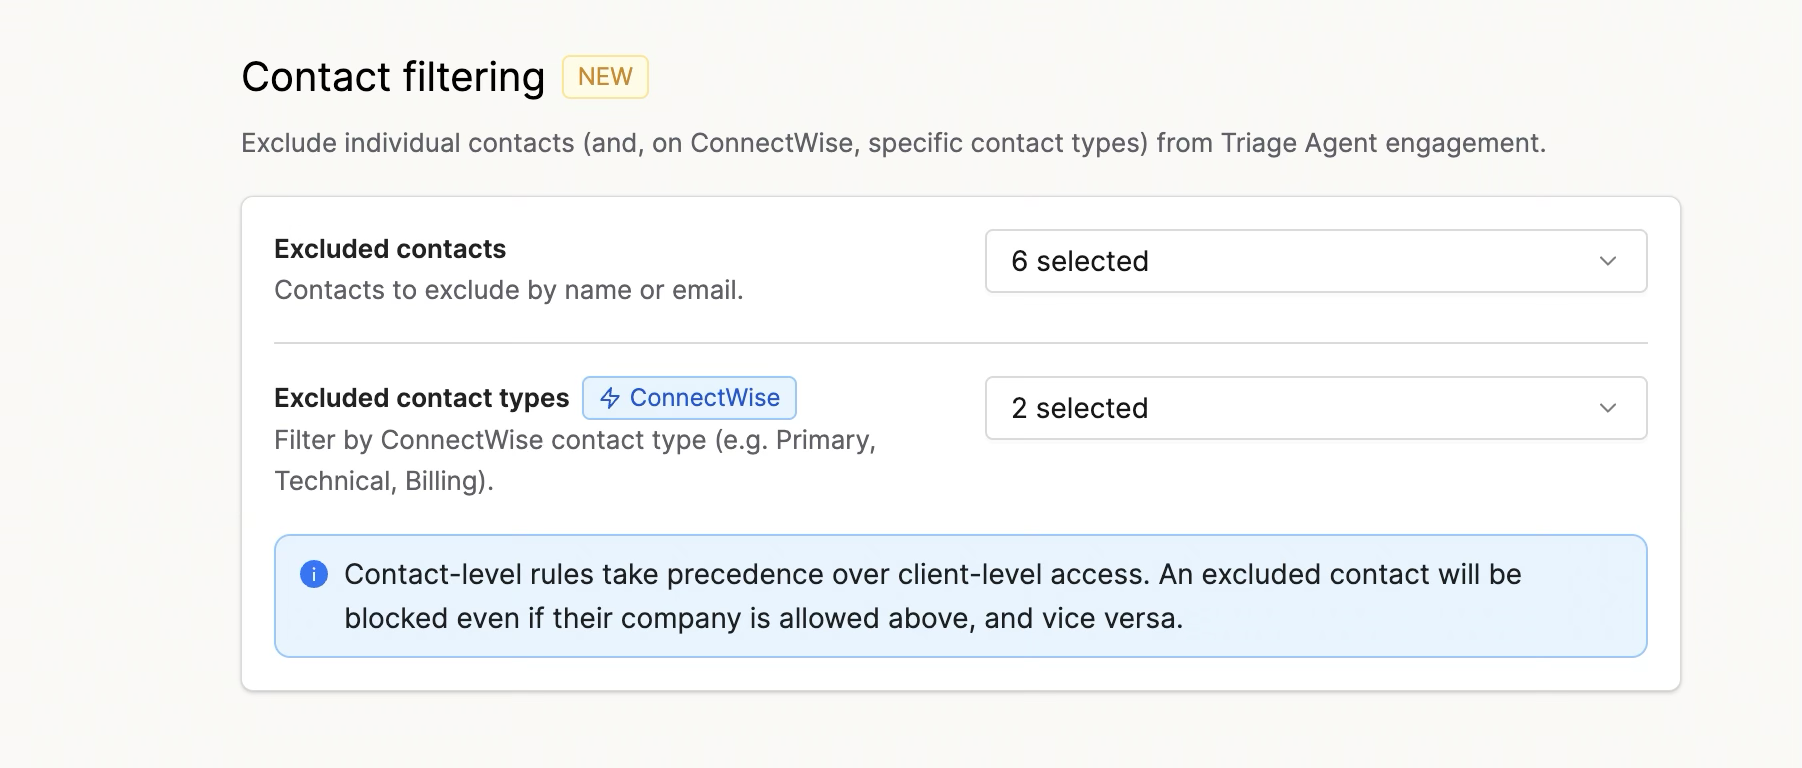
Refine access at the contact level, on top of your company and board settings:
- Excluded contacts: pick individual contacts the agent should never engage with.
- Contact types: include or exclude requests based on a contact's type (ConnectWise contact types).
Contact-level rules take precedence over company-level access. An excluded contact will be blocked even if their company is allowed above.
Request blocking
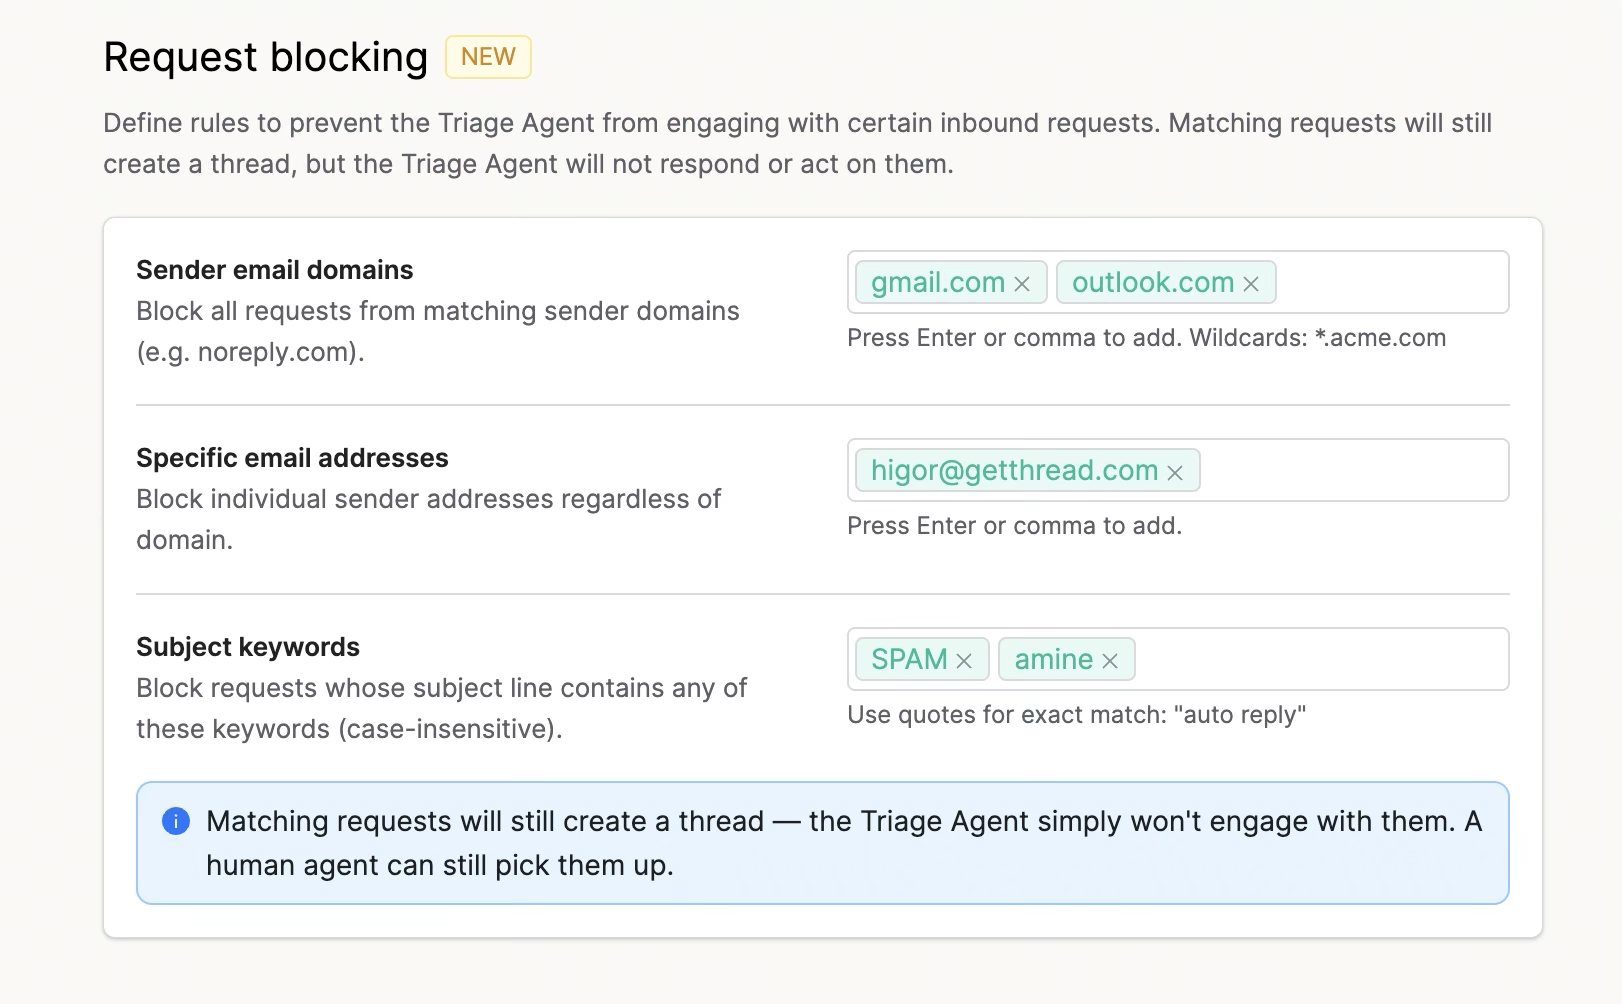
Block requests by what's in them, regardless of who sent them:
- Blocked domains: block any sender whose email domain matches. Wildcards are supported (for example, *.example.com).
- Blocked emails: block specific email addresses (not case-sensitive).
- Blocked subject keywords: block requests whose thread title contains any of these keywords (not case-sensitive).
What happens to a blocked request: The thread is still created, but the Triage Agent will not respond or act on it. A human agent can pick it up as usual.
Agent Settings
Next, we'll go to Thread Admin -> Magic Agents -> Triage Agent -> Edit Agent Settings
Here, we'll define the behavior, custom rules, and custom intents of the Triage Agent
Behavior
The Agent Behavior settings define how your Triage Agent interacts with contacts during initial conversations. These options allow you to control tone, information gathering, troubleshooting, and communication style to align with your support process.
Personality
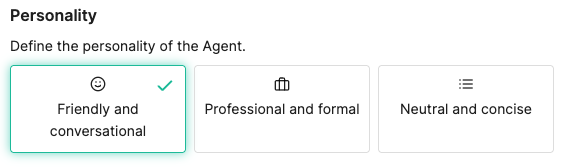
Define the personality of the Agent — how it speaks and engages with contacts.
- Friendly and conversational – Uses a warm, approachable tone, ideal for customer-facing support.
- Professional and formal – Maintains a businesslike, polished tone for professional environments.
- Neutral and concise – Keeps responses brief and to the point, without added tone or flair.
Information Gathering
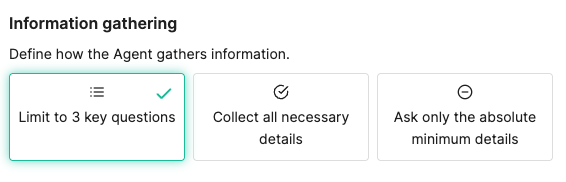
Determine how the Agent collects information from the contact.
- Limit to 3 key questions – The Agent will ask only the most relevant questions to quickly understand the issue.
- Collect all necessary details – The Agent will ask as many questions as needed to gather complete context.
- Ask only the absolute minimum details – The Agent will ask the fewest possible questions before escalating or passing the conversation along.
Troubleshooting
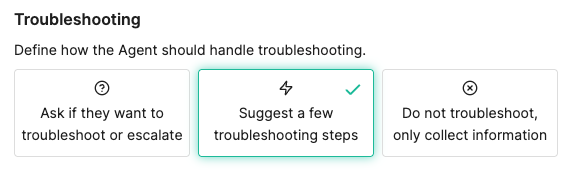
Define how the Agent handles troubleshooting steps.
- Ask if they want to troubleshoot or escalate – The Agent will offer the contact the choice to either begin troubleshooting or have the issue escalated.
- Suggest a few troubleshooting steps – The Agent will automatically offer simple, guided troubleshooting steps when appropriate.
- Do not troubleshoot, only collect information – The Agent will skip troubleshooting and focus solely on gathering details for escalation.
Communication Style
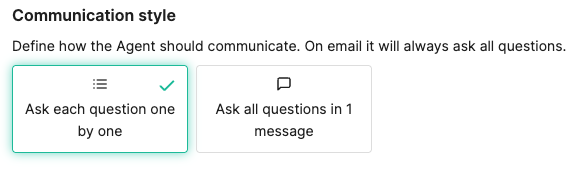
Define how the Agent structures its conversation flow.
- Ask each question one by one – The Agent will ask questions individually, adjusting based on each response.
- Ask all questions in one message – The Agent will send all questions at once, allowing the contact to respond in a single message.
Escalation
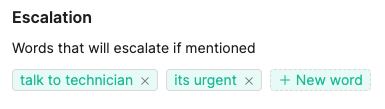
Escalation words help the Agent recognize when a contact’s message needs to be prioritized or handed off to a human technician. When any of these words or phrases are detected, the Agent will automatically escalate the conversation.
Adding Escalation Keywords
You can define specific words or phrases that, when mentioned by the contact, trigger escalation. Examples include:
- “talk to technician”
- “it’s urgent”
- “need immediate help”
- “this isn’t working”
- “can someone call me”
- “critical issue”
- “system down”
To add a new word or phrase, click + New word and enter your desired keyword.
Escalation Message

The Escalation Message is the response shown to the contact when a thread is escalated to a technician.
This field can be used in two ways:
- Verbatim message – The Agent will send the exact text entered here to the contact.
- Prompt-based message – The Agent will use your text as a guiding prompt to generate a personalized message in its own words.
For example, the message below guides the Agent’s tone and intent, rather than serving as a direct response:
“Show empathy and use calming language to let them know that you care about helping them out.”
This approach helps the Agent maintain consistency and professionalism while adapting its response to the situation.
Custom Thread Closed Message

The Custom Thread Closed Message is shown to the contact when a thread is automatically closed by the Agent.
This field functions the same way as the Escalation Message field and can be used in two ways:
- Verbatim message – The Agent will send exactly what you enter here to the contact.
- Prompt-based message – The Agent will use your text as a prompt to generate its own closing message in a similar tone or style.
Custom Rules
Partners that are new to Thread as of 6/2/26 will use the setup instructions linked at the button below!
The Custom Rules field is where you can fully define how the AI Triage Agent should behave beyond the standard settings above.
This section allows for complete customization of the Agent’s logic, tone, and behavior. You can outline exactly how the Agent should triage requests, handle specific scenarios, or interpret unique types of messages.
Custom rules can include instructions such as:
- Inferring the product or topic from message context, rather than asking the user directly.
- Using confidence-based logic to decide whether to troubleshoot or escalate.
- Asking only targeted clarifying questions when information is missing or ambiguous.
- Summarizing only the most relevant findings instead of returning full articles.
- Escalating when access or permissions are required, or when an issue can’t be verified with available data.
Because this field supports up to 5,000 characters, you’re encouraged to create a detailed and descriptive prompt that reflects your organization’s desired workflow and tone.
Service Catalog
The Service Catalog defines the scenarios or “intents” that the Magic Agent can recognize and act on during triage. Each intent represents a specific type of request or workflow the Agent should understand and handle automatically.
You can create as many or as few intents as you need to match your service offerings or support processes. Each catalog entry can be customized, edited, or disabled at any time, and scenarios can also be defined per client for more tailored behavior.
For detailed guidance on building and optimizing custom intents, follow our Custom Intent Creation Guide.
Settings
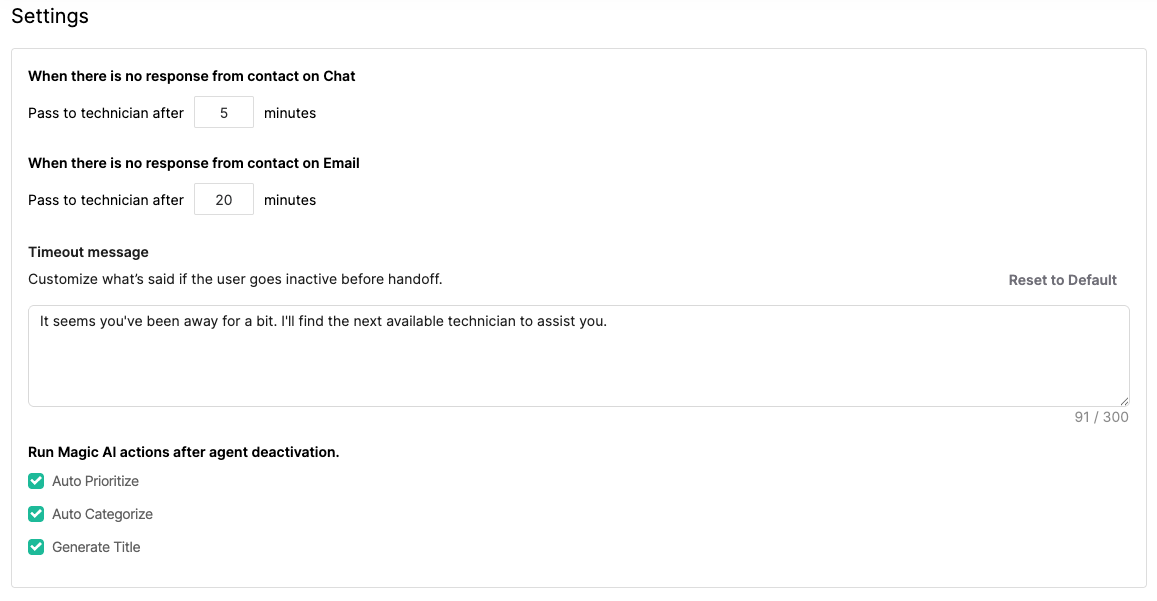
The Settings page defines how the Triage Agent behaves when there is no response from the contact and what happens when the Agent deactivates. These options ensure a smooth handoff to a technician and proper thread handling even when the contact becomes inactive.
Response Timeout
These settings determine how long the Agent should wait for a reply before passing the thread to a technician.
- When there is no response from contact on Chat – Define the timeout (in minutes) for chat-based conversations.
- When there is no response from contact on Email – Define the timeout (in minutes) for email-based conversations.
Timeout Message
The Timeout Message is shown when a contact becomes inactive before the Agent hands off the thread to a technician. This message can either be used verbatim or as a prompt for the Agent to craft its own version in a similar tone.
Default message:
It seems you've been away for a bit. I'll find the next available technician to assist you.
You can edit this message at any time to match your support tone or escalation policy.
Run Magic AI Actions After Agent Deactivation
After the Triage Agent deactivates, you can automatically run other Magic AI features to complete thread processing. These actions help ensure that all triaged threads are properly categorized and documented.
Available options include:
- Auto Prioritize – Assigns an appropriate priority level to the thread.
- Auto Categorize – Assigns the correct category and subcategory based on context.
- Generate Title – Creates a concise and descriptive thread title.
You can enable or disable any of these options as needed.
Status Mapping

The Status Mapping section allows you to define which statuses the Magic Agent should use during triage and escalation.
This mapping ensures that the Agent’s actions align with your existing board and workflow statuses. For example, you can configure which status to apply when the Agent begins triage, when it escalates to a technician, or when a thread is closed automatically.
Click Configure to open the mapping interface. From there, you can:
- Select the appropriate status for each stage of the triage process.
- Map statuses across different boards if your organization uses multiple workflows.
- Ensure consistency between your PSA’s native statuses and Magic Agent automation.
Proper status mapping helps maintain smooth synchronization between automated Agent actions and your team’s manual processes.
This is required if you want Magic Agents to move tickets to an in progress status when it's working on an issue or if you want it to close tickets when it resolves it. If you haven't done this yet, head over to Status Automations to get started. If you have already done this, skip to step 9.