How to Set Up and Configure a Voice AI

Phase 1: Initial Configuration (Foundation)
Concept
Establishing the digital "identity" of your AI agent and configuring the mandatory mechanisms required for it to operate within your PSA.
Value
This ensures the AI sounds professional and prevents critical system errors. By setting a default contact, you guarantee that every call results in a ticket, even if the caller is unidentified, preventing data loss.
How To
- Create the Agent:
- Navigate to Voice > Agents and click Create Agent.
- Agent Name: Give it an internal name (e.g., "Thread Overflow").
- Set the Personality:
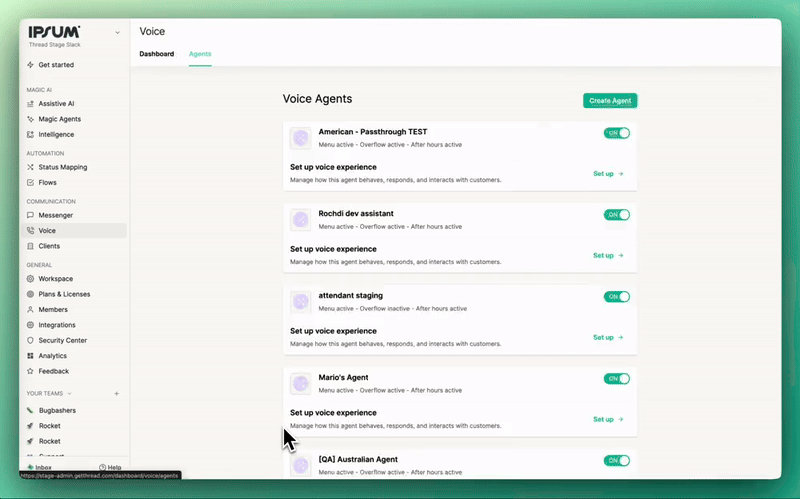
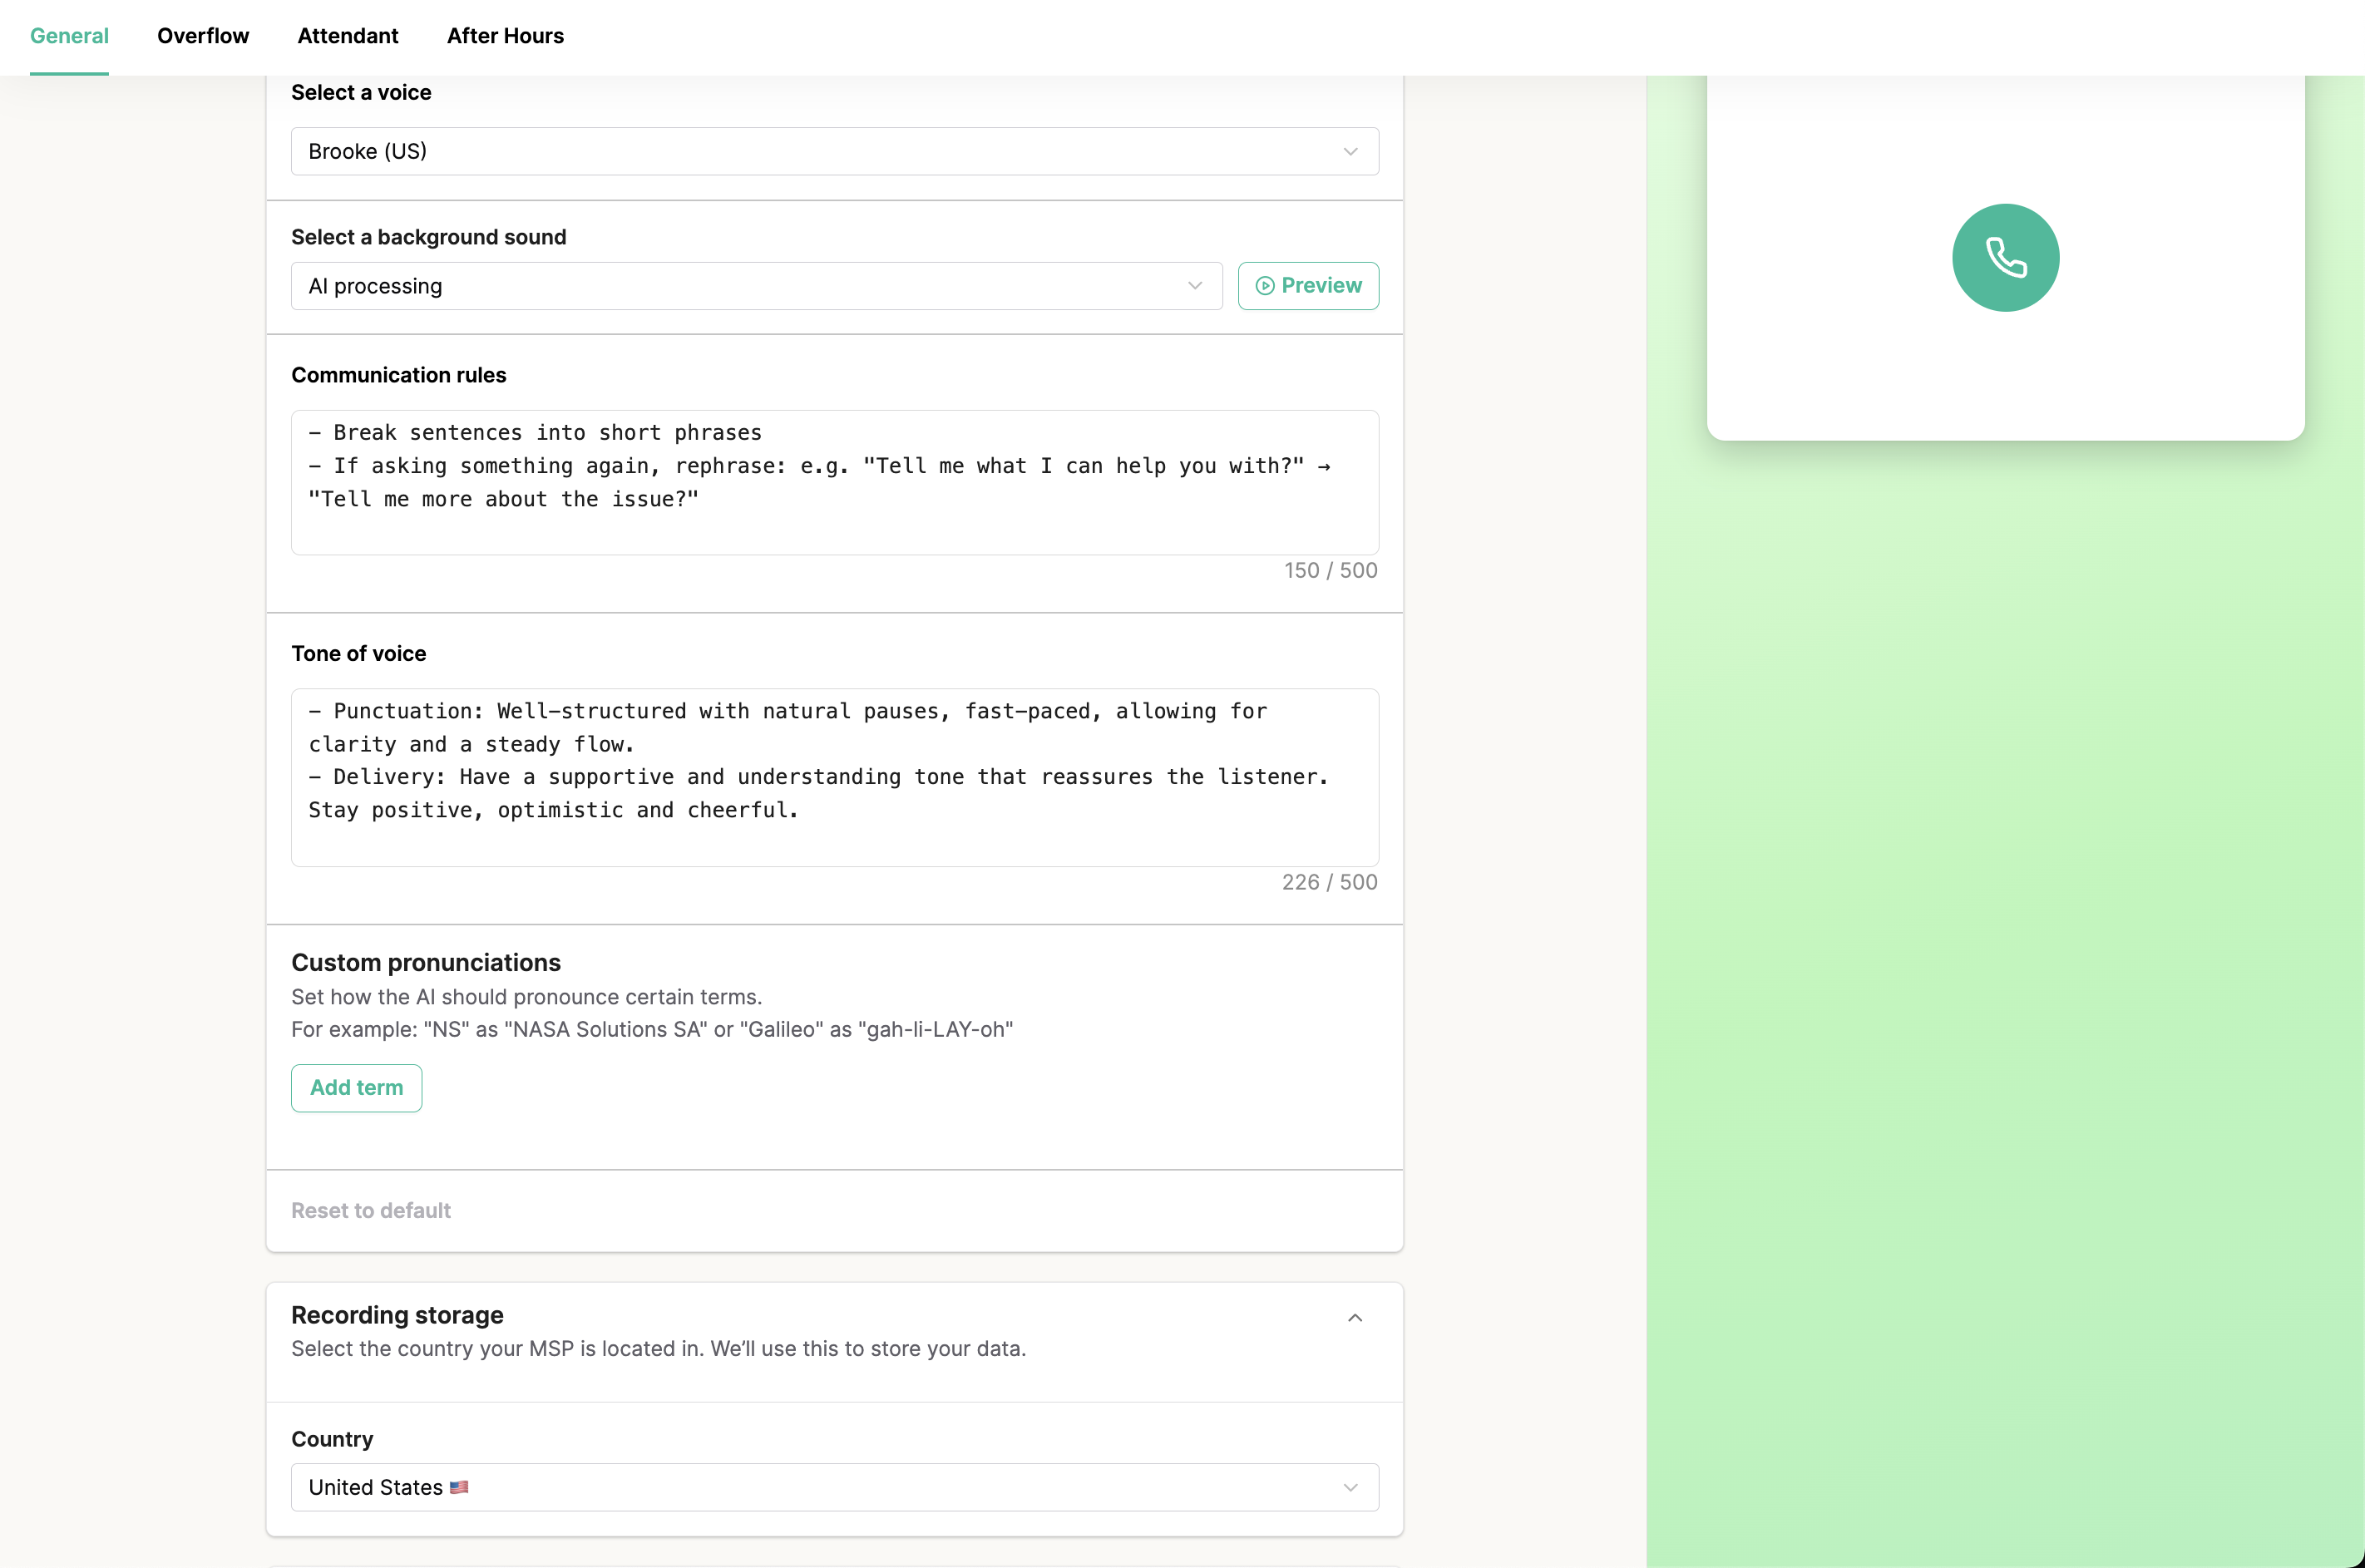
- Voice: Select a voice (e.g., Brooke (US)).
- Tone: Choose the desired tone (e.g., Professional, Friendly).
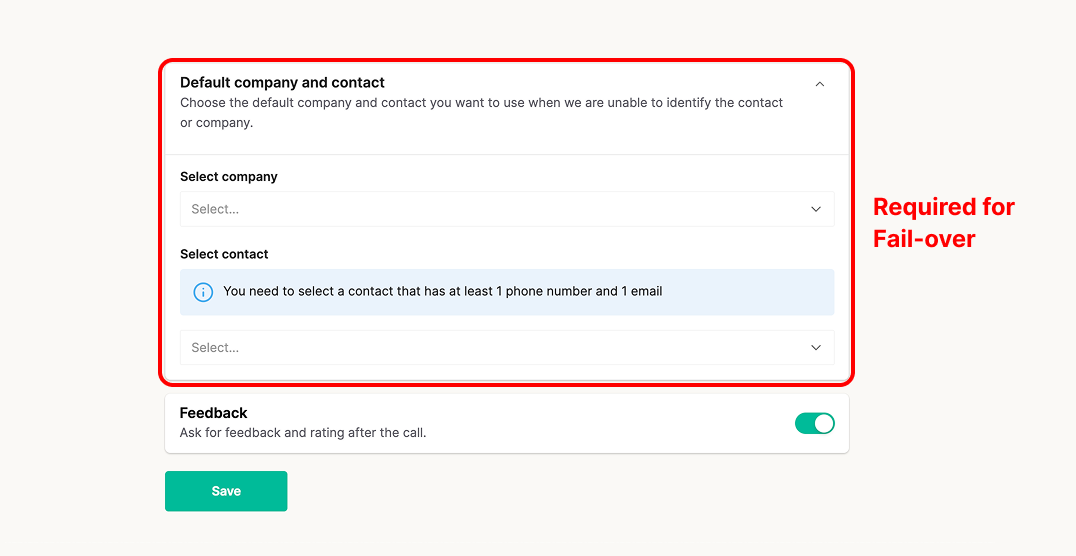
- Default Company & Contact (CRITICAL):
- Action: You MUST select a "Default Company" and "Default Contact".
- Why: If the AI cannot identify the caller's phone number in your PSA, it needs a fallback contact to create the ticket against. Without this, the system will error out.
- Click Save.
Isolate AI-generated traffic from standard phone traffic within your PSA by using unique "Source" identifiers.
-This provides immediate visibility into AI performance. Management can instantly review a dedicated feed of AI transcripts and tickets to measure ROI and quality, without having to dig through a mixed "Phone" ticket board.
- The Problem: Most MSPs use a generic "Phone" source for everything, making it hard to track AI performance.
- The Solution (Unique Source):
- Create a unique Source in your PSA called "Voice AI" (or similar).
- In Thread, under Agent > Overflow > Default Board and Source, select this new "Voice AI" source.
- Create the Inbox View:
- Go to the Thread Inbox.
- Create a new View filtered by
Source = Voice AI. - Benefit: This creates a dedicated feed of all calls handled by the AI, allowing management to review transcripts and performance in one place without digging through other tickets.
Phase 2: Overflow & After Hours (Voicemail Replacement)
Concept
Replacing your static, passive voicemail box with an active AI agent that answers calls, takes intelligent messages, and creates tickets when your team is unavailable.
Value
This eliminates "phone tag" and ensures you never miss a revenue opportunity or urgent issue. You get 24/7 coverage without additional staffing costs, and clients feel heard rather than ignored.
How To
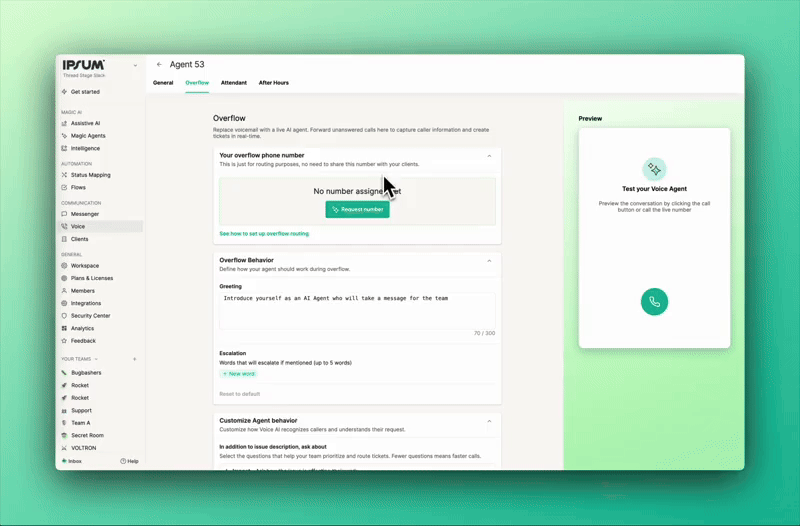
- Get a Number:
- Go to the Overflow tab.
- Click Request Number, select your country, and confirm.
- Set up your Phone System for Voice AI
This step determines when the AI picks up the phone. Depending on your goals, the AI can act as a "Safety Net" (catching missed calls) or a "Front Desk" (answering every call).
Value
Configuring this correctly ensures the AI activates at the exact right moment. Wrong settings can lead to the AI interrupting your team or, conversely, never answering at all.
How To
Choose the scenario below that matches your desired workflow and configure your VoIP/PBX accordingly.
Scenario A: The "Overflow" (Voicemail Replacement)
Best for teams who want humans to answer first and use AI only when unavailable.
Logic: Incoming Call → Rings Your Team → No Answer → Forwards to Thread Agent.
- VoIP Configuration:
- Log into your VoIP provider.
- Locate your Main Ring Group or Call Queue.
- Find the settings for "If no answer," "Busy," or "Max wait time reached."
- Set the destination to the Thread Overflow Number (from Phase 2).
- Note: Ensure your "After Hours" logic also points to this number.
Scenario B: The "Attendant" (The Front Desk)
Best for teams using the AI to triage, screen spam, or route calls (Phase 3 - Auto Attendant).
- Logic: Incoming Call → Thread Agent Answers Immediately → Agent Transfers Valid Calls → Your Team/Queue.
- VoIP Configuration:
- Log into your VoIP provider.
- Point your Main Phone Number (DID) to forward immediately to the Thread Overflow Number.
- ⚠️ CRITICAL LOOP WARNING: When using this mode, you must ensure the Thread Agent transfers calls to a specific Ring Group Extension or Technician Queue, NOT back to the Main Phone Number. Forwarding back to the Main Number will cause an infinite loop.
Phone System Specific Forwarding Instructions
RingCentral -
→Admin Portal > Phone System > Call Handling & Forwarding
→Select main line > After Hours
→Enable 'Forward Calls' > 'External Number'
→Enter Overflow Number with +1
→Set Custom Hours schedule
→Rule applies immediately upon save
8X8
→Configuration Manager > Virtual Office
→Select extension > Call Forwarding > Time-Based
→Add New Rule: 'After Hours Overflow'
→Set time schedule for after hours
→Forward to: External Number (Overflow Number)
→Ensure rule order has this BEFORE other after-hours rules
Mitel/ShoreTel
→Web Console > Users & Extensions
→Select main hunt group > Schedules
→Create schedule: 'After Hours'
→Add routing: Forward External to [Overflow Number]
→Associate schedule with hunt group
→Test in Schedule Simulator before deploying
Microsoft Teams
→Teams Admin Center > Voice > Call Queues (or Auto Attendants)
→Select queue/attendant > Call Routing > After Hours
→Add external transfer: Enter Overflow Number
→Set business hours in 'Hours' section
→Changes can take 5-10 minutes to propagate
CISCO
→Unified CM Administration > Call Routing > Time Periods
→Create 'After Hours' time period
→Route Pattern > Add pattern for main number
→Calling Search Space: Redirect to Overflow Number during After Hours time period
→Apply configuration to cluster
- Immediate Testing (Mandatory): Before customizing further, call the number immediately to verify it connects.
Customize Behavior:
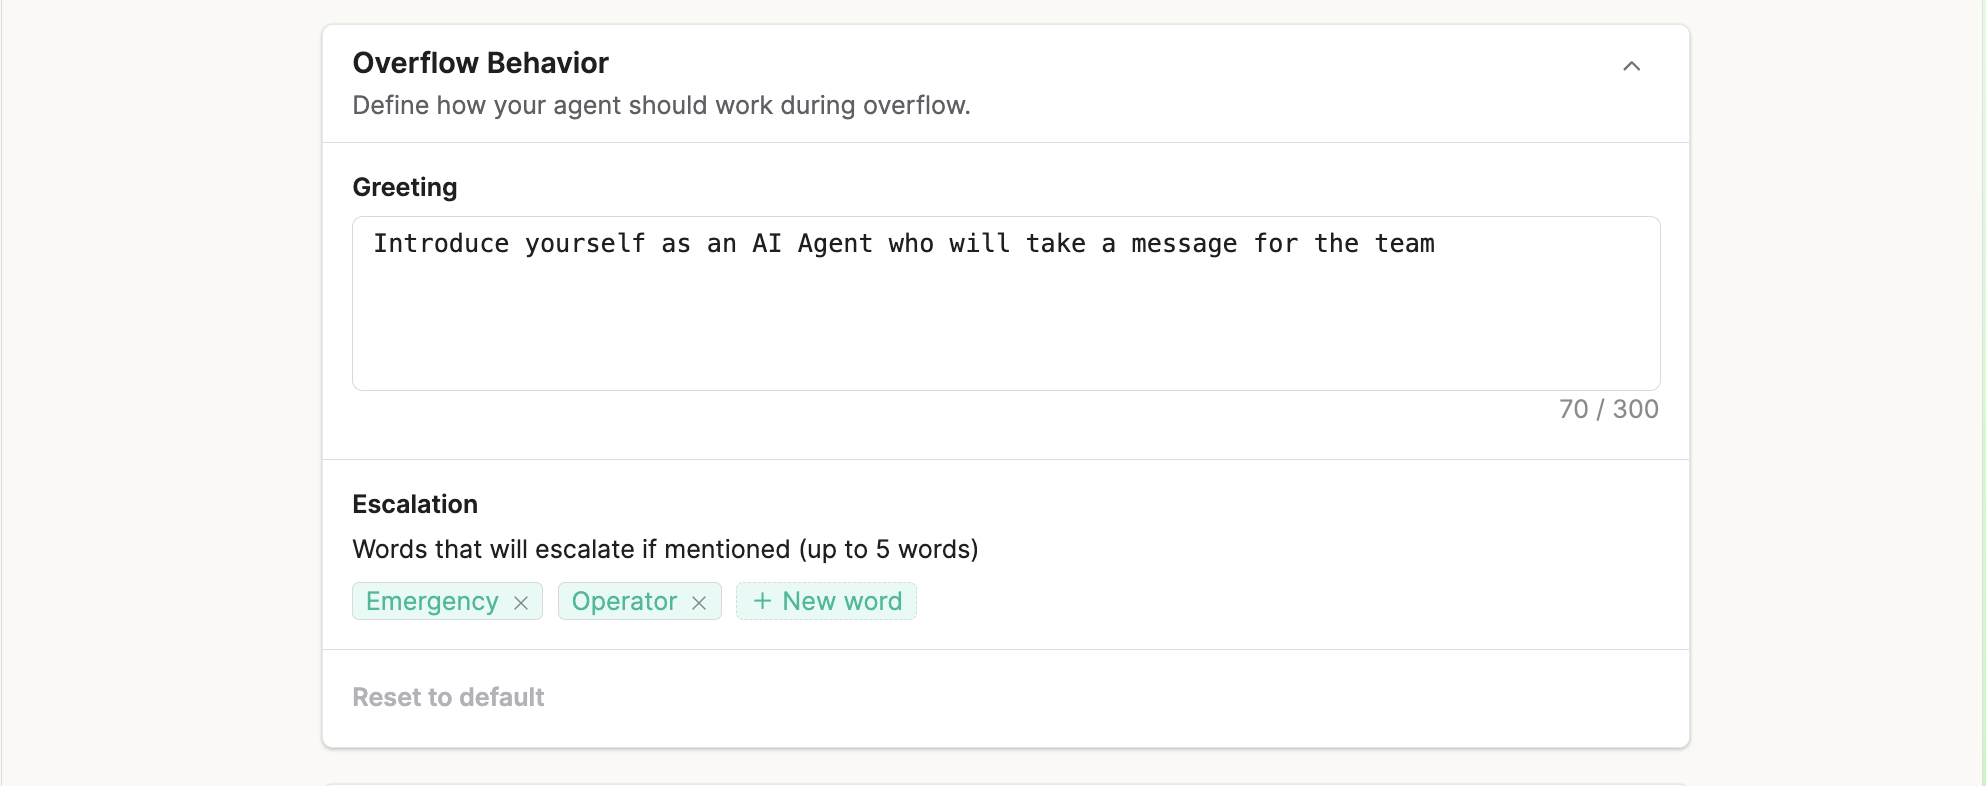
- Greeting: Adjust the script (e.g., "I'm an AI agent taking a message...").
- Escalation: Add keywords (e.g., "Emergency," "Human") that trigger a transfer to a human.Flags escalation attempts based on up to five words or phrases. This does not automatically change ticket priority.
- Custom Questions: Add questions if specific data is needed (e.g., "What is the best callback number?").
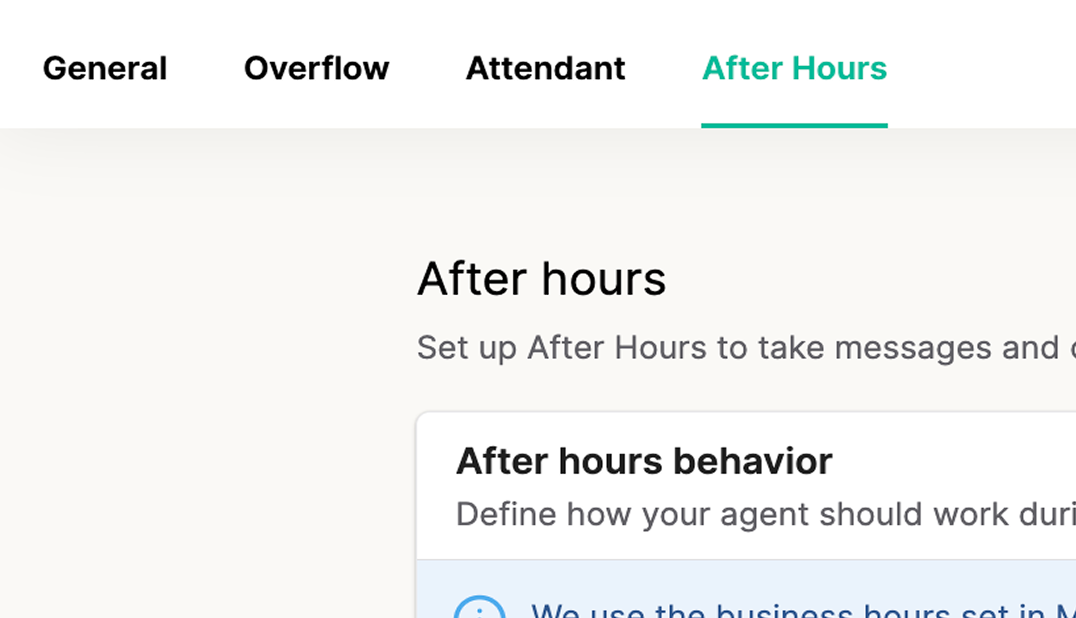
- After Hours Setup:
- Go to the After Hours tab.
- This syncs with your Messenger Hours.
- Define how the agent behaves when your business is closed (typically similar to Overflow but with an "Office is closed" greeting).
Phase 3: The Auto-Attendant (Walk -> Run)
Phone System Forwarding Instructions
Method: Using the Teams Admin Center (Auto Attendant) Note: This is the standard method for routing a main business line.
-Log in to the Microsoft Teams Admin Center.
-Navigate to Voice > Auto attendants.
-Select the Auto Attendant currently handling your main line (or create a new one).
- In the Call flow section, locate the "Call routing options".
-Select Redirect call.
-Choose External phone number as the destination.
- Enter the Thread Voice AI phone number (formatted as +1XXXXXXXXXX).
-Click Submit or Save.
Tip: Ensure the Resource Account assigned to this Auto Attendant has a valid "Microsoft Teams Phone Resource Account" license and, depending on your setup, a calling plan or direct routing usage to allow external transfers.
8x8
Option A: Forward all calls
Method: Admin Console (Forwarding a User or Auto Attendant)
-Option A: Forwarding Main Line (Auto Attendant)
- Log in to the 8x8 Admin Console.
- Go to Auto Attendants.
- Select the Auto Attendant managing your incoming calls.
- Navigate to Call Handling (or "Open Hours" menu).
-Set the action for "Open Hours" (or "Anytime") to Transfer to.
-Select External number.
- Enter the Thread Voice AI phone number.
-Click Save.
Option B: Forwarding a Specific Extension/User
-Go to Users and edit the specific user profile.
-Select Call forwarding rules.
-Uncheck/Disable existing rules if necessary to prevent conflicts.
-Create a new rule or edit "Forward all calls".
-Select Forward directly to and enter the Thread Voice AI phone number.
-Click Save.
BVoIP (3CX)
Note: BVoIP is built on 3CX. These instructions apply to the 3CX Management Console.
Method: Inbound Rules (DID Forwarding)
-Log in to the Management Console.
-Go to Inbound Rules.
-Click + Add DID Rule.
-Enter a name (e.g., "Forward to Thread AI").
I-n the DID/DDI field, select the main trunk number you wish to forward.
-Under Route calls to, select Send call to number.
-Enter the Thread Voice AI phone number.
-Click OK (Save) at the top.
RingCentral
Option A: Admin Portal (Auto-Receptionist or User)
-Log in to the RingCentral Admin Portal (service.ringcentral.com).
-Go to Phone System > Auto-Receptionist > General Settings.
-Locate IVR Settings or Call Handling.
-Set "Company Hours" (or "After Hours") handling to Forward to Extension.
Note: It is often cleaner to create a "Virtual User" extension first that forwards to the AI, then route the Auto-Receptionist to that user.
Option B: Direct User Forwarding
Go to Users > User List.
Select the extension receiving the calls.
Go to Call Handling & Forwarding.
Under "Incoming Calls", find Forward to other's phones.
Click Add number and enter the Thread Voice AI phone number.
Ensure this number is at the top of the list and set to "Active".
Mitel (ShoreTel)
Method: Mitel/ShoreTel Director (Route Points) Note: Using a "Route Point" is the most reliable server-side method.
-Log in to ShoreTel Director (or Mitel Connect Director).
-Navigate to Call Control > Route Points.
-Click New to create a new Route Point.
-Name it "Thread AI Forward" and assign it an extension.
-Uncheck "Enable Mailbox" (you do not want voicemail here).
-Click Save, then select the Route Point you just created to edit it.
-Go to the On Hours (or applicable schedule) tab.
-Change "Call Forward" to Always.
-In the destination field, enter the Thread Voice AI phone number (include the trunk access code if needed, e.g., 915550199).
-Click Save.
-Point your Main Trunk group or DNIS map to this Route Point extension.
Cisco
Method: Cisco Unified Communications Manager (CUCM)
-Log in to Cisco Unified CM Administration.
-Go to Call Routing > Directory Number.
-Search for and select the Directory Number (DN) you want to forward (e.g., the main line extension).
-Scroll down to Call Forward and Call Pickup Settings.
-Locate the Forward All field.
-In the Destination box, enter the Thread Voice AI phone number.
-Important: Ensure you include the outbound prefix if required (e.g., 9 followed by the number).
-In the Calling Search Space (CSS) dropdown next to the destination, select a CSS that has permission to make external calls.
-Click Save and then Apply Config.
Concept
Deploying the main phone line AI in a staged approach. You begin with a "silent" mode to test connectivity and infrastructure before allowing the AI to speak and route calls.
Value
This "Walk, then Run" strategy mitigates risk. It allows you to verify that audio recording, transcription, and routing are working perfectly without disrupting the client experience. Once verified, you can switch to full AI with confidence.
How To
Feature | Minimal AI Mode (Passthrough) Option A | Advanced AI Mode (Full IVR) Option B |
Concept | The "Walk" Phase (Silent Mode) | The "Run" Phase (Active Agent) |
Does the AI Speak? | No. The AI remains silent. | Yes. The AI greets and guides the caller. |
Caller Experience | Caller hears a standard ring and is connected directly to your technician line or queue. | Caller interacts with an AI receptionist, selects menu options, or asks questions. |
Routing | Static. Calls go to one pre-set destination (e.g., your main queue). | Dynamic. Calls are routed based on caller input (e.g., "Press 1 for Support"). |
Ticket Creation | Yes. Records, transcribes, and creates tickets in the background. | Yes. Records, transcribes, and creates tickets based on the interaction. |
Setup Complexity | Low. Requires only a transfer number and timeout setting. | Medium. Requires configuring menus, prompts, and panic words. |
Best Used When... | You want AI data (transcripts/tickets) but are not ready for an AI voice to answer the phone yet. | You are ready to fully automate call routing and replace a traditional phone menu. |
Option A: Minimal AI Mode (Silent / Passthrough) Start here. This allows you to "Walk" before you "Run".
- Action: In the Attendant tab, select Minimal AI Mode.
- Behavior: The AI stays silent. It simply passes the call through to your team while recording and transcribing the audio in the background.
- Routing: You must enter a "Call queue and extension" number (your actual ring group/technician line) so the AI knows where to send the call.
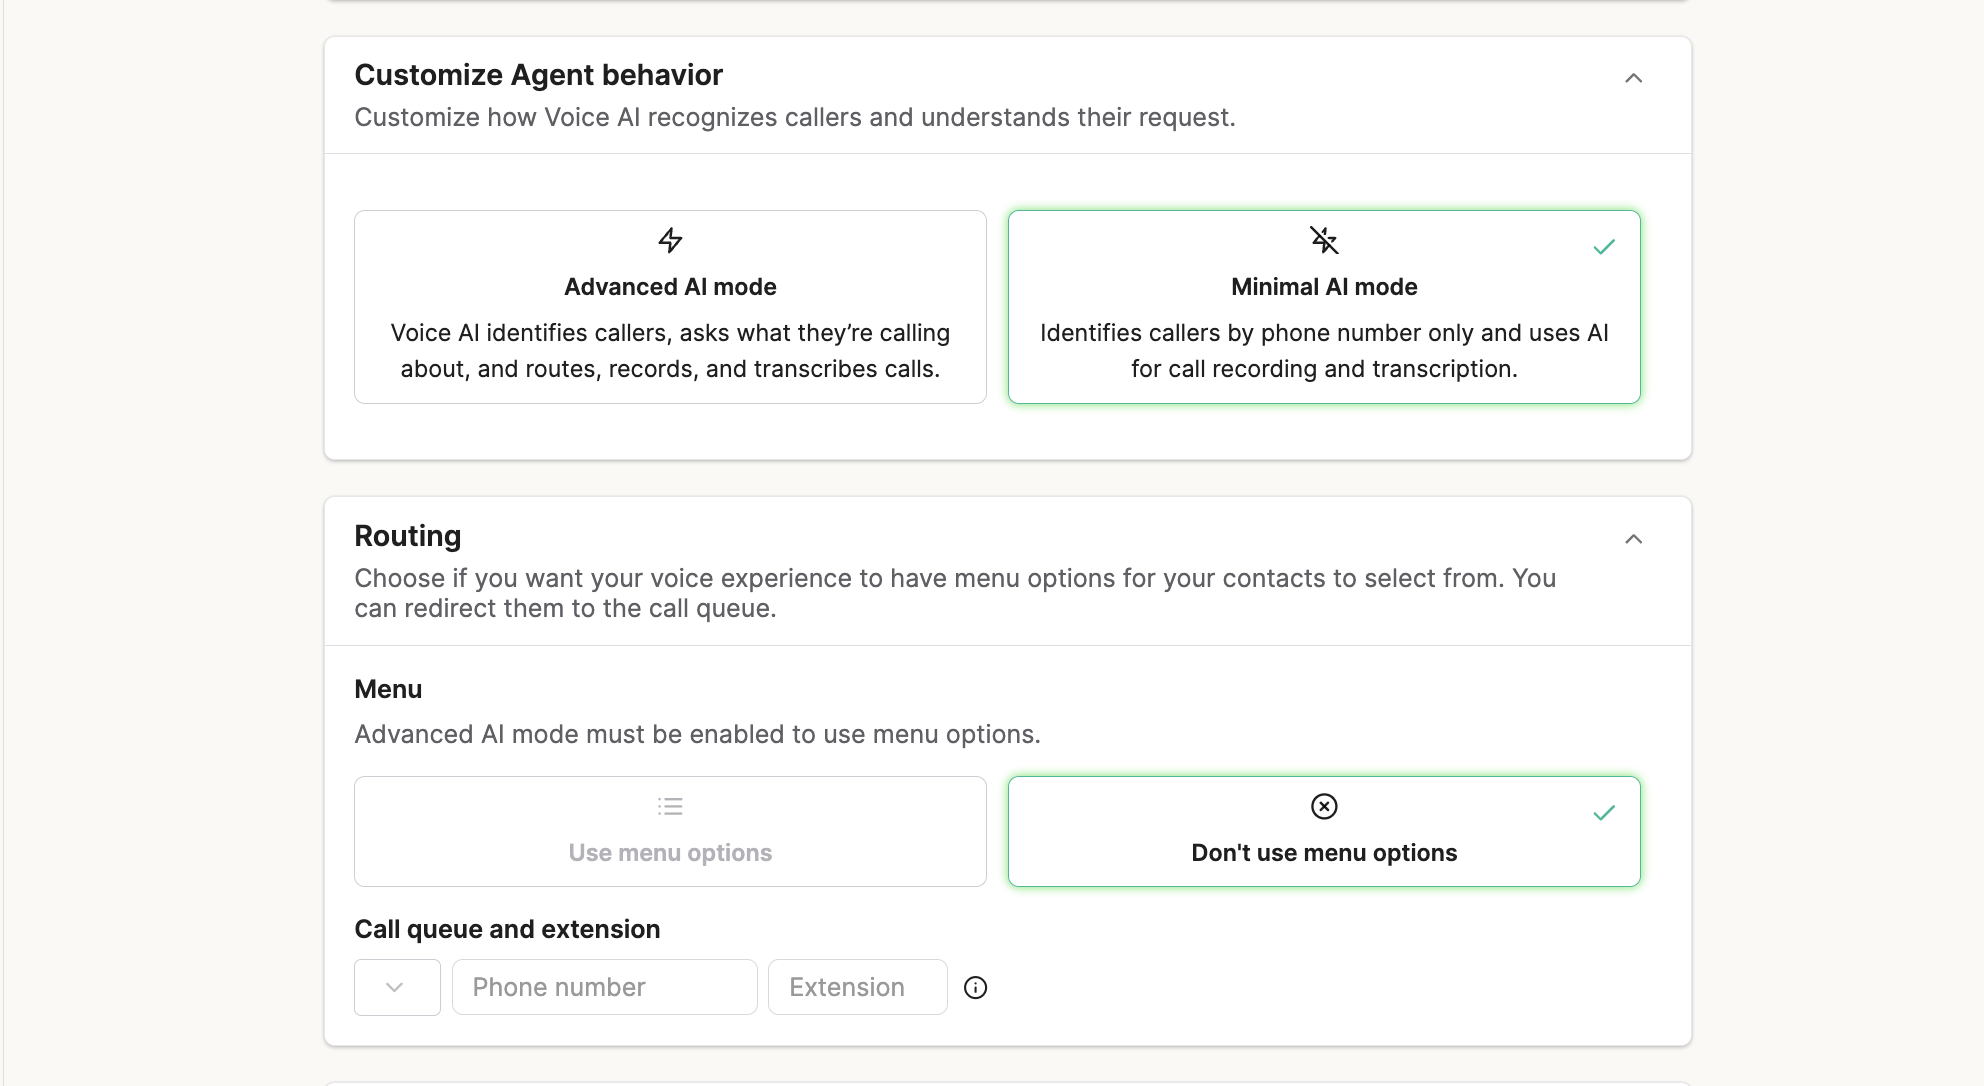
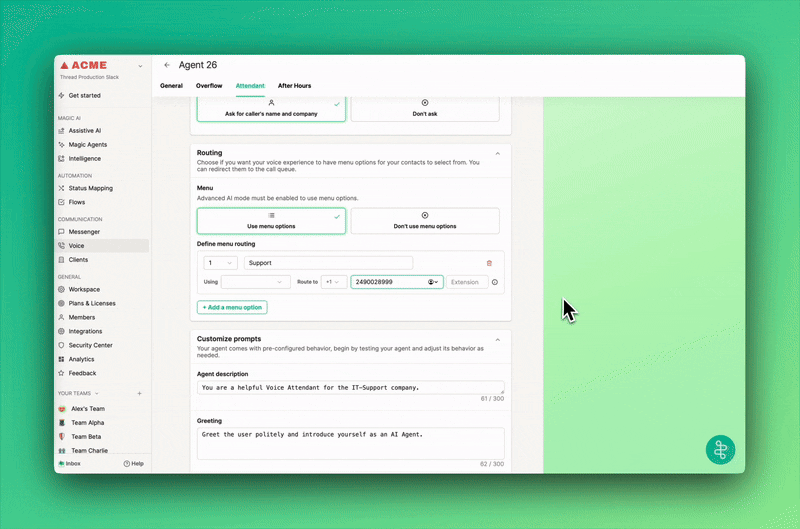
Option B: Advanced AI Mode (Full IVR) Move to this only after testing Minimal Mode.
- Action: Switch to Advanced AI Mode.
- Features:
- Menus: Set up "Press 1 for Support, Press 2 for Billing."
- Transfers: Configure the AI to transfer calls to specific technicians or queues.
- Personality: You can give the agent a role name (e.g., "Jeffrey") to make the experience feel more personal.
New Product Features
Overflow Redirection (Advanced AI Mode)
- Concept: You can now select Overflow as a redirection option directly from the IVR menu settings in Advanced AI mode. This allows you to route callers to your Overflow agent natively from your menu and create custom greetings specifically for these IVR transfers.
- Value: Previously, routing callers to Overflow from the IVR menu required telephony workarounds or manual configuration, which could lead to unexpected behavior. Using the native Overflow option ensures reliable routing and a smoother experience for the caller.
- How To:
- Navigate to your Voice AI agent settings > Attendant > Advanced AI mode.
- Under Define menu routing, select Redirect to > AI Transfer to Overflow.
- Check the box for Use custom greeting on transfer from IVR.
- Enter your desired greeting text.
Attendant (Minimal AI) → Overflow on Transfer Timeout
Concept
When using the Attendant in Minimal AI mode, unanswered calls are no longer dropped. If a technician fails to answer a transferred call within the configured timeout period, the system now seamlessly hands the caller off to the Overflow agent.
Value
This update guarantees continuous support and ensures no call goes unresolved. Previously, an unanswered transfer resulted in a simple "no one is available" message before abruptly disconnecting the caller. Now, the Overflow agent automatically steps in to greet the caller, capture their issue details through a natural conversation, and generate a support ticket so your team can effortlessly follow up.
How To
Navigate to your Attendant settings and ensure you are in Minimal AI mode.
- Enable the Use Overflow when no one is available toggle.

- Customize the greeting message that the caller will hear when the Overflow handoff occurs. ( The agent will ask the caller what they an help them with, you do not need to include this in your greeting
Your system will automatically apply your existing configured duration for the transfer timeout.