Setting up your Triage Agent (User Guide)

Setting up your Triage Agent (User Guide)
What your Triage Agent does
Your Triage Agent handles the first touch on every incoming thread. It greets the requester, asks the right questions, gathers the context your techs usually chase down, and either resolves common issues or hands off a ticket that is ready to work. This setup tunes it to your real work and lets you watch it in action before it ever reaches a client, so you can turn it on with confidence.
What good looks like: every thread reaches your techs already triaged, with the details they need and less back-and-forth. Your team spends its time resolving, not gathering.
Before you start
- Your PSA should already be connected and syncing.
- Pick a board you know well. Setup learns from the real threads on it.
- Nothing is locked in. You can change everything after setup.
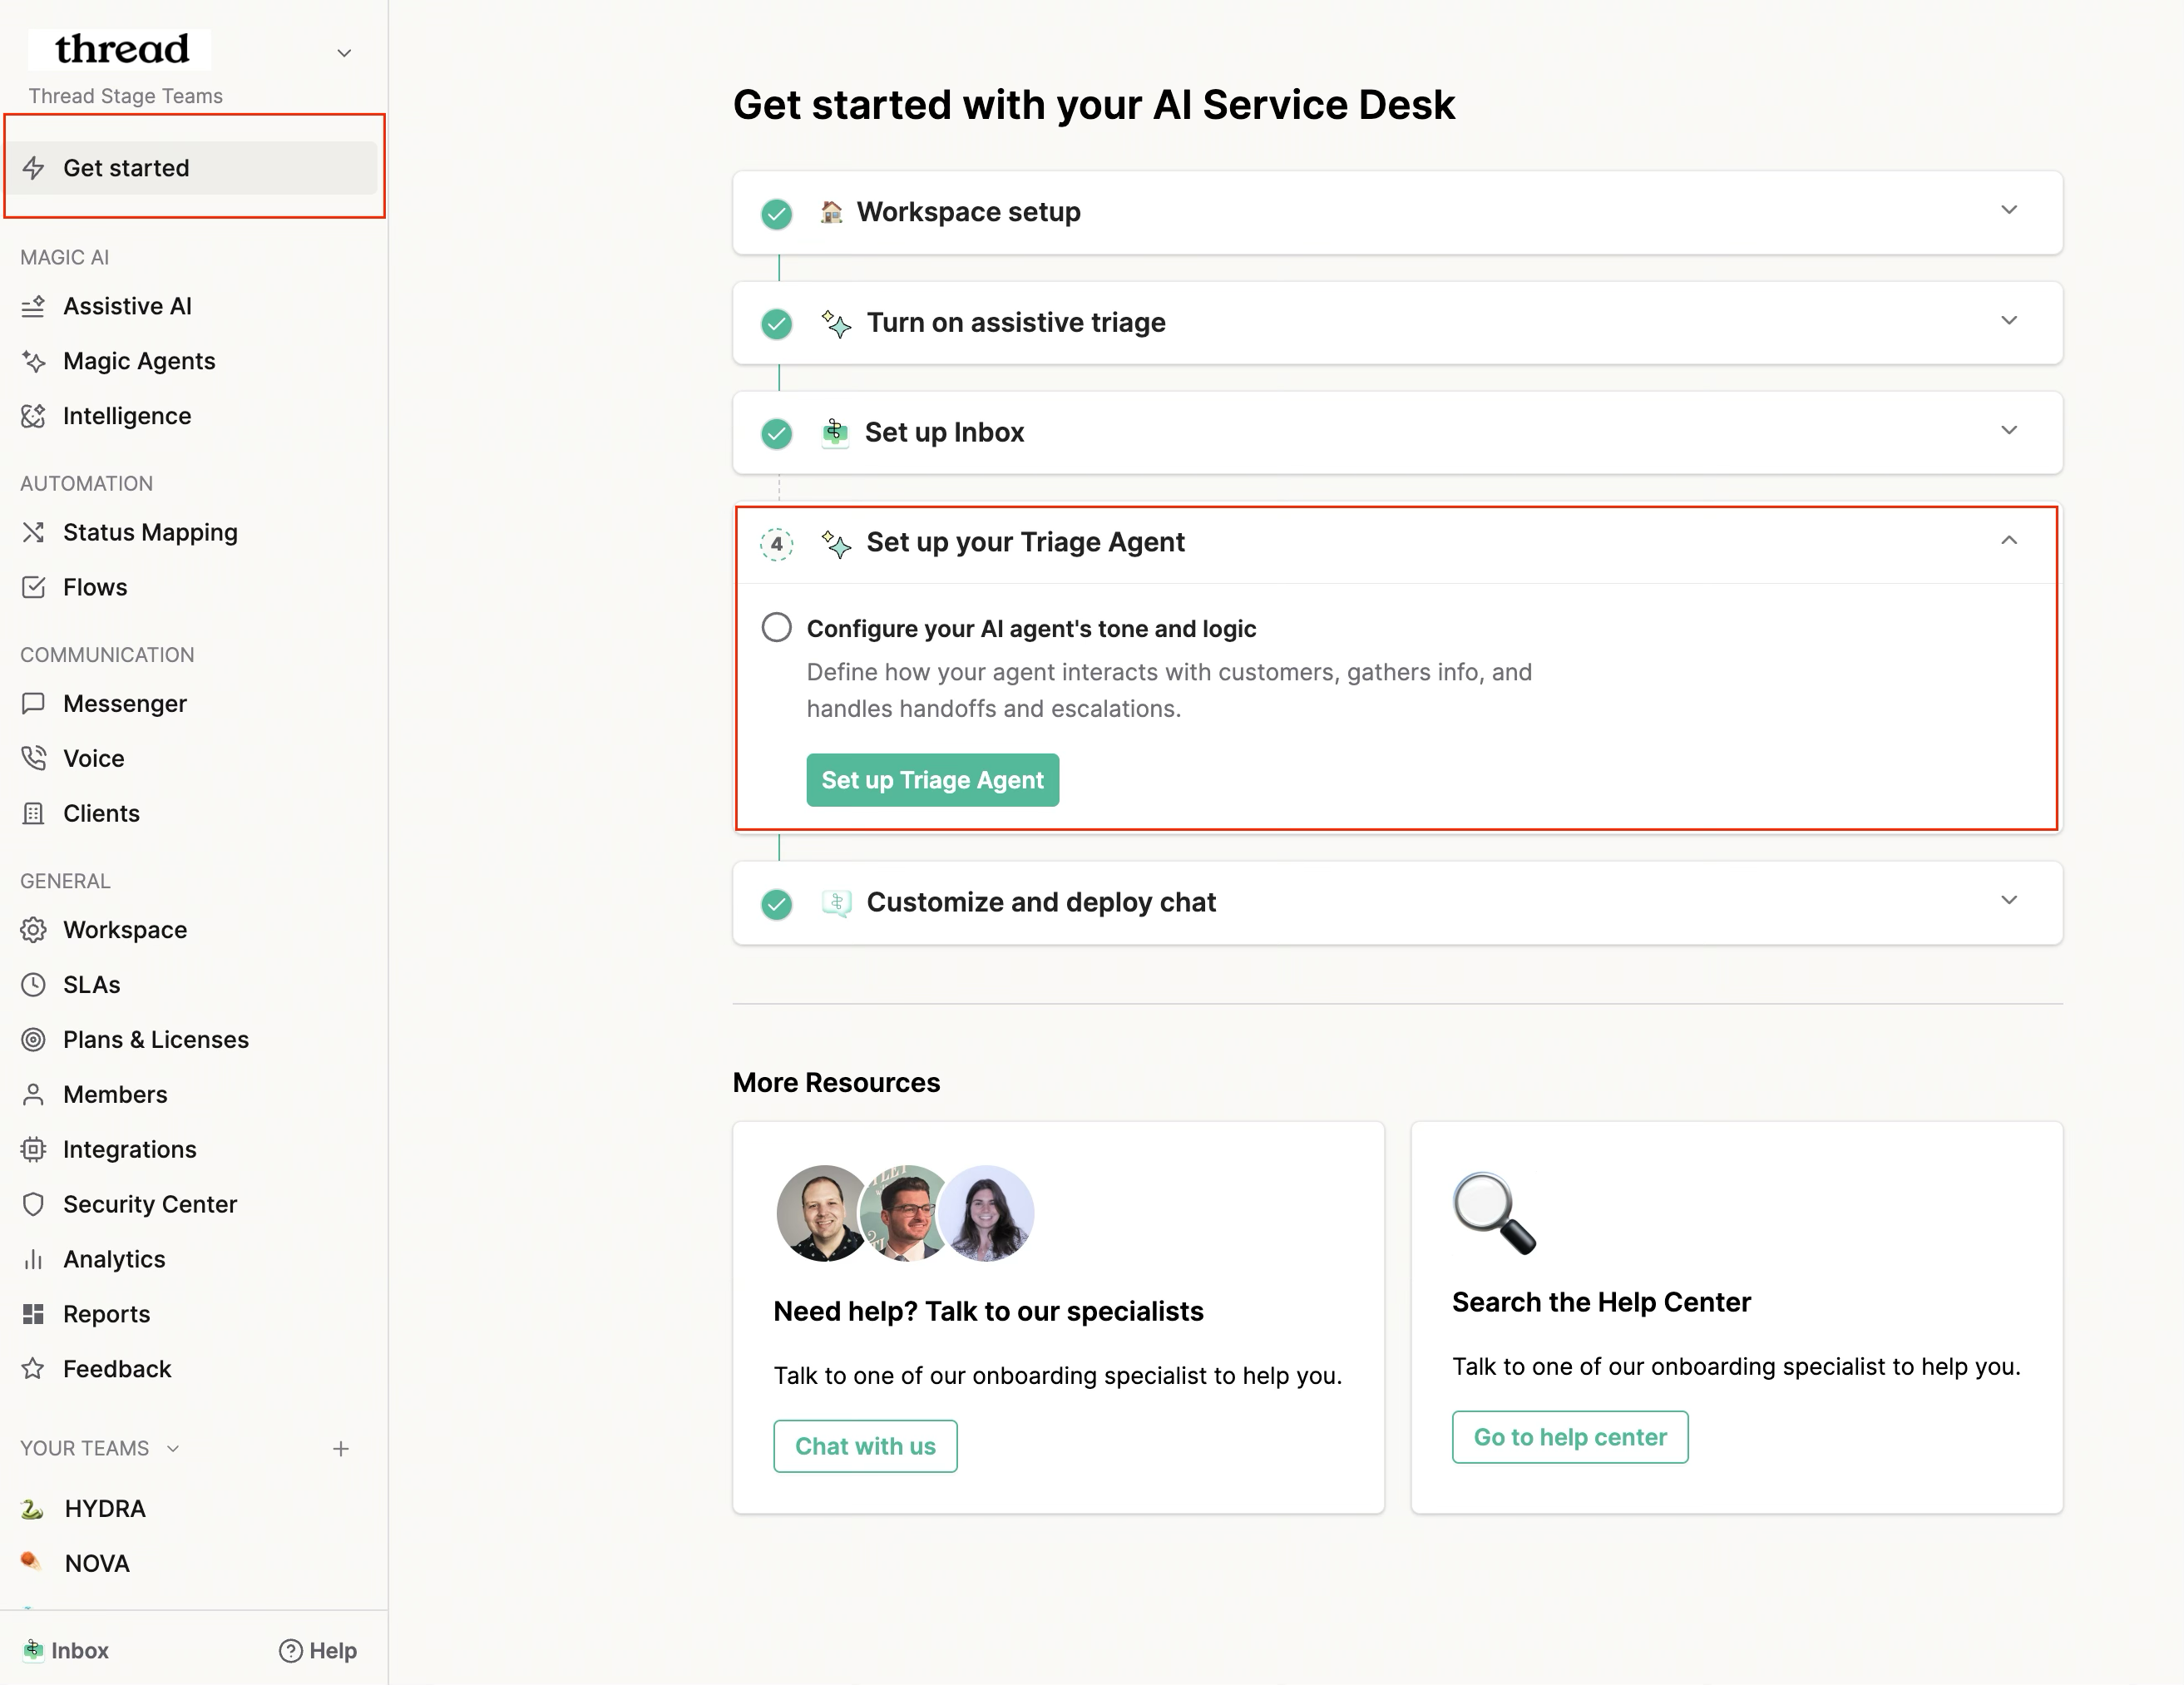
The setup steps
Admin → Get Started → Set up Triage Agent
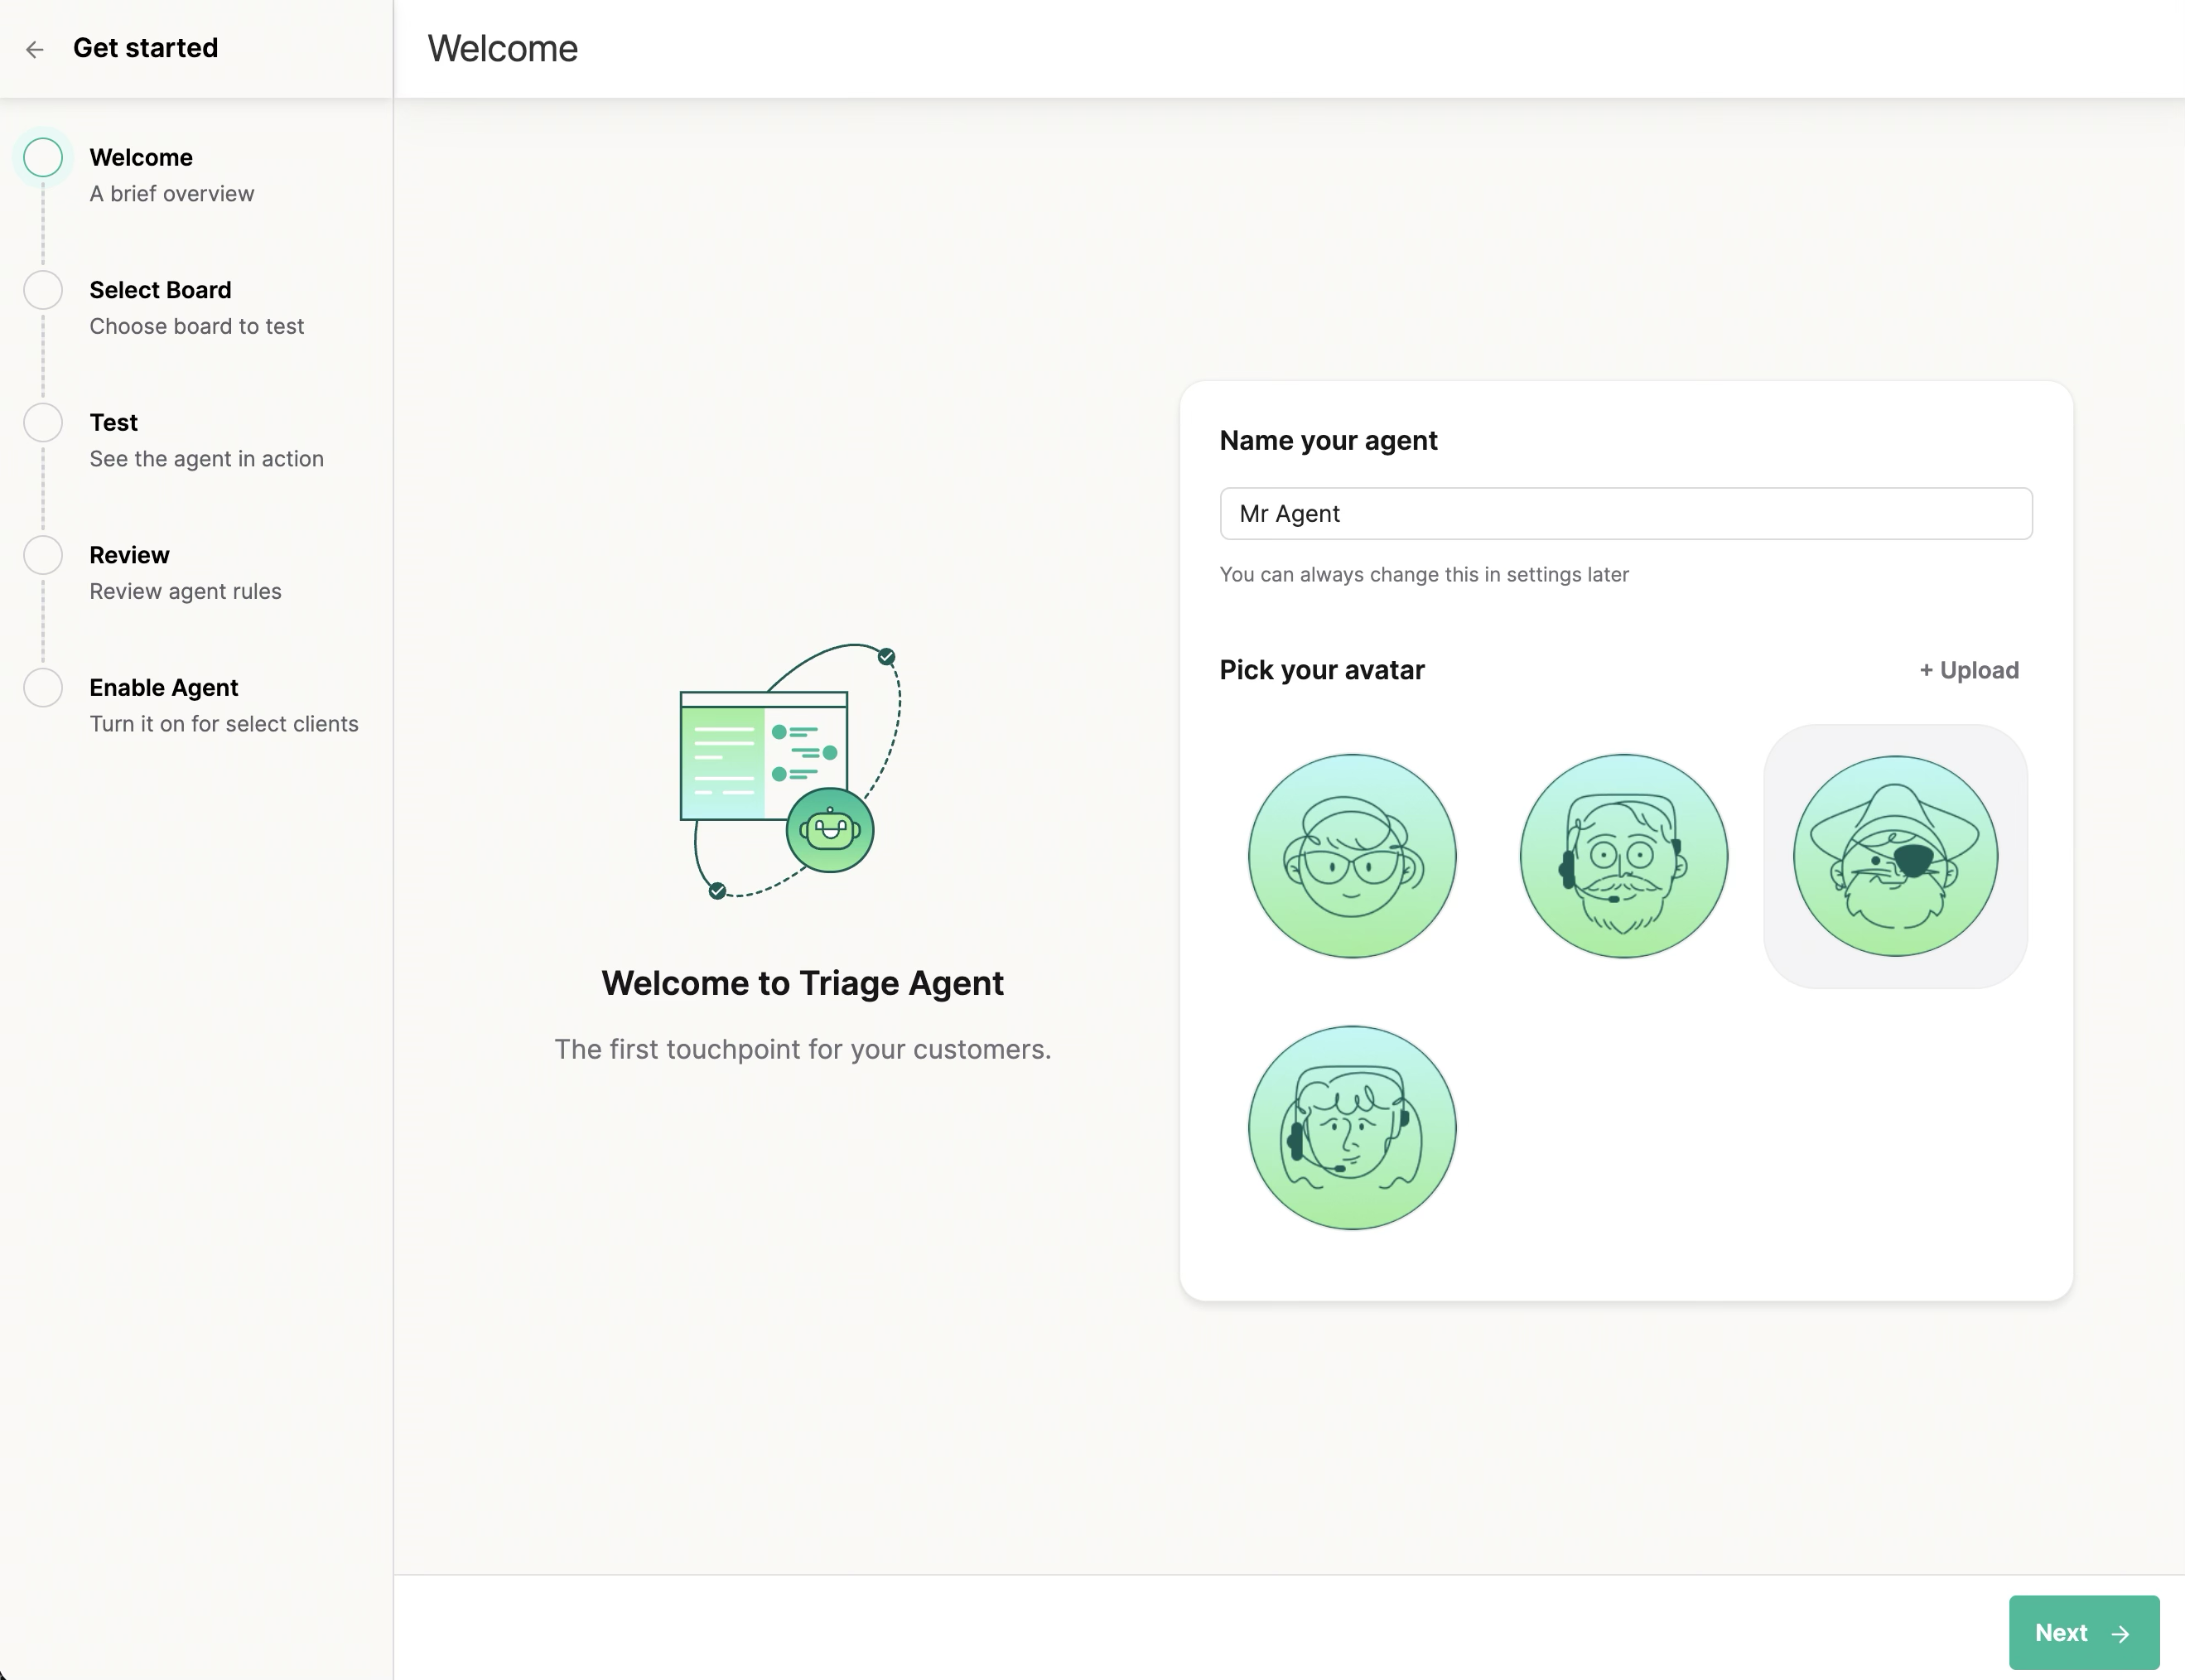
1. Name and personalize your agent
Give the agent a name and pick an avatar. This is what your clients see in chat, and a familiar name and face make it feel like part of your team. This step shows whatever name and avatar you already have in Messenger settings, so you can keep or change them here. Changes made during setup overwrite your Messenger settings on publish, and you can update them any time later in Messenger settings.
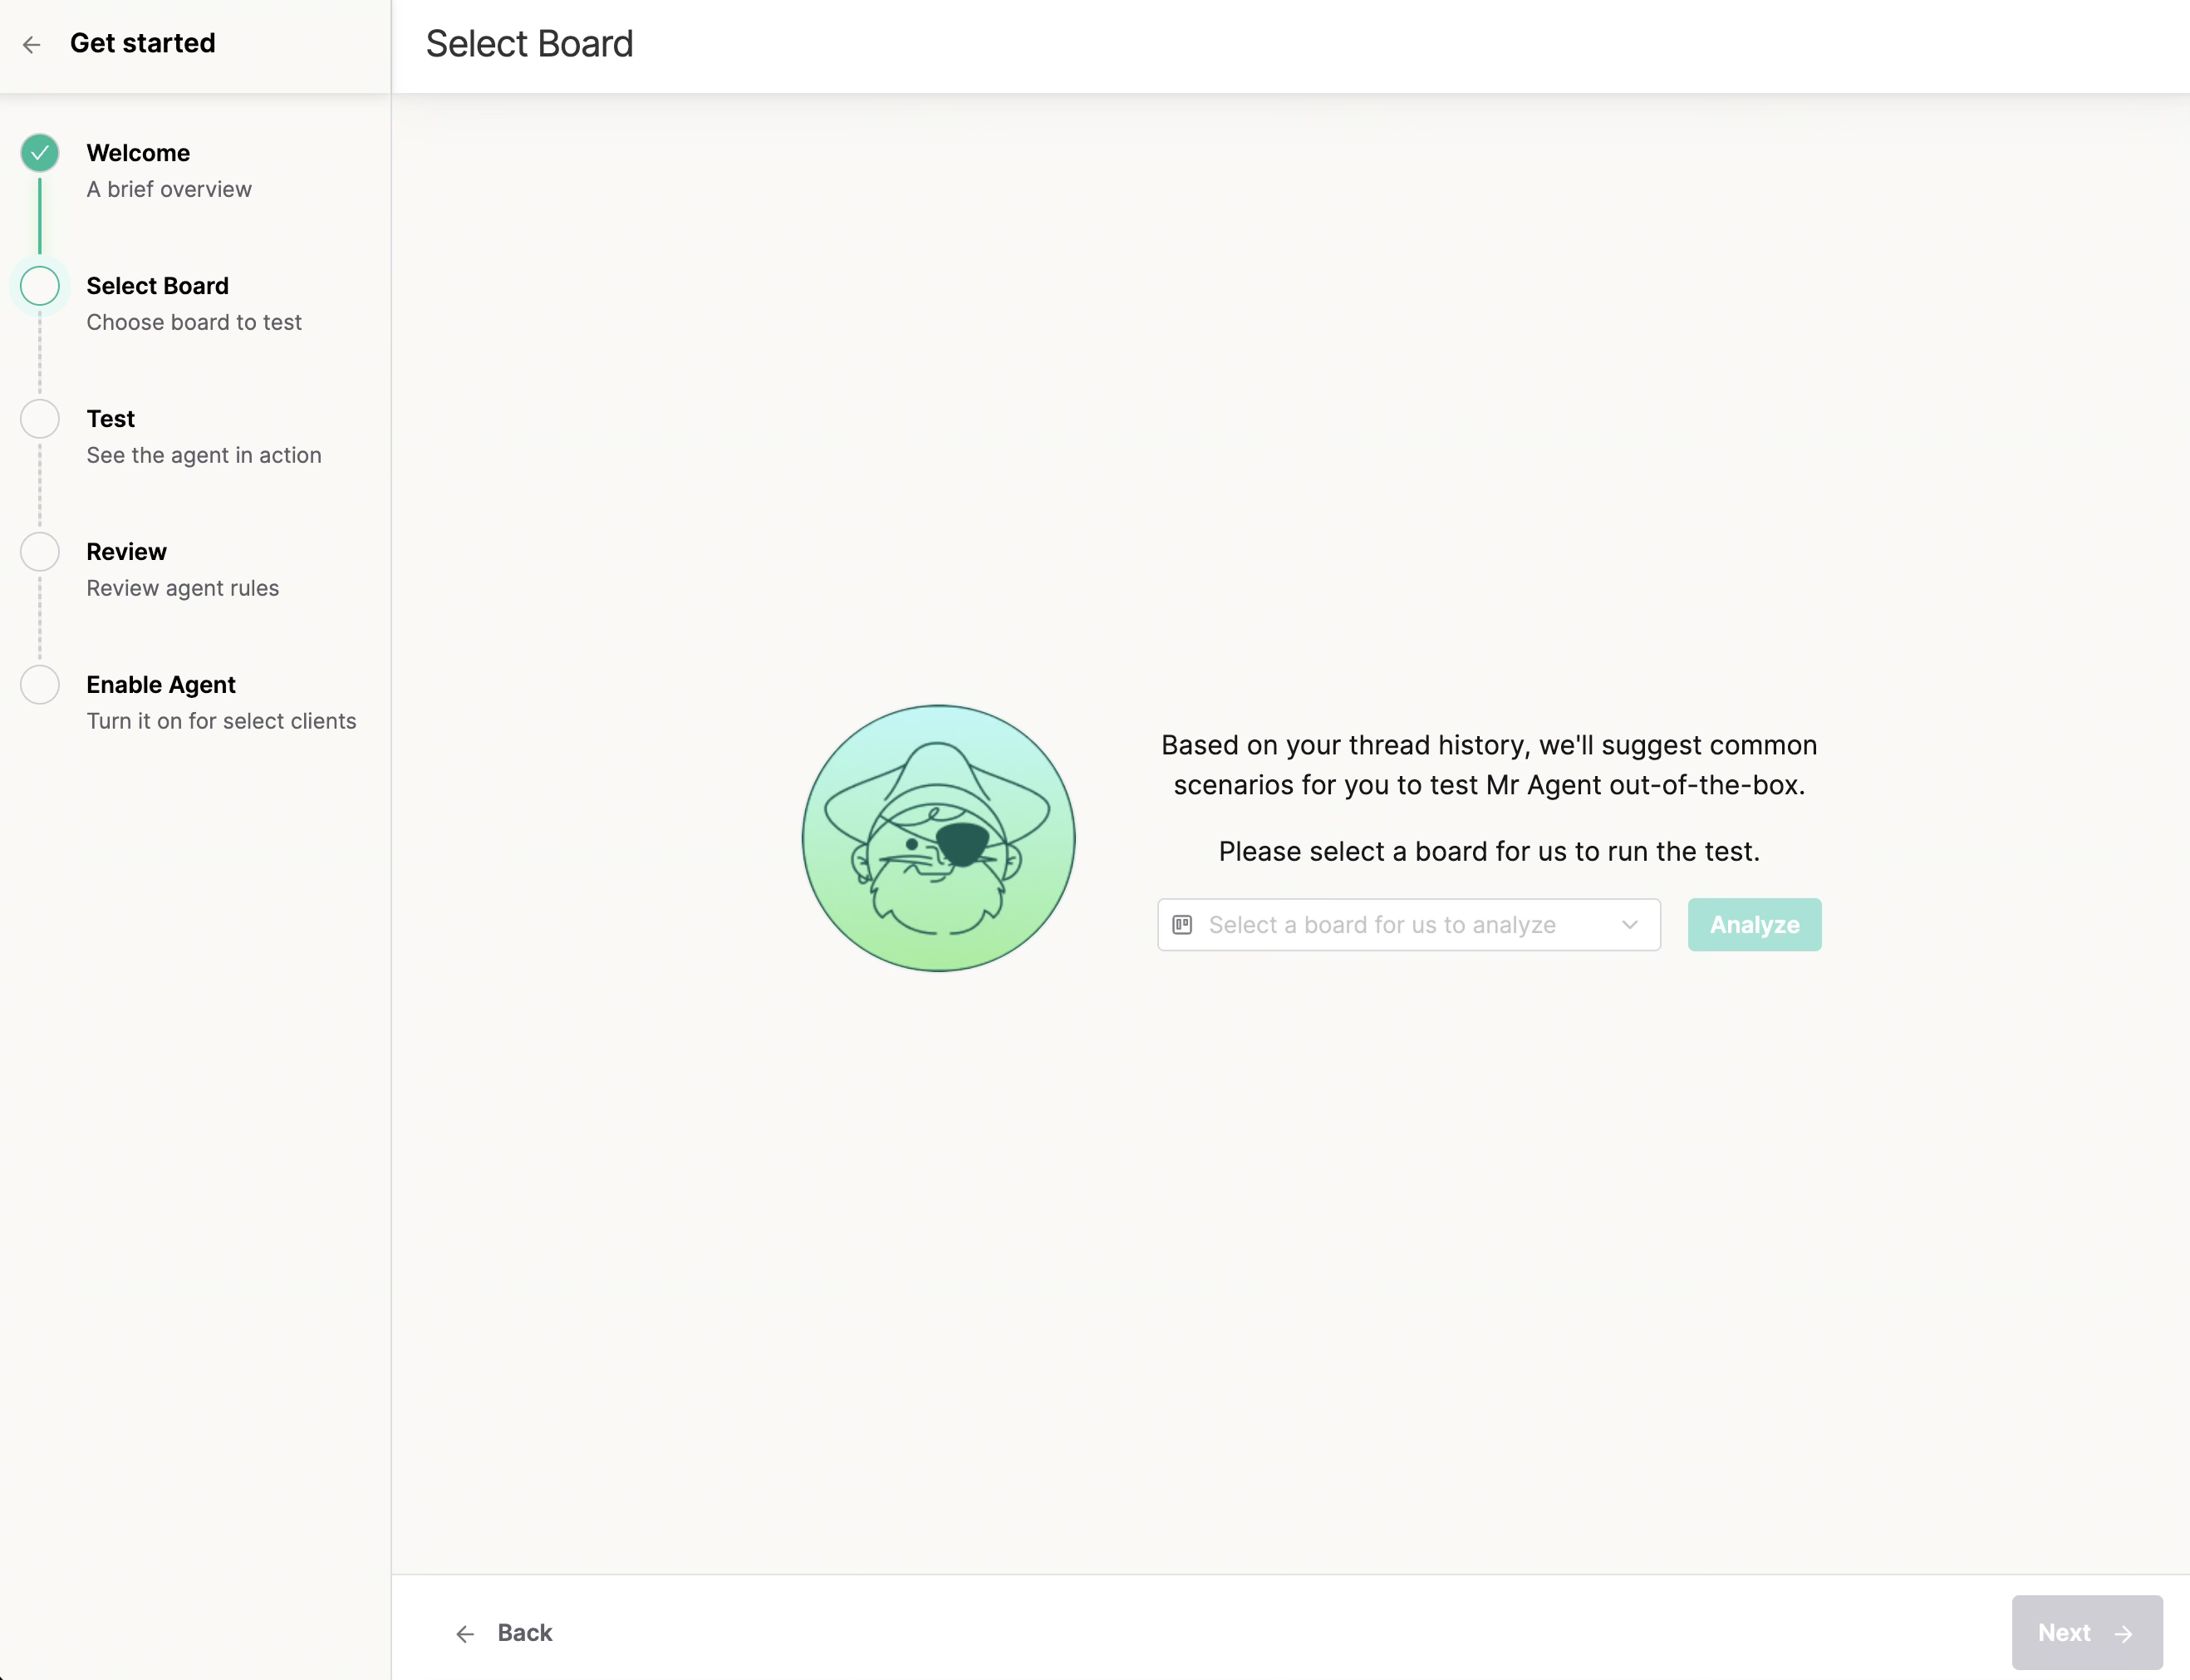
2. Pick a board to learn from
Choose a board with strong, representative threads, ideally one where the Triage Agent would clearly thrive. We read the recent real requests on that board, identify the three most common types, and use them to show the agent in action. The better your example board, the more useful the rest of setup. The agent learns from your actual tickets, not generic scripts.

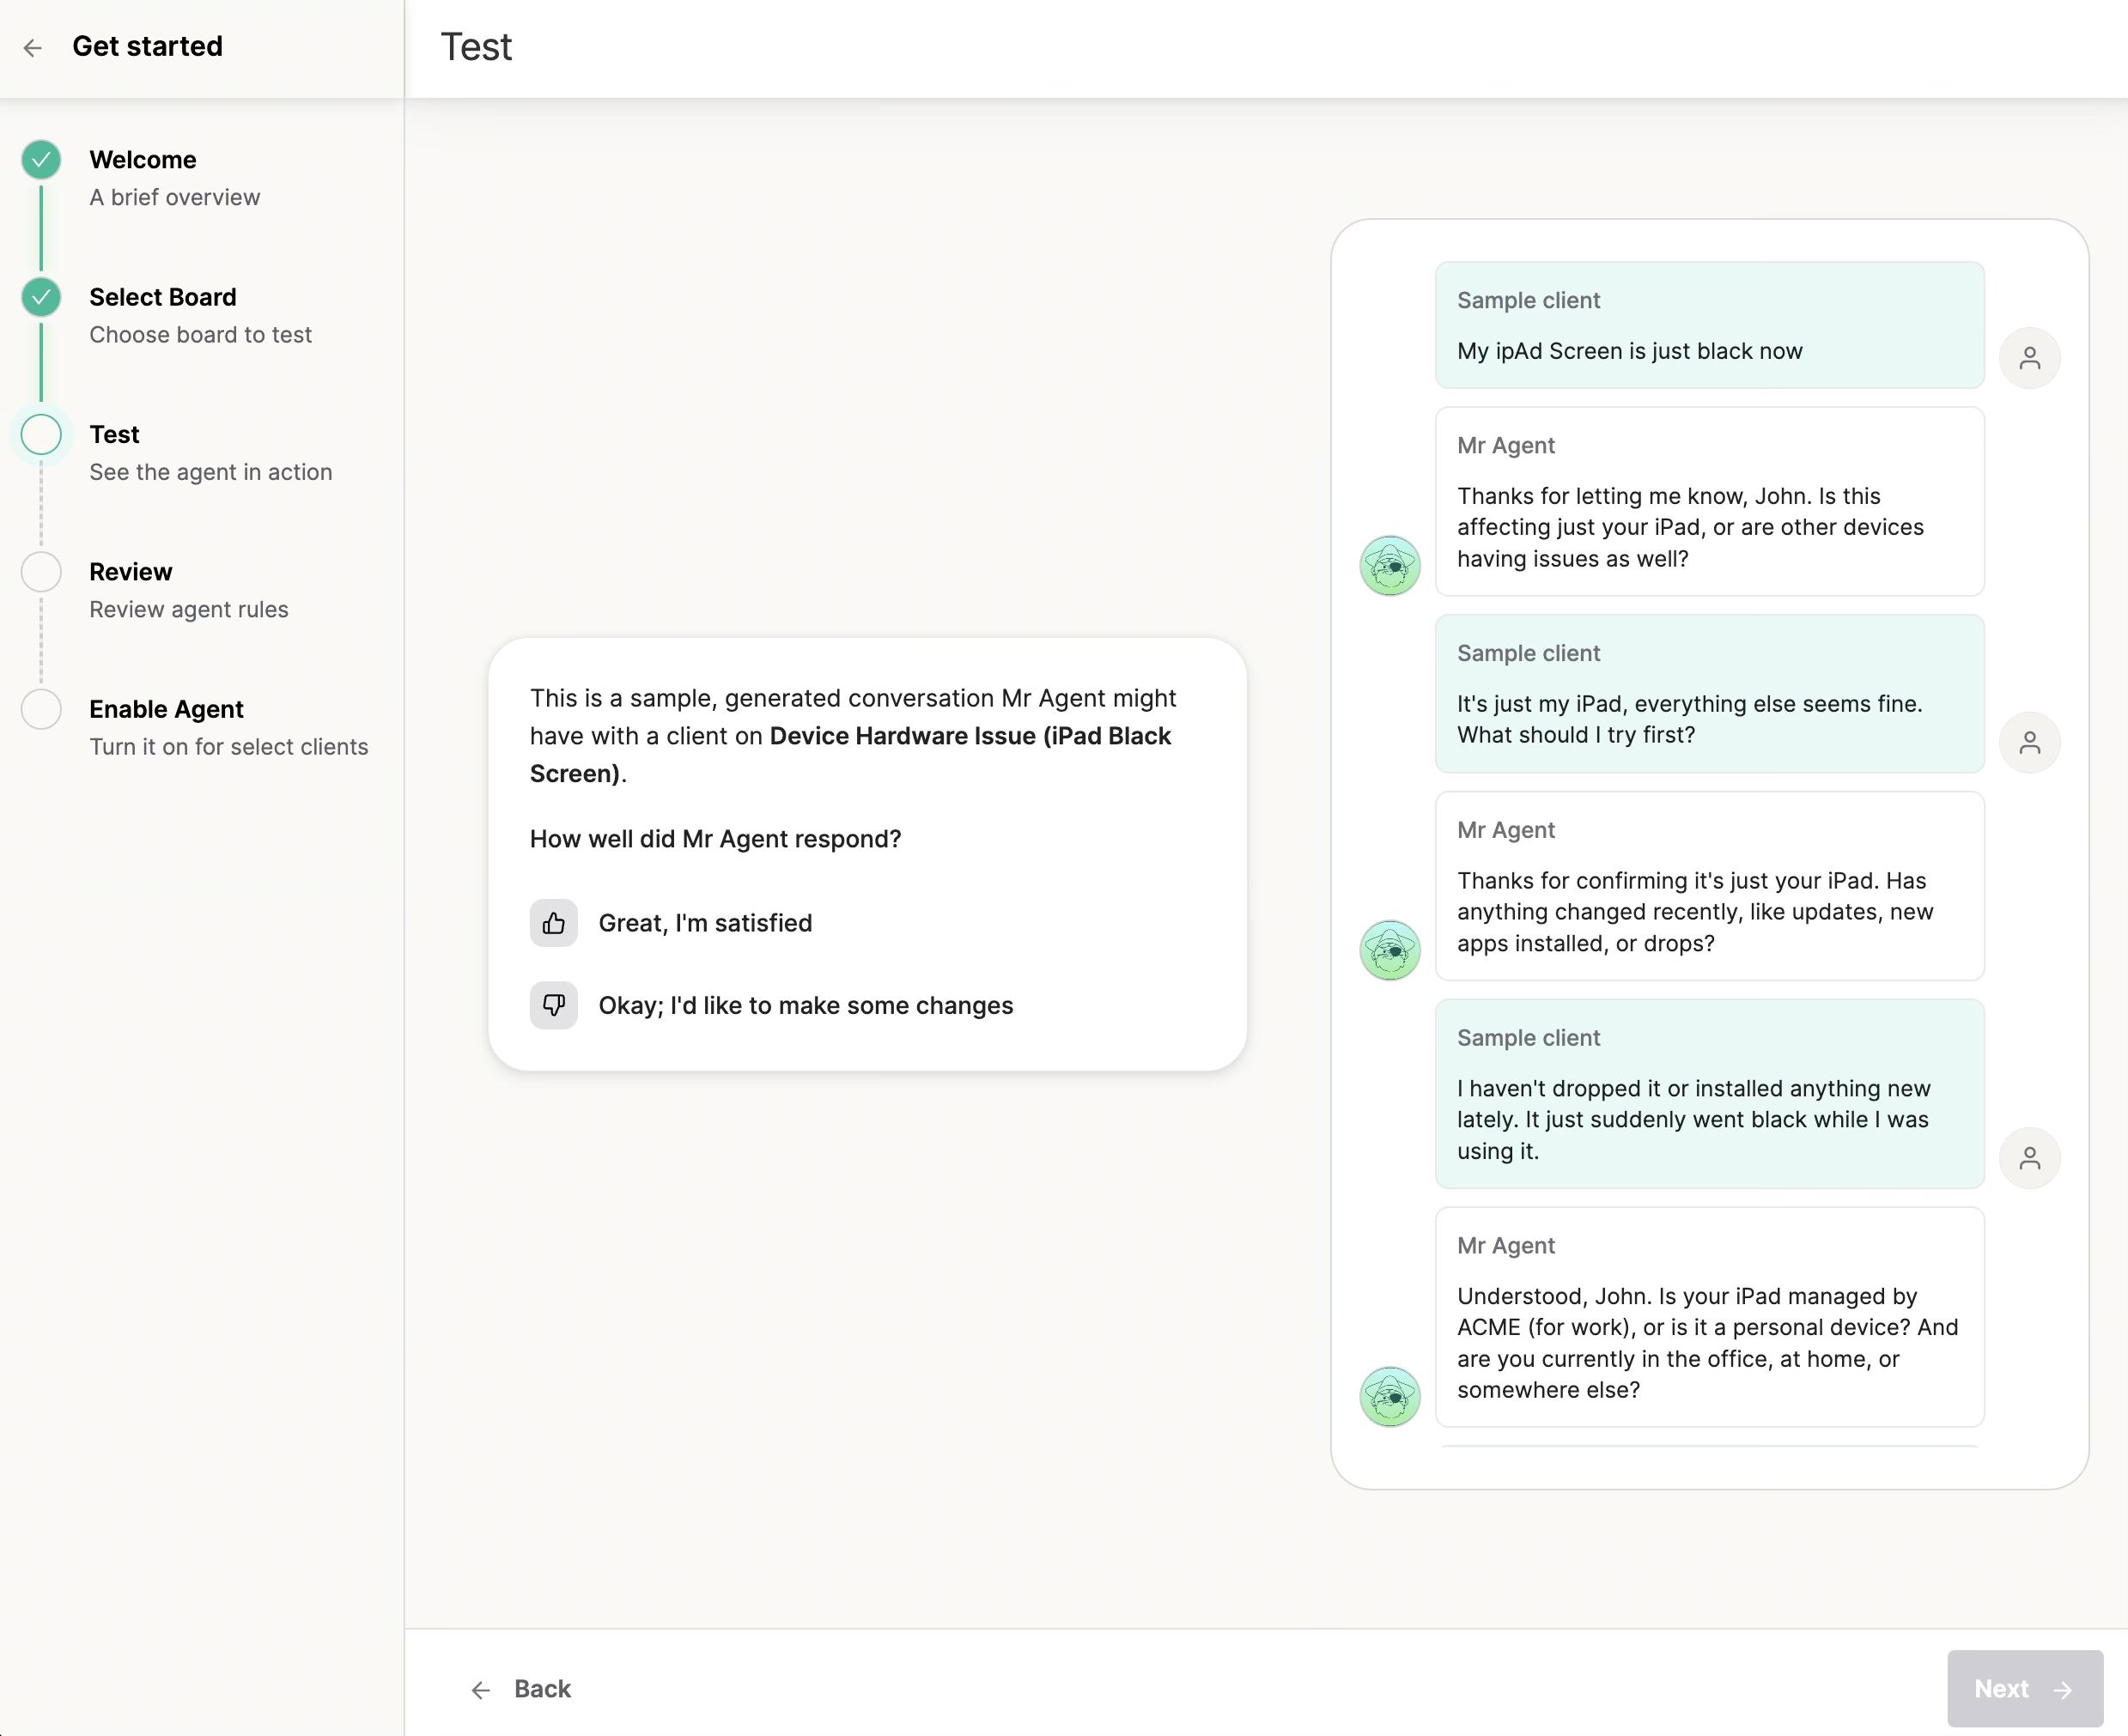
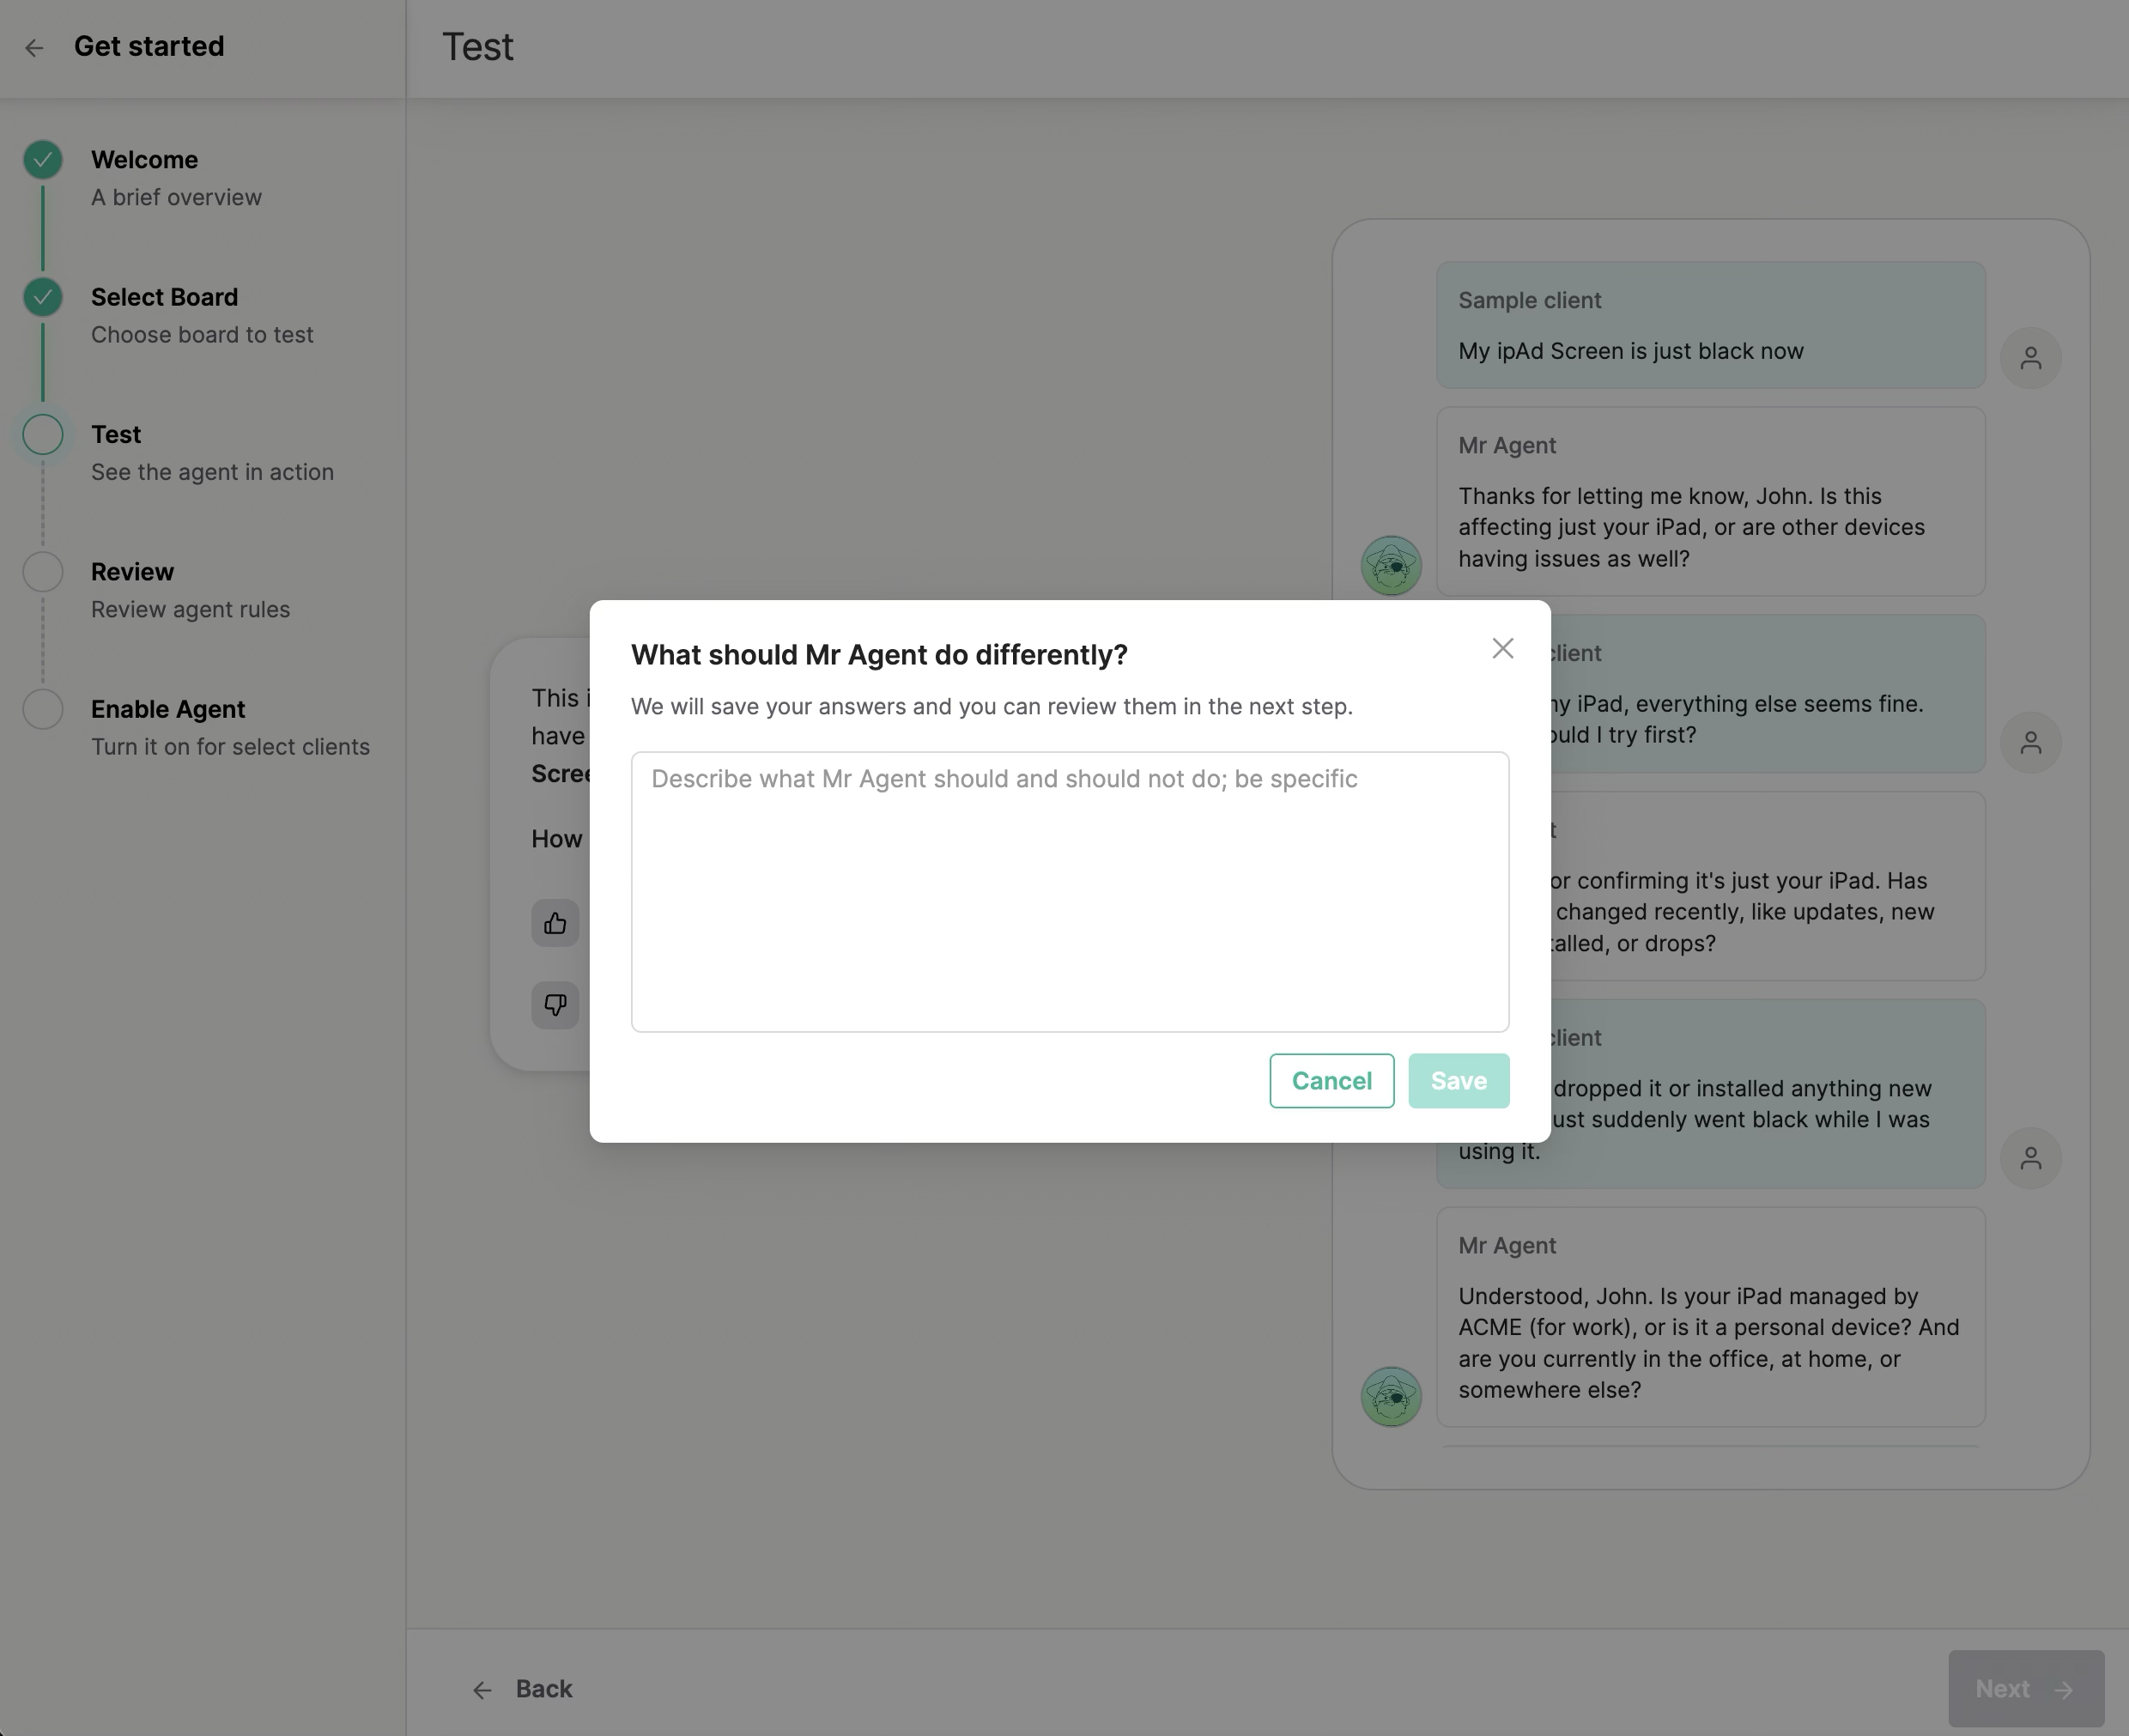
3. Review and coach the conversations
For each of the three topics, the agent runs a full simulated back-and-forth, just as it would with a real requester. Approve what looks good, or give feedback in plain language (for example, "ask for the asset tag before troubleshooting"). The agent adjusts on the spot, and your feedback becomes a Custom Rule you can edit now or later. This is where the agent learns your standards and starts to sound like your best technician.
Tell it how to behave
Use this to shape how your agent sounds and behaves, not just what it does. Think tone, greetings, and conversational habits. For example: "Always open by introducing itself by name (eg. Mr Agent) and welcoming the client," or "Use the contact's first name in the first message only, not in every reply," or "Keep replies short and friendly with max 1 emoji, and avoid jargon unless the client uses it first." Describe the behavior you want and when it applies, and we will save it as a rule you can review and edit in the next step.
Step 4: Review and refine
Before you give any client access, the Review step is where you make the agent yours. You have just watched it work in the Test step, so now you tune the details and confirm it behaves the way your team would.
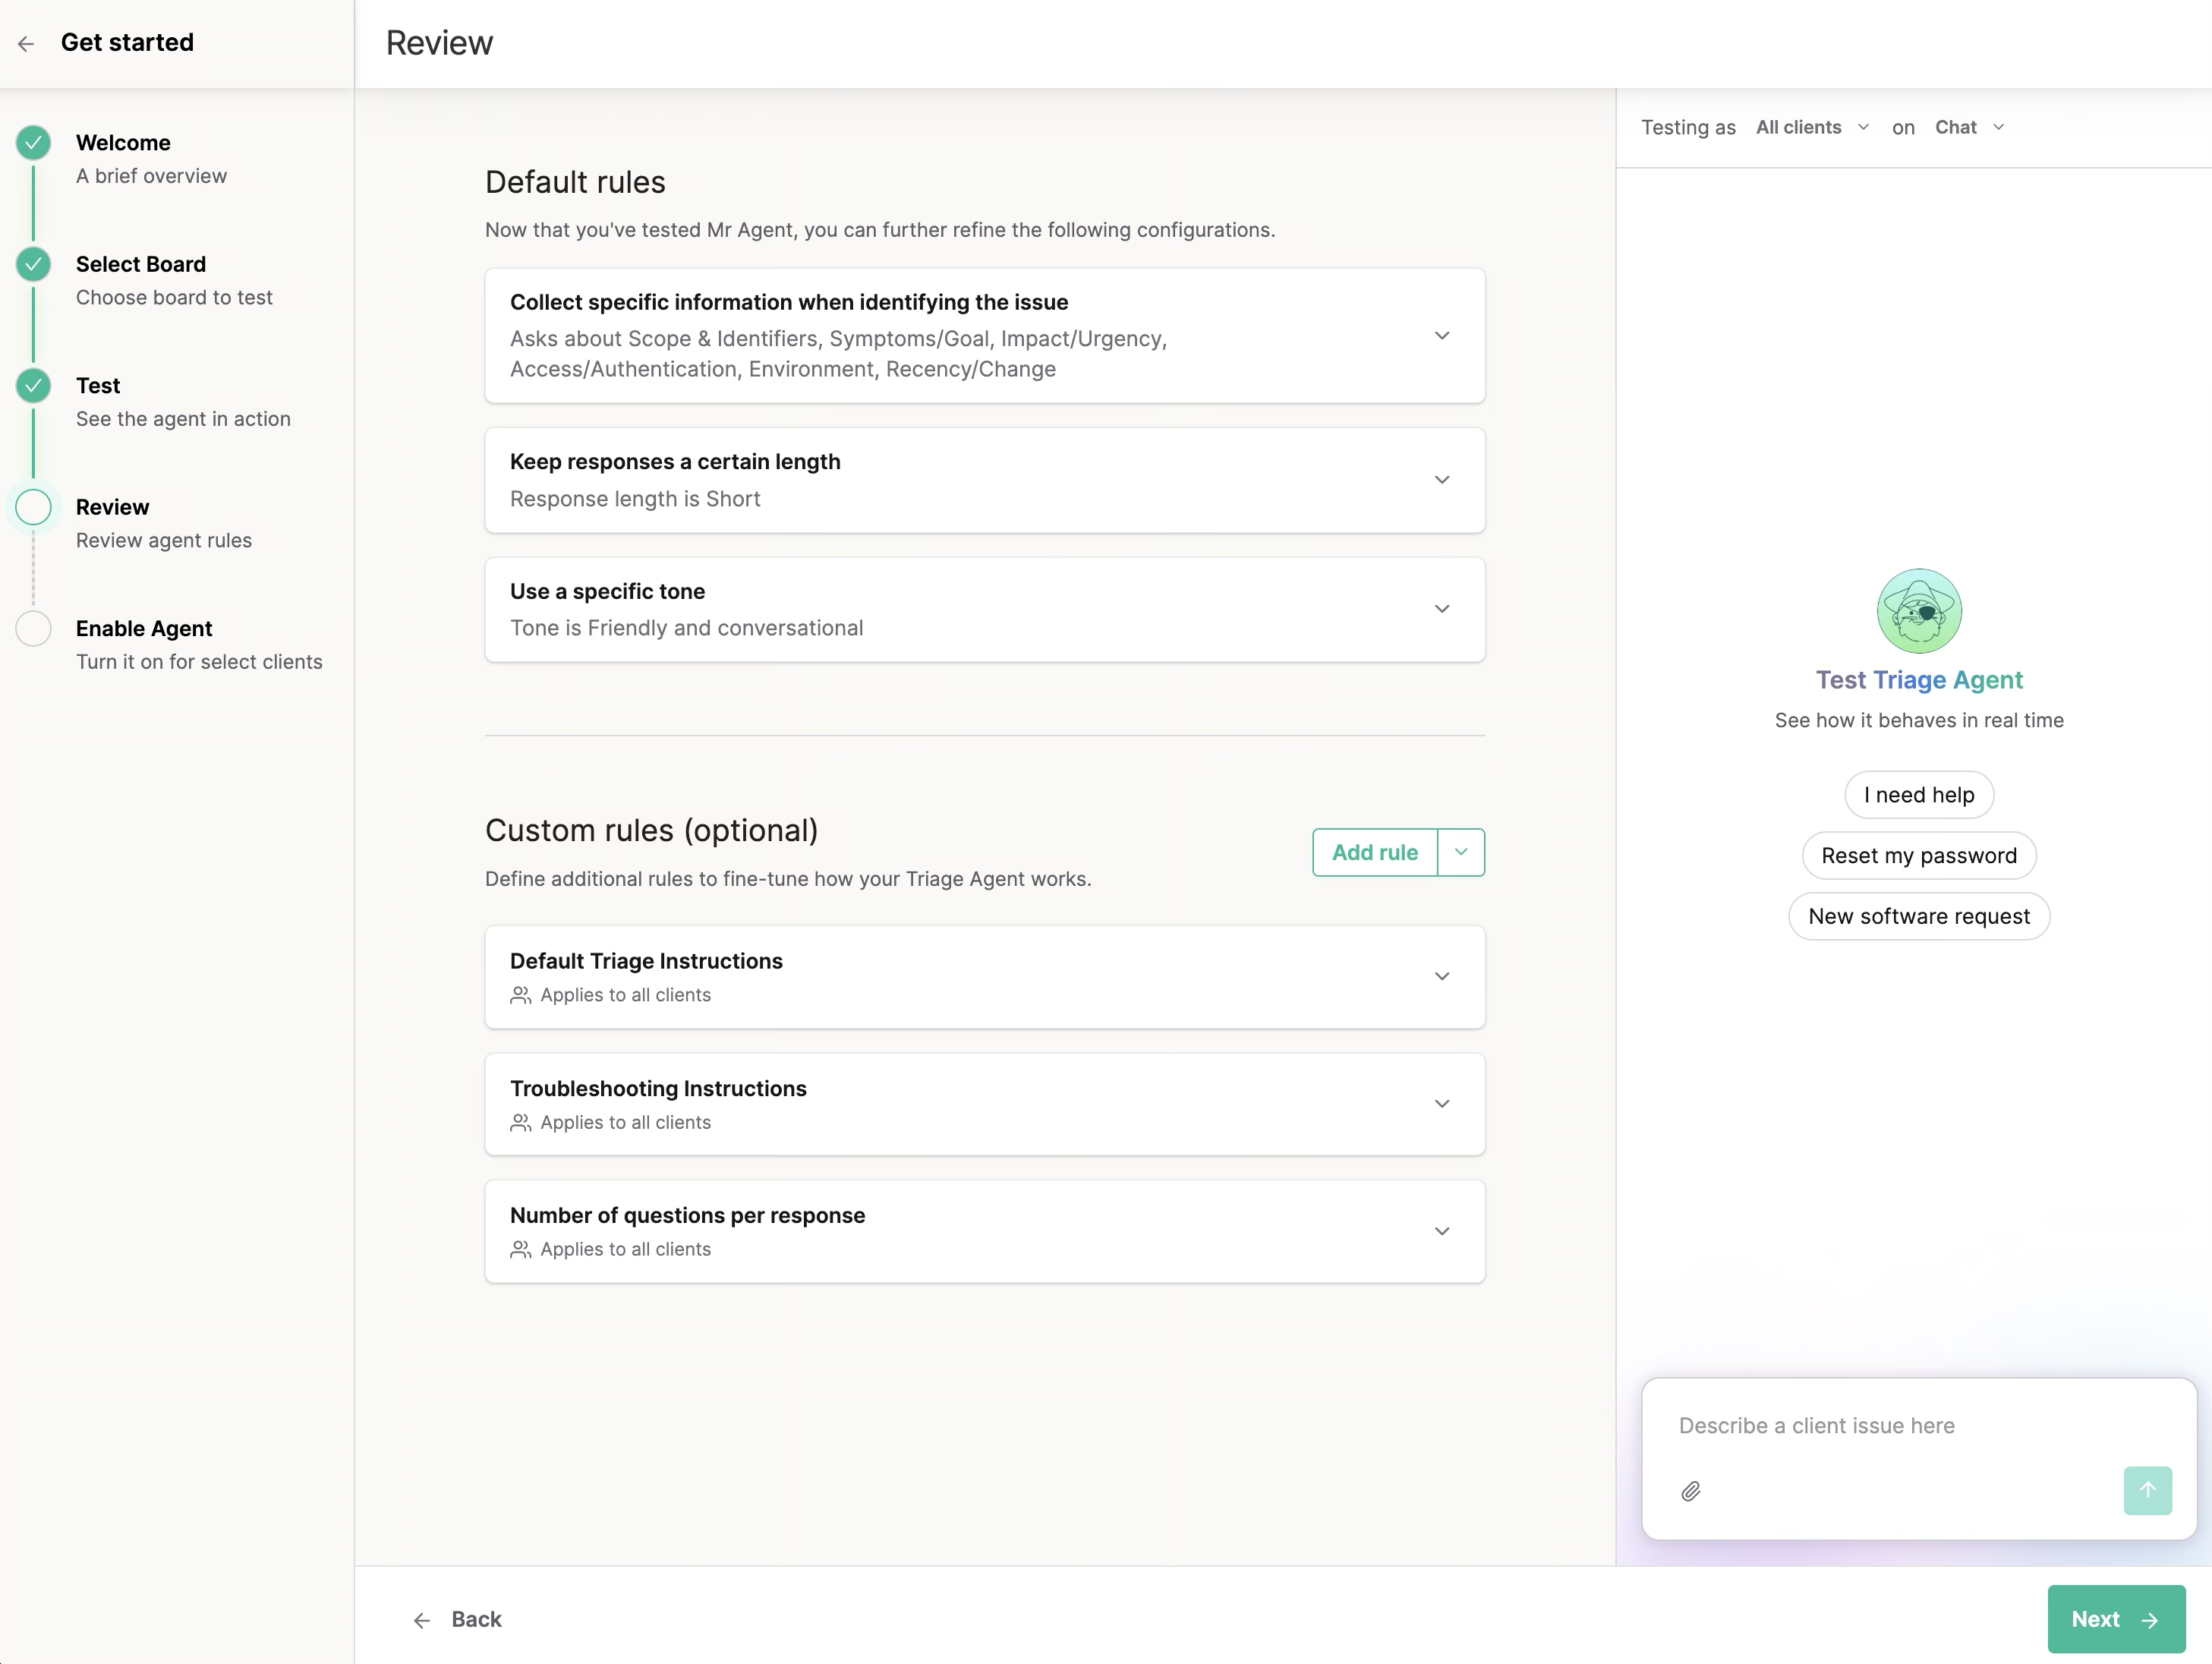
Default rules. Three core behaviors, already on and ready to adjust:
- Collect specific information when identifying the issue. Choose what the agent always tries to pin down before handing off: scope and identifiers (who or what is affected), symptoms or goal, impact and urgency, access and authentication, environment, and recency or change. Pick at least two; the more you select, the more complete the ticket your techs receive.
- Keep responses a certain length. Short asks only the essentials, Medium probes a bit deeper into root cause, Long gathers as much relevant detail as it can. Match this to how much back-and-forth your clients will tolerate.
- Use a specific tone. Friendly and conversational, Professional and formal, or Neutral and concise, so the agent sounds like your brand.
Custom rules. This is where the coaching you gave during the Test step lives, saved as editable rules. Open any rule to fine-tune it, add new ones, or set whether a rule applies to all clients or only some. Nothing is locked in; everything here can change now or any time after onboarding.
Keep testing. The live test panel stays on the right the whole time. After any change, send it a sample issue and watch how it responds. Spend a few minutes here getting comfortable. The more you test and adjust now, the more confident you will be when real client threads start flowing.
When the agent is asking the right questions, in the right tone, at the right length, you are ready to give it access to your first clients.
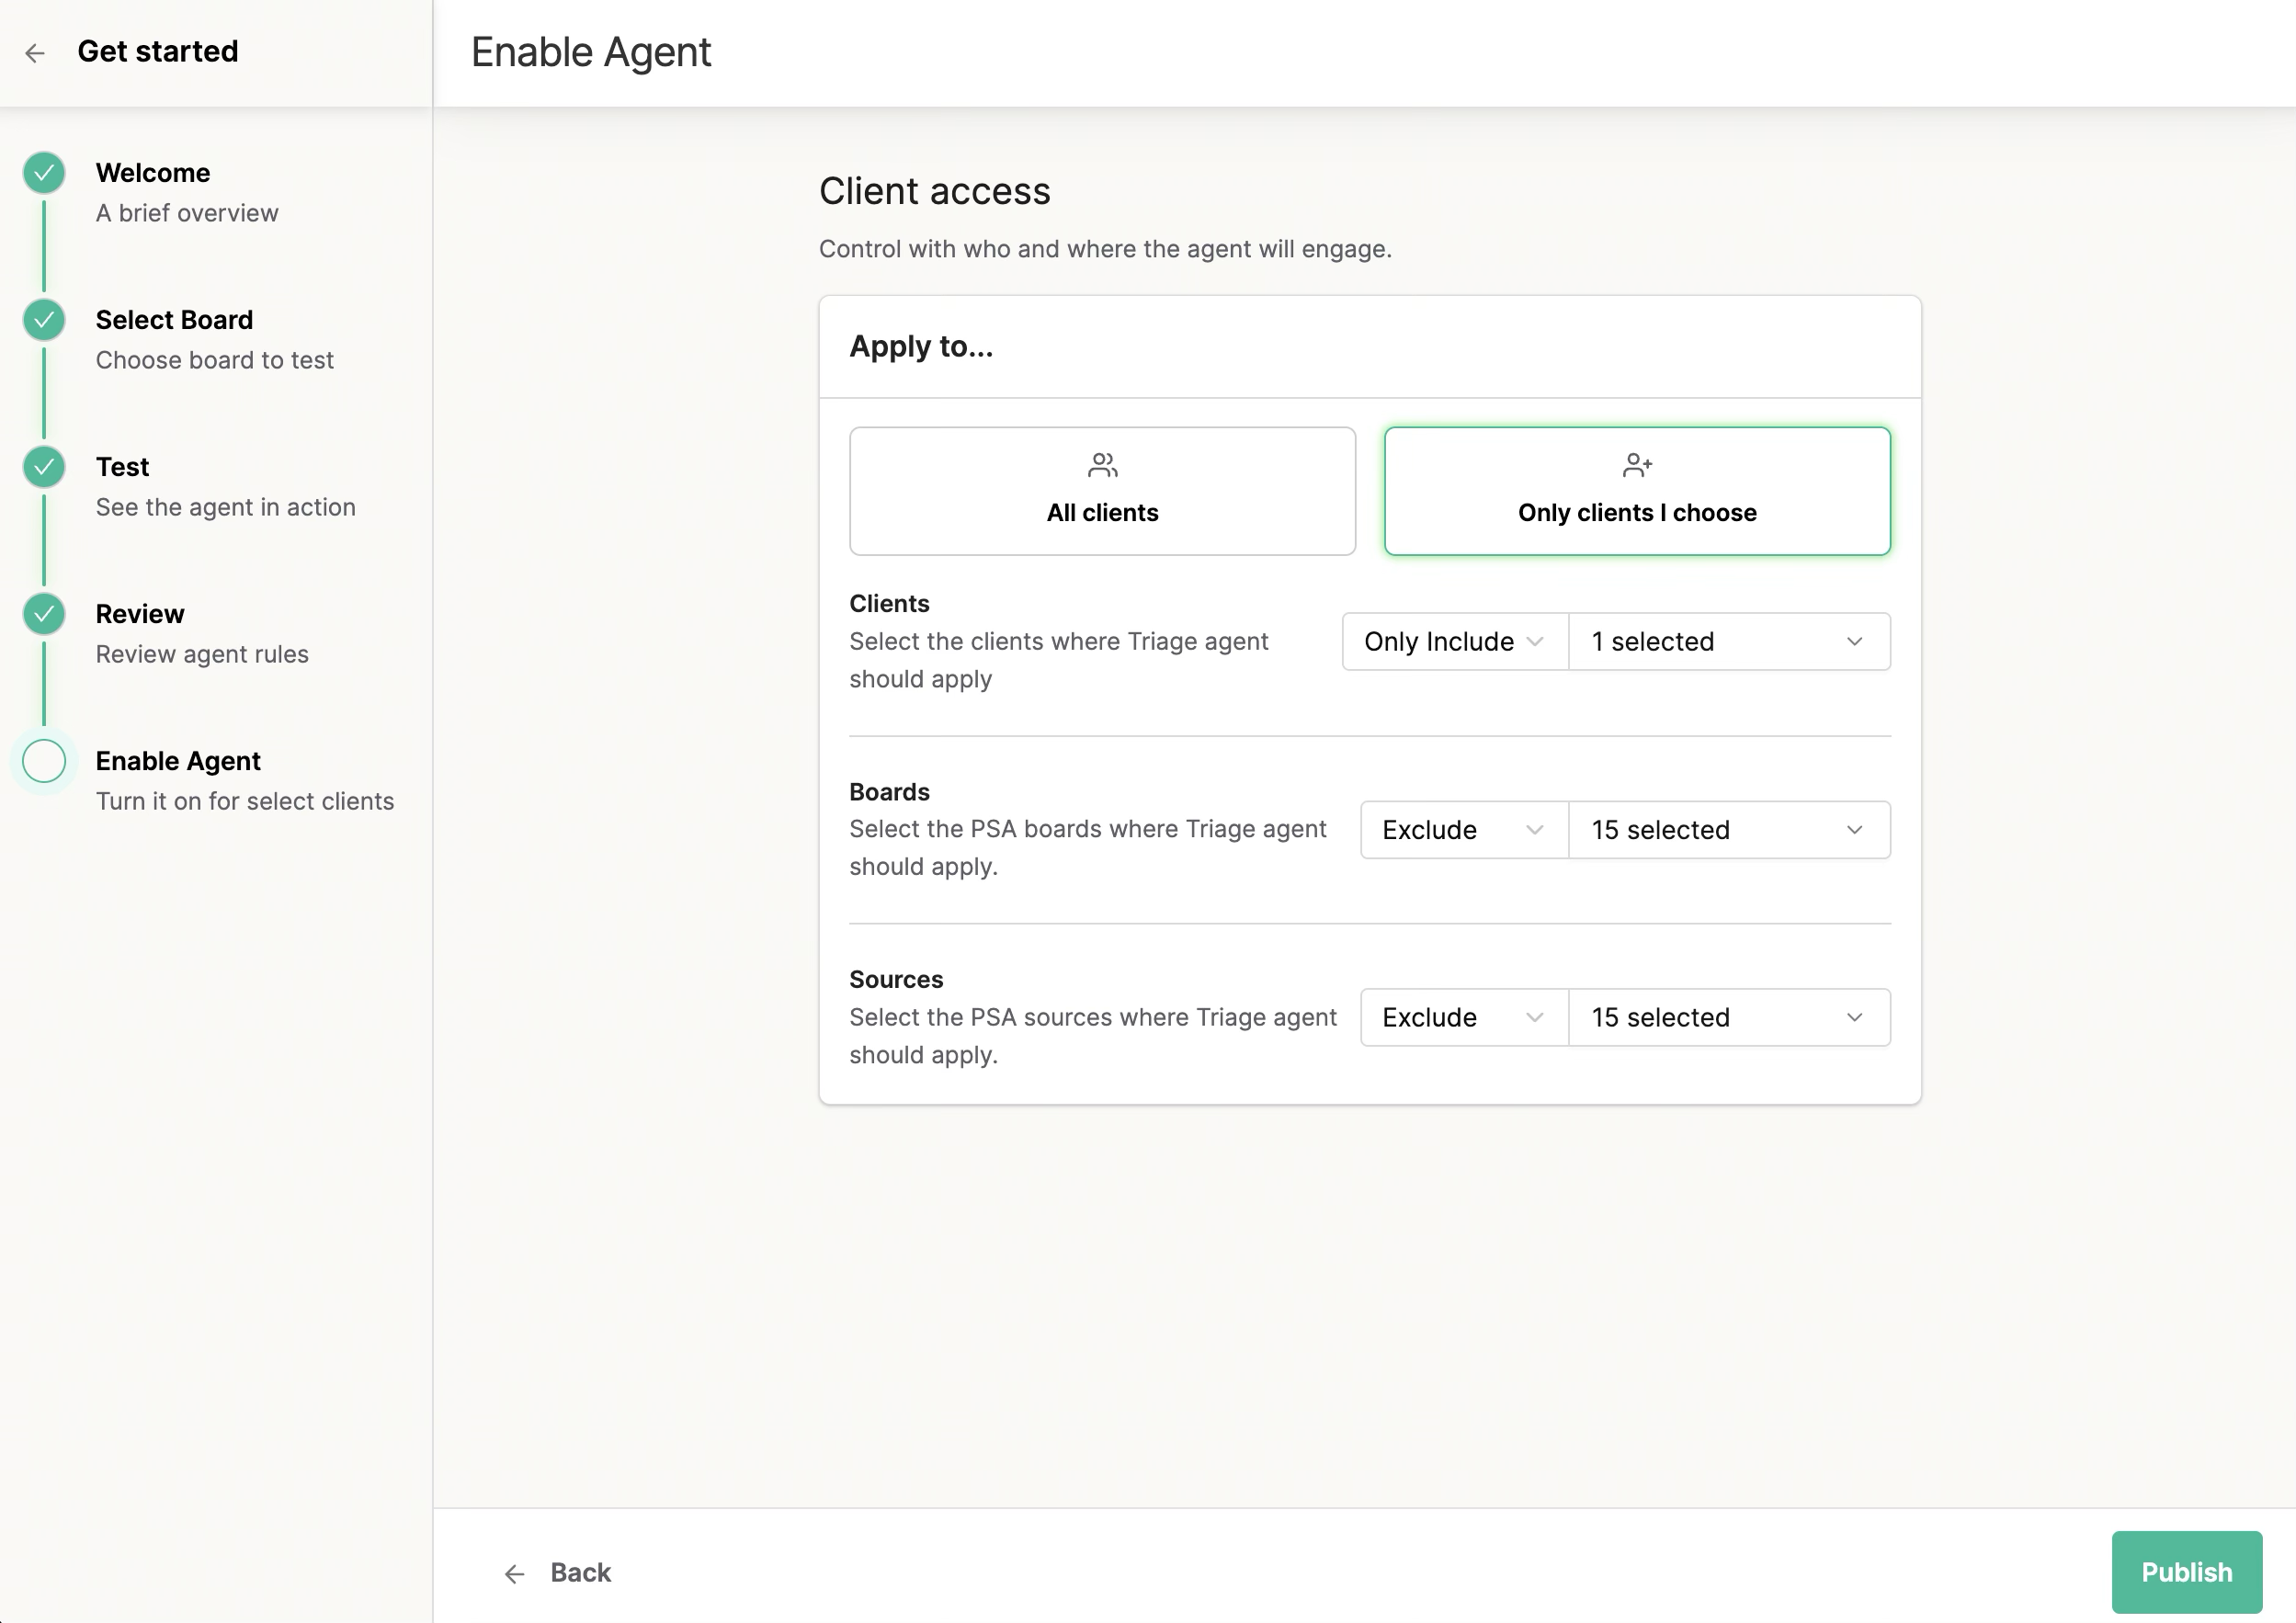
5. Set client access
Choose which clients, sources, and boards the Triage Agent works on once it is live. It only acts on threads that match, so you decide exactly where it shows up.
Recommended: start with your internal teams first. Seeing it prove itself on your own people is the lowest-risk way to build confidence before you expand to client-facing threads. You can widen access any time.
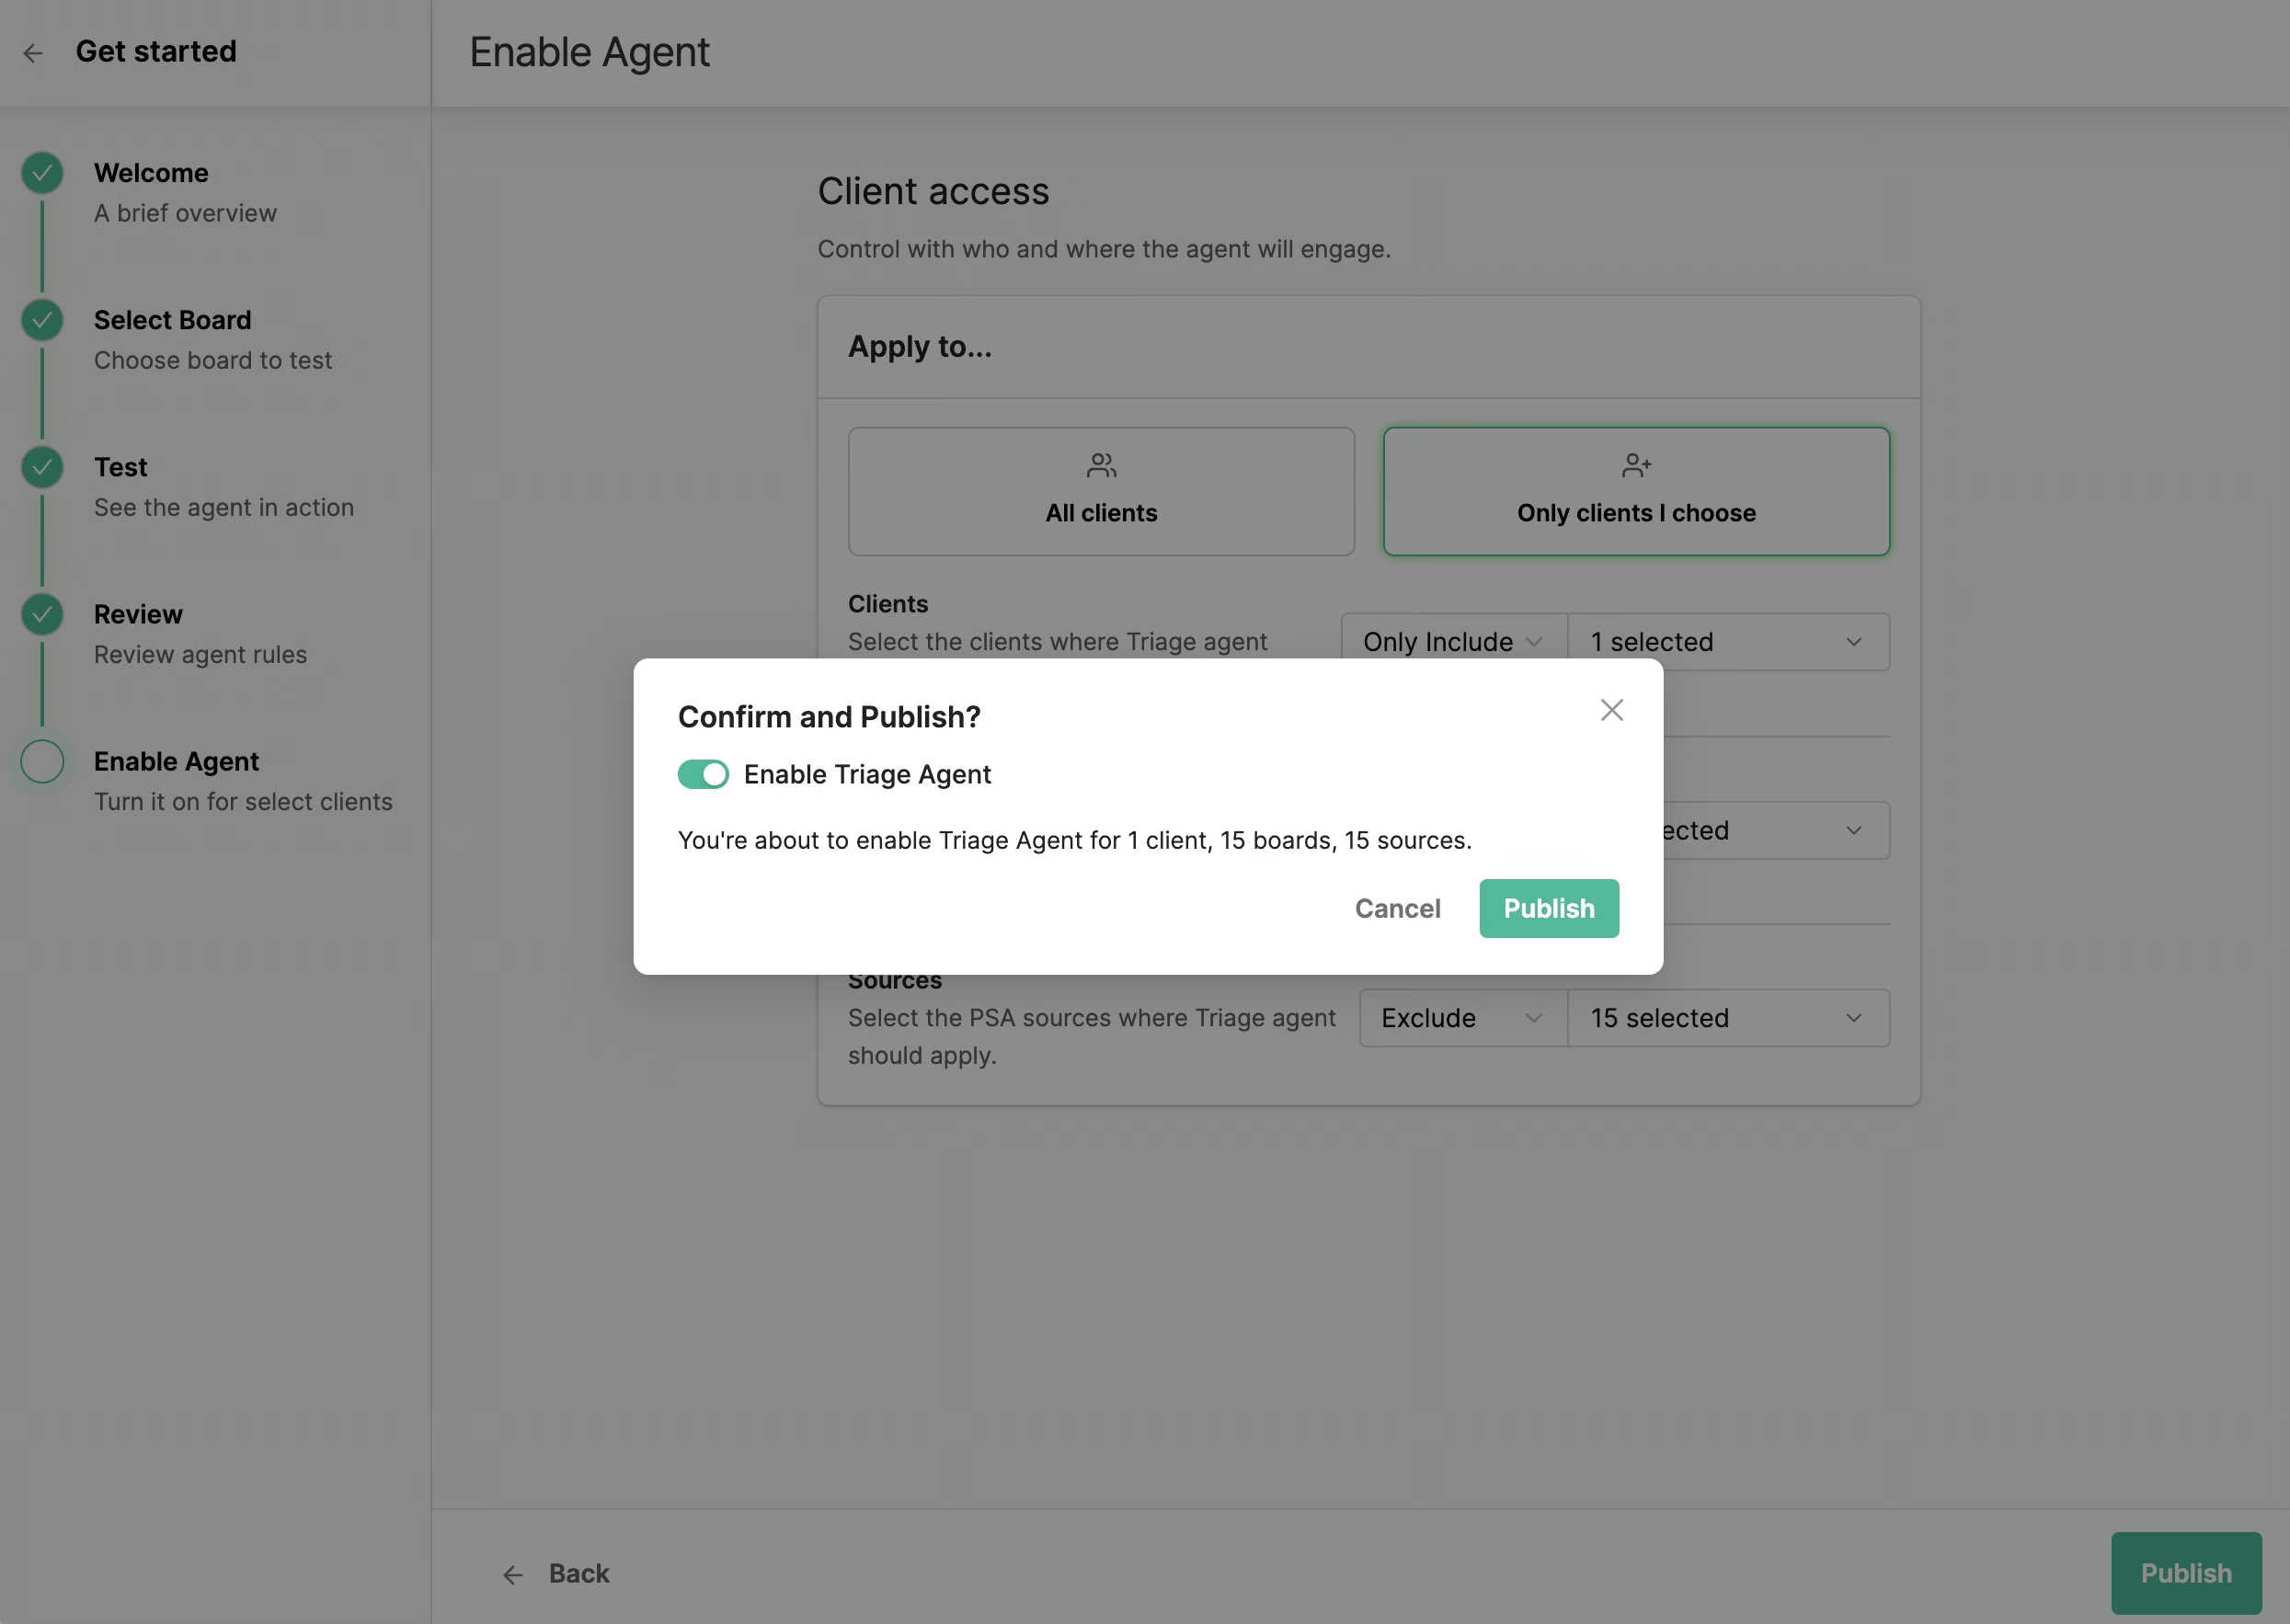
6. Turn on your agent
On the final step, a confirmation popup includes a Triage Agent toggle.
Recommended: leave this toggle on. With it on, the agent starts triaging the threads you just scoped, which is the fastest way to see the value in your own queue. If you leave it off, your setup is saved but the agent stays idle until you turn it on later.
After you publish
- The agent starts triaging new threads within the access you set, so your team feels the difference on the next ticket.
- The Custom Rules created during setup appear in your Custom Rules list, where you can refine, add, or remove them as you learn what works.
- Name and avatar live in Messenger settings; client access lives in Triage Agent settings. Both editable any time.
FAQ
Why does the board I pick matter?
The agent builds your sample conversations from real, recent requests on that board. A board with clear, representative threads gives you the most useful setup.
Will it touch threads outside my scope?
No. The agent only acts within the clients, sources, and boards you set in step 4.
Why start with internal teams?
It lets you see the agent prove itself with low risk before client-facing threads.
What if I leave the Triage Agent toggle off?
Your setup is saved, but the agent will not process threads until you turn it on.
Can I change the name or avatar later?
Yes, in Messenger settings → Design in Admin. What you see during setup comes from there, and changing it during setup overwrites the Messenger values on publish.
Are the sample conversations real client tickets?
They are simulations built from real past requests on the board you choose. Nothing is sent to clients during setup.